Not Paint Or Stain: Updated Honey Oak Cabinets With A Clever DIY
We may receive a commission on purchases made from links.
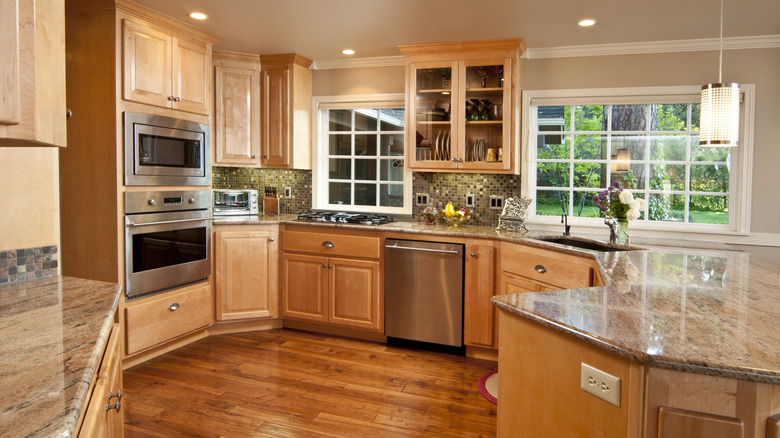
Did you just hear your kitchen sigh as you put groceries away, or was that just you? Frankly, the space is looking a bit boring, tired, and out of style. Honey oak cabinets looked so warm and inviting a few decades ago, but it's time to give your cabinets 21st century upgrade. There's a clever solution for updating outdated kitchen cabinets without painting, staining, or covering them contact paper. If you're not afraid to pick up a jigsaw and make permanent changes to your cabinet faces, consider outfitting them with cane panels. You can pull this task off with about as much work and cost — or even less — than giving your cabinets a few coats of paint. In fact, there's also an easier option that's renter-friendly.
The permanent route involves cutting out the centers of paneled doors and stapling sheets of cane in their place. If this thought is too intimidating, you can cut, peel, and stick a product like the WESTICK Self-Adhesive Cane Wallpaper to squeaky-clean cabinet faces. The look won't be as polished or durable, so if you're up for a long-lasting upgrade with real impact, purchase a roll of cane and set aside a drill with a screwdriver bit, a jigsaw, a utility knife, a staple gun, a sander, clamps, and stain that matches your cabinets. You'll need to soak the cane before applying it, so it's best if you have a bathtub that can fit the entire roll at once. If this isn't possible, a tall, clean trashcan or large plastic storage tub are good soaking alternatives.
Adding cane panels to outdated cabinet doors
All of the cabinet doors will have to come off for this cane makeover, but it'll be easier to give them a preliminary scrub down while they're still hanging. Grab some Dawn dish soap and a handful of rags; this everyday cleaning essential is great for degreasing yucky cabinets. Remove the screws from the hinges on the cabinet doors, but leave the hinges attached to the cabinet boxes to simplify rehanging.
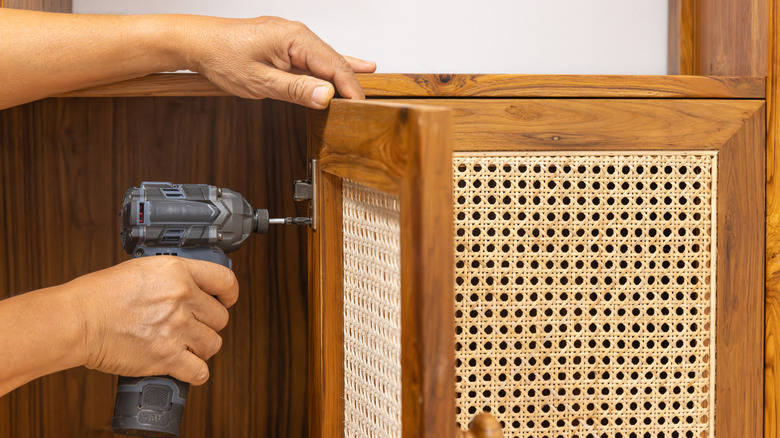
Clamp your first cabinet door to the work surface so that the spot you'll be cutting overhangs the counter's edge. Cut away the center panel one side at a time, re-situating and clamping the door after cutting each side. While the door is still clamped, sand away any roughness on the cut edges. Repeat this for all of the doors, and touch up the raw areas with stain.
Thirty minutes before you're ready to attach the cane, place it in warm water to soak. Once it's pliable, cut a section of cane that's about the side of the door face, set it over the back side of the door's panel area, and staple it in place. Start by stapling the cane at each corner to assure that the woven pattern lines up horizontally and vertically inside the opening, and follow up with the sides. Cut away the overhanging cane material, and let the cane dry and tighten for a tidy look. Once you rehang your cabinet doors, take in how they've refreshed your kitchen without a total overhaul.