Transform An Old Pot Into A Luxurious Planter With A Cheap IKEA Hack
We may receive a commission on purchases made from links.
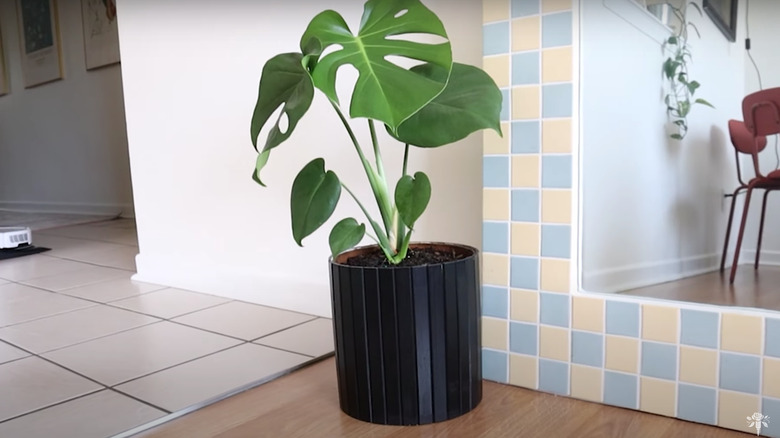
When shopping for planters for all your decorative greenery, you're bound to find some beautiful options. However, once you look at the price tag, you may end up feeling discouraged, especially if you're going for a luxurious look. For instance, a black, luxe pot with vertical lines from the Veradek Mason Series costs about $60 at Walmart. Depending on how much greenery you have, the price of all your planters could quickly add up. Luckily, there's an easy way to DIY an expensive-looking planter using inexpensive materials, including the Rödeby armrest tray from IKEA that costs about $20.
To complete this DIY, you'll simply wrap the armrest tray around an old or cheap planter to give it new life. This will most likely cost less than purchasing a new container since you'll only need a few basic tools and just a couple of cheap materials. Further, it's so easy to complete that you don't need any prior DIY experience. Another huge benefit is that you can easily customize this piece's size and appearance according to your wants and needs.
How to create this IKEA planter
When searching for the right planter to transform, your local thrift store could be a great place to shop. It's best to find a container that fits the IKEA armrest tray perfectly around it, though it could be slightly larger or smaller. When you wrap the armrest tray around the planter, if it's too tall, cut off the excess material. To do this, measure the planter's height, then draw a line down the length of the armrest tray that indicates where you need to cut. Also, attach a straight-edge ruler with clamps down the line to make sure you cut straight. Score the line with a utility knife, cut it with a hand saw, and smooth the edges with sandpaper.
The next step is to attach the armrest tray with E-6000 glue, which you can get on Amazon for under $5. Because this adhesive is extra strong, you may want to wear gloves. Place this glue around the top rim of the planter, then stick on the armrest tray and tightly wrap a piece of rope around it while it's drying. If there are any gaps, you can fill them in with a scrap piece of wood or a paint stirrer. Just saw it down to size, use sandpaper on the rough edges, spray paint it black, and attach it with more glue. Finally, paint the edges of the planter black to give the piece a finished look.
Ways to personalize this planter
The great thing about this DIY is that it's so easy to personalize to your tastes. For instance, if you don't want your planter to be black, you could use the bamboo-colored Rödeby IKEA armrest tray instead or spray paint the piece whatever color you desire. Another way to make this planter unique is by changing the sizing. Those who want an extra large size could cover an oversized container with two IKEA armrest trays instead of just one. If your plant is extra tall, you could skip the step of cutting down the armrest tray with a saw, even if the planter is quite a bit shorter.
Those who don't already have a planter on hand but also don't want to spend any money could transform something else. To do this, simply add a drainage hole to the bottom of a container with a drill. The best containers are bowls or bins that are made out of durable-enough materials like plastic, as they'll need to withstand regular watering and pressure from growing roots.