The Best Drainage Materials To Relieve Your Plants Of Excess Moisture
When we think about the fact that the only elements plants really need to survive are water, air, and sunlight, it's easy to convince ourselves that keeping them in our homes should be easy. Yet, how many times have we mistakenly watered our plants to death? It actually might not be the amount of water we're giving them so much as it is the lack of water flowing out of the pot. Because when water collects at the bottom of a planter, we're accidentally inviting the dreaded root rot to come ruin the party.
To ensure ongoing and sufficient drainage of excess moisture, we need to amend the potting soil to improve aeration and create pathways for the water to continually flow through and out. But we can't shove just anything into our pots. For instance, you won't want to use materials that will deteriorate quickly, like cardboard, newspaper, or grass clippings. Packing peanuts and styrofoam are also less than stellar options. More than anything, you don't want to create a stagnant, clumpy mess. Here are some options that will get the job done.
Broken terracotta pots
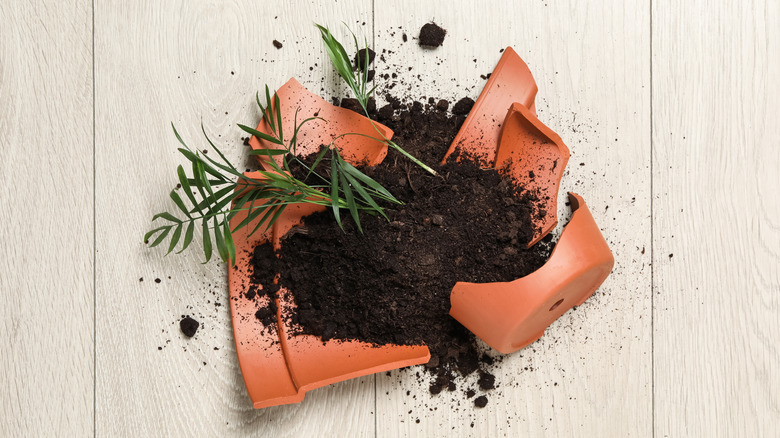
Broken pieces of clay are part of the game when gardening with terracotta pots because they can crack after years of use or, if they're not of the highest quality, they may shatter due to extreme temperature fluctuations. All is not lost when you have a broken terracotta pot because it can be put to use in other ways, such as stacking a few of the broken pieces at the bottom of a new pot to create a drainage layer for your next plant. Don't overdo it with broken pieces; just a few small ones will be enough to create space for water to exit the pot.
Something to remember with the reddish earthen clay is that it is a naturally porous material that absorbs water. When you have improved drainage combined with extra absorbency, you'll need to keep a close eye on the hydration of your plant. You might have to water it a little more often than you have been.
Bubble wrap
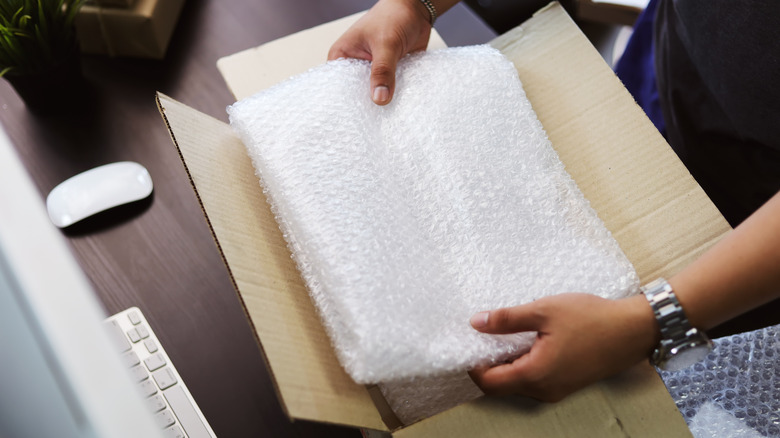
Bubble wrap gives you a quick and easy answer for adding space to the bottom of your planters for aeration and drainage. While it's not naturally porous like terracotta, bubble wrap still works because it separates plant roots from stagnant water. Much like how you add rocks to the bottom of some planters, adding rolled-up bubble wrap will separate the sitting water from the plant, lowering your risk of root rot. A couple of layers swiped from your latest online delivery order will stay in place in the pot and won't break down. It actually takes anywhere from a decade to 1,000 years to decompose, so it's best to keep it out of the landfill anyway. Even Martha Stewart uses bubble wrap to cut down on the amount of soil she needs when using extra large planters.
Fold a sheet of bubble wrap or roll it up so excess water won't pool on top, and pull it away from the edges of the pot so that water has a clear exit pathway. Then add your soil and plants. Come wintertime, bubble wrap can also be used to insulate outdoor plants against extremely cold weather and frost.
Coffee filters
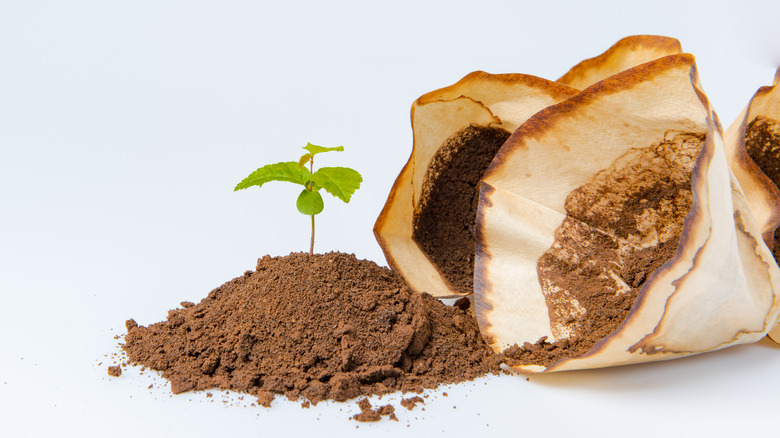
Think of how coffee filters work in your coffee pot: They allow the liquid (coffee) to flow through while holding back the grounds. They can do the same for houseplants by letting the excess water rush out, but keeping the potting soil in the pot. One benefit of that is that the dirt won't get clogged in the drainage hole, which can lead to increased root rot risks. Keeping things neat and tidy will translate to better drainage all around. In addition, the filters will retain a little bit of moisture that will be appreciated by the plants.
To try this at home, simply line the bottom of a planter with a coffee filter before adding soil. Since they are made of paper and will decompose, coffee filters can be used outside in the garden or added to the compost heap as well. If you plan to use them for all your plant needs, you might consider switching to the unbleached kind.
Cut up pool noodles
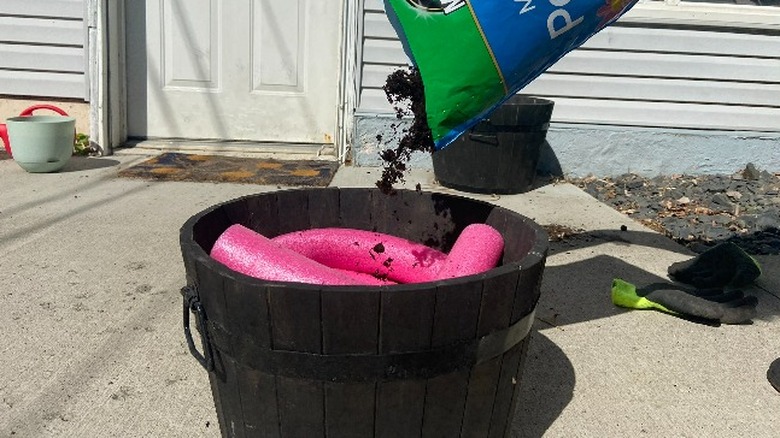
If you've got a pool, you've probably got some pool noodles, which means you've got what you need for a cheap and easy way to add drainage to your potted plants. You already know they'll survive without breaking down in water, so they'll also be good to go in a planter. It works the same way as bubble wrap, in that it helps separate pooling water from plant roots, and helps add aeration. Cut the pool noodles into 2-inch chunks with an Xacto knife or gardening shears and arrange them at the bottom of your pots before filling them with growing medium and plants.
Pool noodles are a hit on TikTok for a variety of uses. Here at House Digest, we tried the viral hack for saving potting soil and were quite pleased with the result. By simply using even more cut-up pieces of pool noodles in your pots, you'll save significantly on the amount of soil you have to use to fill larger planters. This will make the pots lighter and easier to move around, and even better yet, it'll leave your wallet feeling a little heavier than it would if you paid twice as much money on expensive potting soil.
Expanded clay pebbles
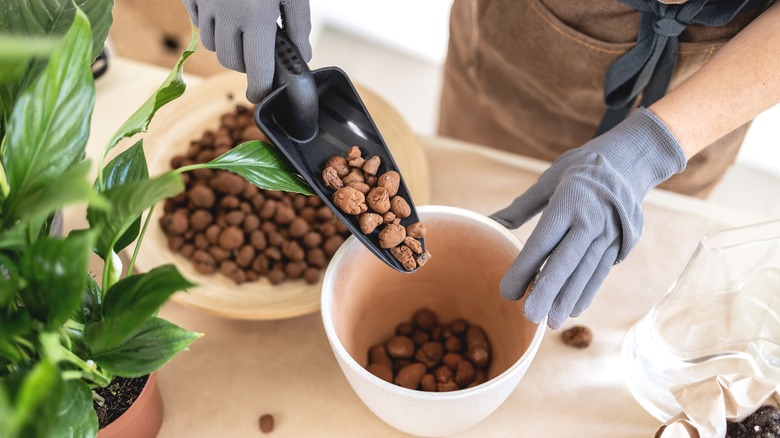
Expanded clay pebbles are often used as a growing medium in hydroponic gardening. They can be used for houseplants too, and can sometimes replace soil altogether. That might get expensive when it comes to the initial investment (especially if you have a large pot), so you can also just place a few at the bottom of the container or mix them into the potting soil to improve drainage. They're lightweight and porous, so they'll make your heavy pots easier to move around, and they'll do double duty when it comes to retaining water while increasing aeration. Expanded clay pebbles are a natural option made from pieces of clay that get heated in a kiln at 2,000 degrees Fahrenheit.
It's easy to track down expanded clay pebbles online or at a garden center (where they may be called leca), but you're not likely to have them just lying around unless you have hydroponic gardens. So there's some investment needed with these, but it's well worth it considering how well they work. And a bonus with clay pebbles is that they are reusable.
Horticultural sand
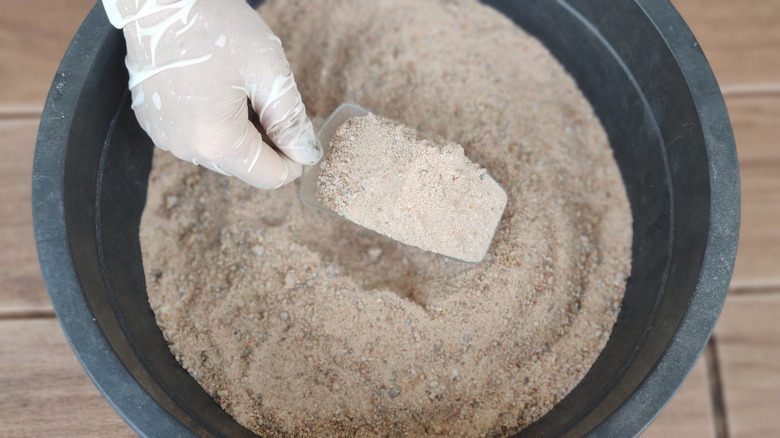
Before you run out to the sandbox with your pots and shovels, it's important to understand that there are different types of sand, and you've got to start with the right one. Horticultural sand is grainy and coarse, meaning it comes in large-sized particles so it won't get compacted or turn into muddy sludge at the bottom of your pot. At the garden center, you might find this type of sand labeled as coarse sand, sharp sand, or quartz sand. To use it for drainage, you can either add a thin layer to the bottom of your pot, or mix it in as an additive with your dirt.
Horticultural sand comes in different grades. Medium and coarse-grade particles will be between ¼ to 2 millimeters in size. If you use anything smaller than that, you'll inadvertently create a bigger problem with potting soil that morphs into thick clay. If you want to use this option for several planters, you can also consider builder's sand, which can be purchased in bulk and is generally less expensive.
Kitchen colander
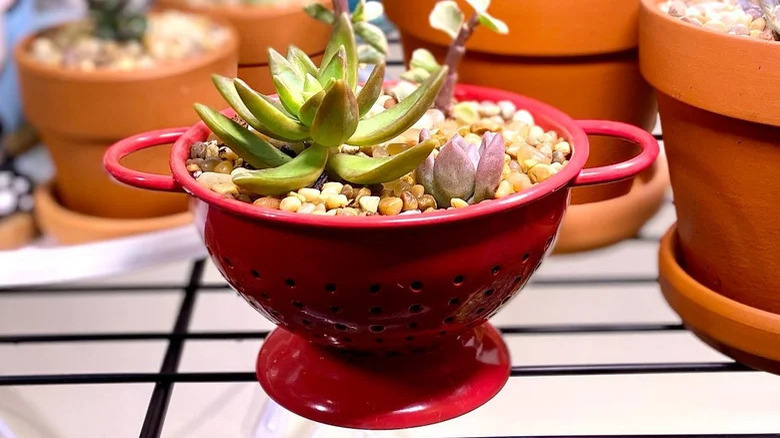
Can you really plant flowers in a kitchen colander? Yes, you absolutely can. And it's not only a fantastic solution for sufficient drainage; it's artsy and fun to do, and the results are adorable. Start with a standard stainless steel colander and a can of spray paint. You can choose a paint color based on seasons or a hue that will match your patio décor, or you can go for something that will complement your favorite flowers. If you're using an old colander, give it a good cleaning with vinegar or a degreaser to remove any built-up oil residue. Regardless of whether the colander is new or used, the next steps are to scuff off some of the sheen with sandpaper and coat the colander with a primer, both of which will help the paint adhere.
After the paint has completely dried, lay down coffee filters or burlap inside the colander, cover it with soil, and plant your flowers. The last thing you'll need is a basket hanging kit or, if you buy the pieces separately, chains, hooks, and eye screws.
Perlite
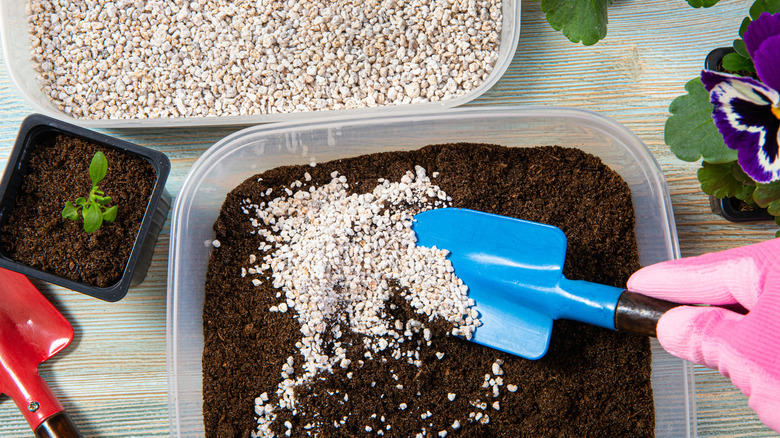
Perlite is a naturally occurring substance best known as the white stuff you see mixed into potting soil. It is derived from volcanic glass that gets heated until it pops and resembles tiny pieces of styrofoam. It is an extremely porous and pH-neutral substance. Just like expanded clay pebbles, perlite excels at simultaneously retaining moisture and aerating the soil to improve drainage. It's often available at nurseries, and, if not, then look for it online.
You can use perlite as a base layer or mix it into the potting soil. Adding it to potting mix is especially helpful for succulents and any other plants that cannot survive having soggy roots, which is most of them. When creating your own potting soil, as much as 10 to 20% of the total can be perlite. Another very similar soil amendment is vermiculite, which we will go into more detail about below. If you find yourself needing to choose between the two, know that perlite is slightly better at aeration, and vermiculite takes the crown for superior water retention.
Pine cones
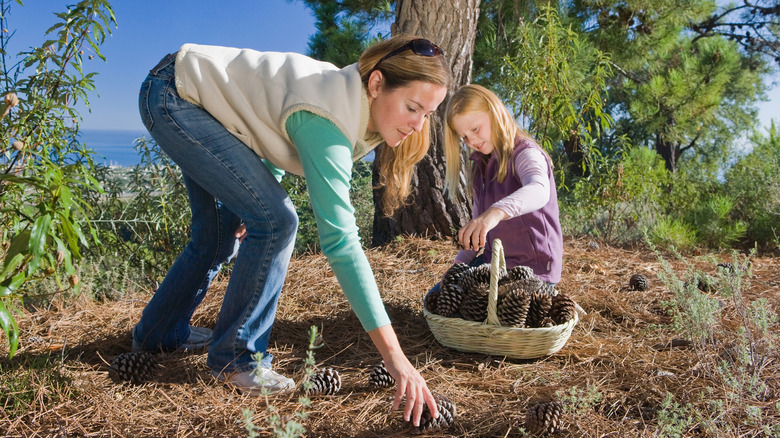
What can you do with the hundreds of pine cones littering the yard? Collect them for your houseplants is what. Free and plentiful, pine cones are a great option for aerating soil and improving drainage in potted plants. The benefits of pine cones are that they're all-natural and, even though they're organic and will eventually break down, that process will take a while. Pine cones are sturdy enough that they won't just turn to mush like newspaper or cardboard would. Almost like a miniature no-mess version of a compost bin, some plants' root systems will even consume the pine cones for energy.
If you don't have evergreens in your backyard, you likely won't need to go too far to find them in a park. A few inches of pine cones at the bottom of the pot will give excess water a place to flow away from the roots. Or, if you have particularly small pine cones, you could stir them into the soil as an amendment before adding your plants.
Plastic bottles

Just like bubble wrap, plastic bottles work at the bottom of a planter as a buffer layer. Only use bottles that have been thoroughly cleaned and have never held noxious chemicals. Think water bottles, not cleaning supplies. Milk jugs and soda bottles will work too, once they've been washed. Also, keep the caps secured tightly to keep them from filling up with potting soil or the water they're supposed to be helping alleviate. Capping them will also keep them from collapsing.
A side benefit of filling up a good amount of space in your planter with empty plastic bottles, is that it will be lighter and easier to move around. Of course, this is beneficial for seasonal plants that need to move inside once it gets cold or just for when you're in the mood to reorganize and redecorate your patio. The bottles will still be recyclable even after sitting under plants for a while. If you find you're done with them, give them a quick rinse with the garden hose and toss them in your recycling bin.
Vermiculite
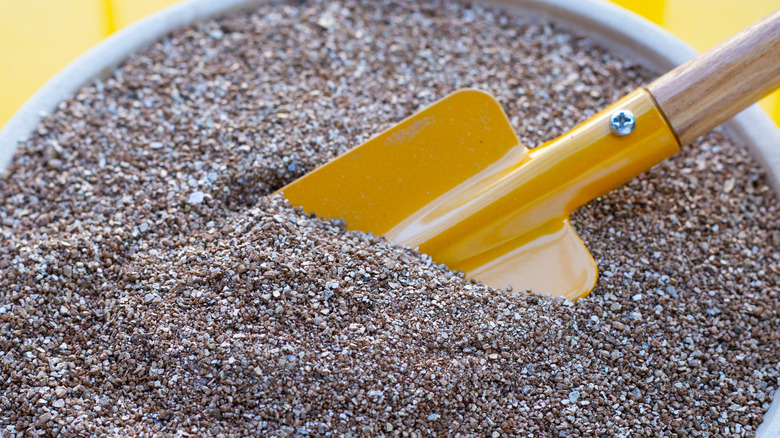
As mentioned above, vermiculite is very similar to, and sometimes mistaken for, perlite. It is also pH neutral and gets heated so that it expands and can better retain moisture, but instead of looking like white styrofoam, vermiculite has a gray color and flaky texture. Vermiculite is sterile and porous, and when it comes to its strengths, it wins out for water retention. That's partly due to the curled and worm-like shape of each small particle that allows it to hold water in its tiny crevices. That excess moisture won't damage the roots of your plants, but it will be available for them when they need it.
Vermiculite is another naturally occurring option that gets mined from the earth, so it's perfect for organic growers. A bag of just vermiculite should be easy to find at garden centers or on Amazon. Use it to create a drainage layer at the bottom of your pots, or mix it into the soil as an amendment.