5 Easy Ways To Take Your Planters From Boring To Beautiful
One of the easiest ways to make your house feel more like a home is by decorating with plants. Anywhere they are used, greenery will add a soothing yet vibrant color and inviting energy. My Flower Tree says that more and more people are adding plants to their homes because they are aesthetically attractive and can fit into a number of styles. Not only that, but they freshen the air by removing toxins and releasing oxygen, and they're typically pretty inexpensive. They are also known to reduce tension and provide a more zen atmosphere.
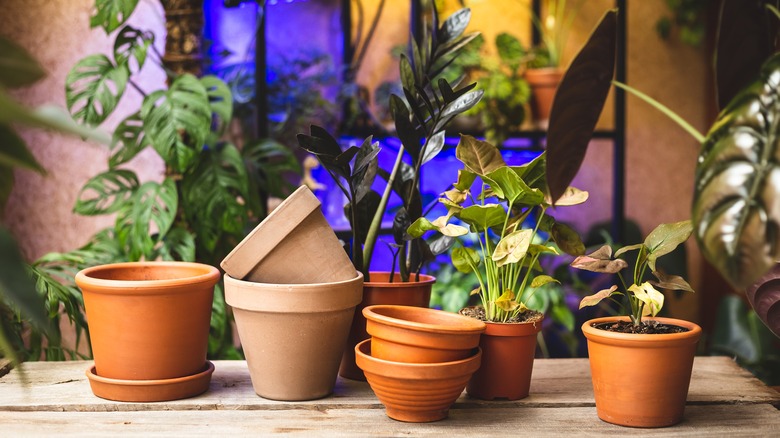
However, plants usually get all the attention, while planters become an afterthought. People use plastic containers or terracotta pots to hold their precious green babies. While these options have a classic appeal, you may want to jazz up your planter's appearance. If so, we've gathered creative and easy ways to make your boring planters much more beautiful.
1. Create a vintage or distressed look
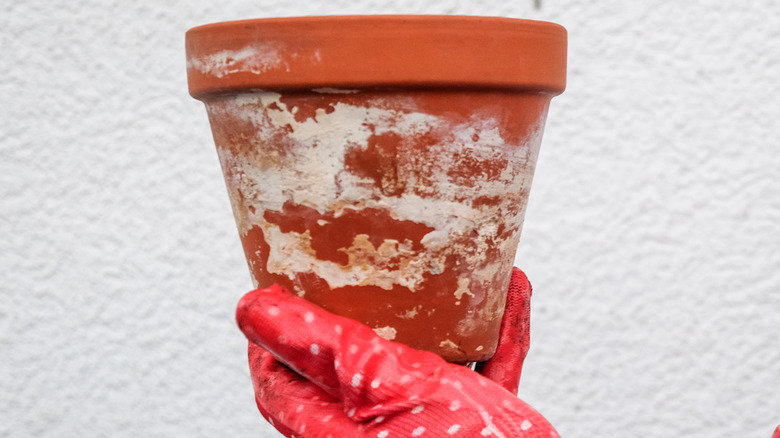
Vintage planters can look amazing in rustic and industrial-style homes. However, it can take quite a while for terracotta pots to patina naturally. If you want a distressed look, you could create one using sandpaper and paint. Ideas for the Home by Kenarry describes how to complete this project in just a few simple steps. You'll begin by sanding random areas of your pot with sandpaper. Then, you'll apply a very light coat of gray chalk paint with a foam brush and do the same with white outdoor paint. When doing this, don't cover the whole surface of the planter, and make sure you use a light hand. Next, use a wet paper towel to blend in the paint and make it look extra distressed. If desired, you could repeat these steps until you get the exact look you're going for.
If you want your pot to have more texture, you could begin by applying garden lime mixed with water, then sanding the surface, per My Vintage Porch. Next, after spraying the surface with a matte sealer, you can dab on white and black paint with a rag. However, be aware that these materials may harm an actual plant, so this process is best used on planters that hold faux greenery.
2. Add whimsical elements
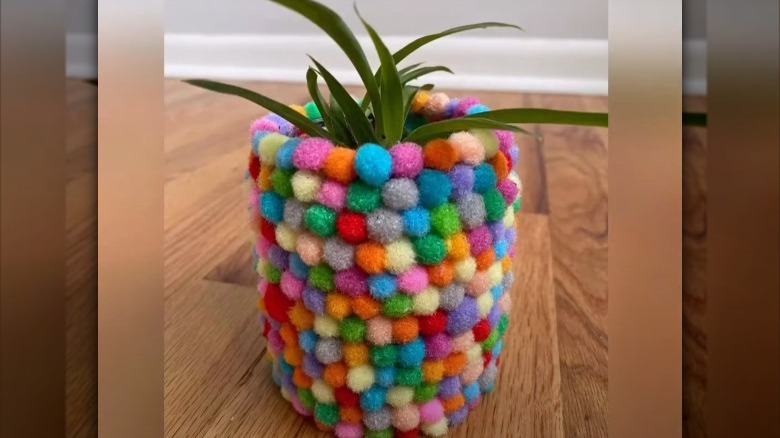
You may prefer a more colorful and fun design if you're not into the rustic look. If so, you could add some whimsical and bohemian elements to your planters, like pom poms or fringe. The Crafted Life describes how to add pom poms to your planter, and it's straightforward. You'll glue them onto the outside of the pot in whatever pattern or style you prefer. You could cover the whole surface or leave some extra space when doing this. Additionally, when potting the plant, make sure you don't drop soil on the pom poms, as it may be difficult to remove.
Or, you could create a fringed exterior, per Ohoh Deco. To do this, you'll first cut out a piece of cardboard that fits around your planter. Next, vertically wrap the rectangular piece of cardboard entirely in yarn. Using a hot glue gun, you'll attach a piece of ribbon lengthwise to the top of the yarn and leave some ribbon on either side. Then, you'll cut the yarn on the other side where the ribbon's not attached, to create the fringe. You can repeat these steps with different yarn colors as well. To attach them to the planter, tie the ribbon around it and secure it with a dab of hot glue.
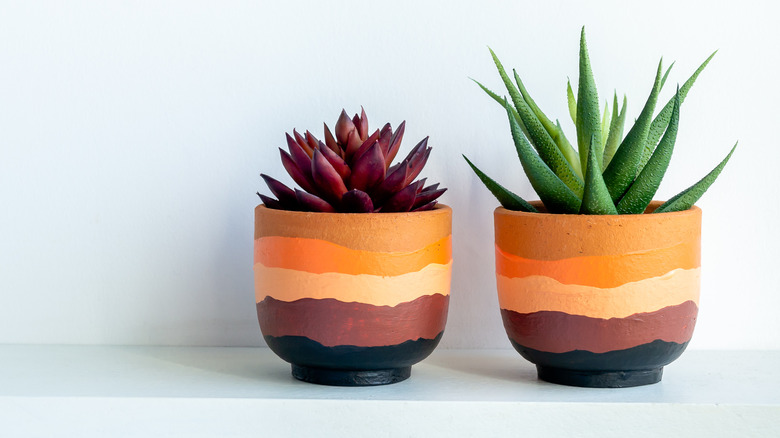
3. Paint your planters
An easy way to make your planters more beautiful is by painting them. You could use spray paint or add a unique pattern with regular paint and brushes. If you want to change the color of your planters, you could spray paint them. Decor Hint shows how to do this on large plastic outdoor planters. After cleaning the planters well, sand them with sandpaper, hose them down and let them dry. Next, spray paint them in light layers, allowing the coatings to dry before continuing. Do this outdoors in mild weather with safety goggles and gloves, and place the planters upside down in a cardboard box to contain the paint. Once covered completely, allow the planters to dry for 48 hours before using them.
If you want to add a fun decorative design to terracotta pots, it's possible. First Day of Home suggests beginning by sealing the pots, so they don't lose their moisture and letting them dry for a day. Then, you can apply a layer of chalk paint with a foam brush. You could use small brushes, painter's tape, or stencils to create the designs. Once you're done, seal the design with an outdoor sealer.
4. Suspend them in a hanger
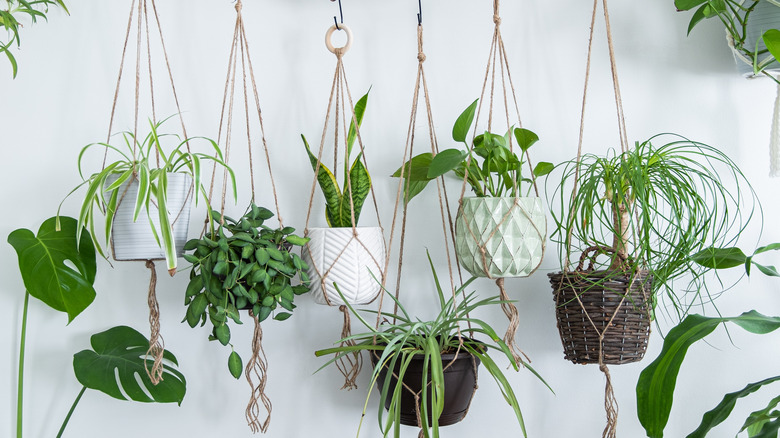
You could also change the look of your planters by housing them on a hanger, which you could purchase or create yourself. A hanging plant could be suspended from the ceiling, the wall, or a curtain rod. Buschs says that hanging your plants will make your space more charming and cozy. Also, hanging them could free up more surface areas on your tables or window sills. Clever Bloom has a great tutorial that uses a barrel sling knot if you want to make a hanger out of a piece of cord or yarn. However, remember that removing the pot would ruin the hanger, so you may want to add a watering saucer.
To begin, lay out your long piece of cord in a U-shape on the floor, then cross over the "U" so that one side has a small loop. Next, place your planter on top of where the cord crosses. Take the two long pieces of cord on the opposite end and bring them over either side of your plant. Then feed them through the loop and cross the two pieces back over the plant. Once you've tied the open ends together (as close to the end of the cord as possible), you can raise the cords above the plant to create the hanger.
5. Give them a mosaic design
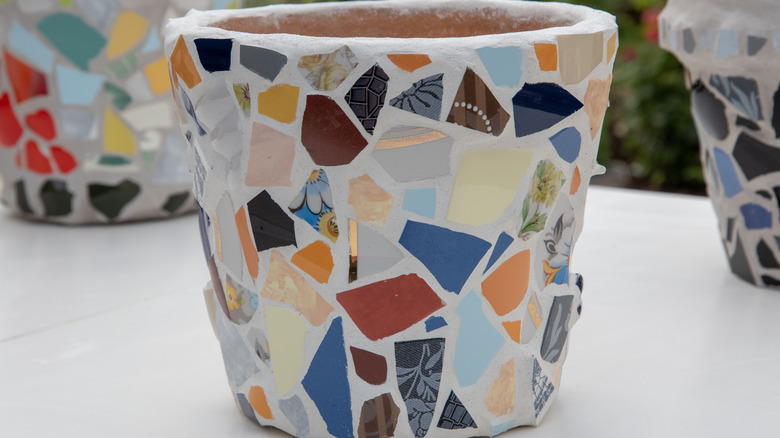
Finally, you could spice up your planter by adding a mosaic finish with broken glass, tile, or stone pieces. Grounded and Growing says this could be an excellent project for those who want to complete something over multiple days, as it involves lots of drying time. They suggest using ½ inch tiles since large ones may be hard to attach to a planter's curved surface. For a 6-inch pot, they recommend using 200 pieces of ½ inch tiles.
First Day of Home says this project can be a great way to reuse broken dishes or china plates. To begin, you'll need to apply a sealer and wait 24 hours. You may also need to cut your tiles with tile nippers while wearing safety goggles and gloves. Once the sealer is set, you can apply tile adhesive and attach the tile pieces however desired, then let it cure for five to six hours. Then, apply the grout and remove any excess in 15 to 20 minutes with a damp cloth. Once the grout has been set (the grout container will tell you how long to wait), you can wipe your pot with another damp cloth and use a grout sealer.