How To Use Picture Molding To Hang Photos And Art Without Putting Nails In The Wall
We may receive a commission on purchases made from links.
If your house or apartment has high molding on the walls, check to see if it's more than just decorative by feeling the top of each piece of wood. If it has a deeper notch in the back where a hook could hang, you're in luck, as this trim can serve a dual purpose: It can also hold artwork or photographs. Picture molding is a traditional element that was especially popular from the 1840s to the 1940s in America. It's commonly found in three places: at the very top of the wall, underneath crown molding, or level with the top of the window and door trim.
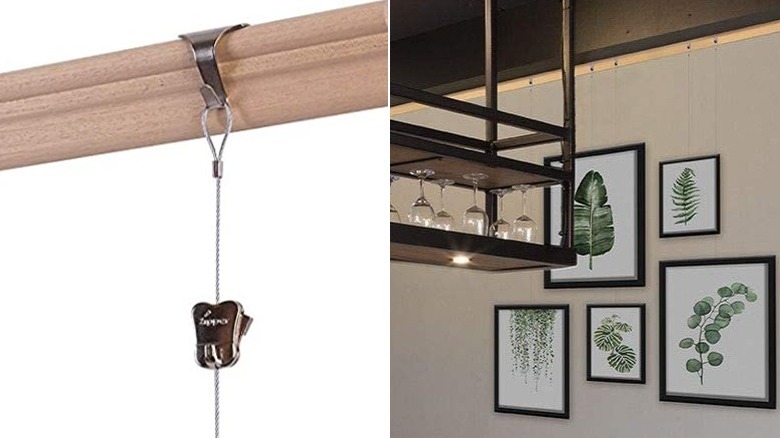
Using this feature will save your walls from nail holes while making it extra simple to hang art pieces. To suspend items, you'll need two supplies: mounting hooks, which are often silver or brass, and wire (or strong ribbon, as pictured above). Cut two even pieces of the wire, attach them to either side of your frame, tie the wire together, and hang it from the hook, which will perfectly fit into the molding's notch.
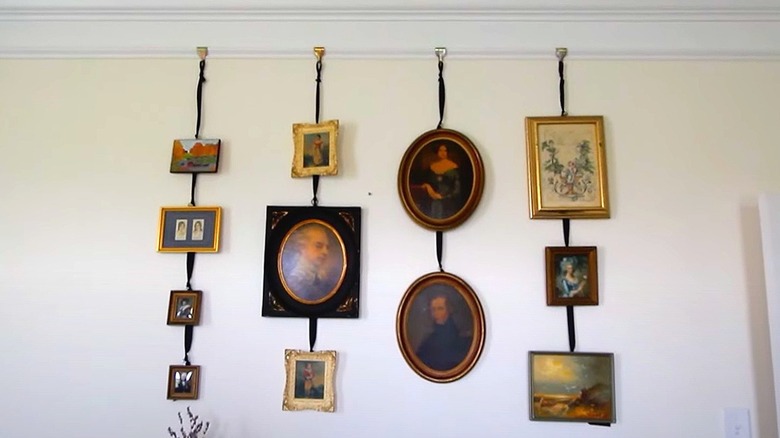
Different artwork arrangements to try
A huge benefit of using picture molding is that you can easily move your artwork across the wall by sliding the hook. This'll give you the freedom to play with various arrangements and spacing without creating numerous holes in your wall. Further, as long as the two wires that connect to each frame are the exact same length, your pieces will always hang perfectly straight.
To create a gallery wall with picture molding, follow in TikToker Logan Ivey's footsteps and attach multiple frames together in vertical rows, with the smallest pieces at the top and the larger ones closer to the bottom of the wall. You could also suspend multiple frames but give each one its own hook. For an orderly and pleasing appearance, display three matching frames, all at the same height. Or, simply hang one large piece of artwork, either from a central hook or from two side hooks.
How to install picture molding
If your home doesn't already have picture molding, you could add it to your walls, for a traditional, old-school feel. To do so, you'll need the pieces of trim molding, which you could buy from Amazon or your local hardware store. However, before you purchase, decide where you want the trim to be placed. Traditionally, many homeowners aligned their molding with the top of windows and doors or put it up near the ceiling. Also consider whether you want just one horizontal piece along each wall or the look of floor-to-ceiling wainscoting, which will require a lot more material.
Cut your molding to fit the wall and attach it with glue, screws, or nails. You'll probably want to use both glue and another material to make sure the trim is secure enough to hold the weight of multiple frames. If desired, you can then paint it, or you can leave it as is. Many either paint it the same color as the wall or the rest of the room's trim, but you can choose whatever color you desire.