How Often Should You Be Cleaning Your Lawn Sprinkler Heads?
Installing an in-ground irrigation system is a great way to keep your grass hydrated and healthy during the scorching summer months. But, just like any appliance, the system needs to be inspected regularly to ensure its many parts are working at their best capacity. With sprinklers spending so much time underground, it's easy for dirt, grass, sand, and other particles to clog the elements that release water into your yard. If allowed to accumulate for too long, these particles can hinder the performance of your individual sprinklers and your irrigation system as a whole. Lawn sprinkler heads should be cleaned at least once or twice a year to prevent clogging and allow water to disperse evenly and at full pressure while in use.
Some sprinkler repairs are unavoidable, but clogs are easily preventable with routine checkups and proper maintenance. Simply cleaning your sprinkler heads and filters by hand and flushing out your sprinkler's in-ground valve can be accomplished using simple hand tools. However, repairing a sprinkler head or repairing an entire sprinkler system, can cost a household anywhere from $50 to upwards of $400. Cleaning your sprinkler heads early on can prevent more dangerous and expensive issues from arising in the future.
How to clean sprinkler heads
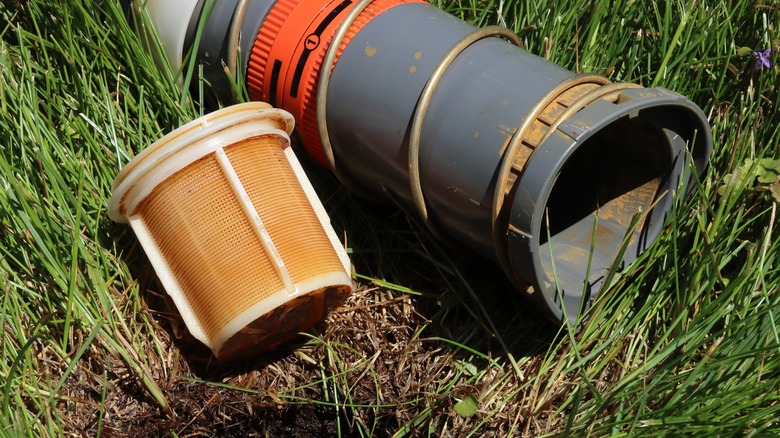
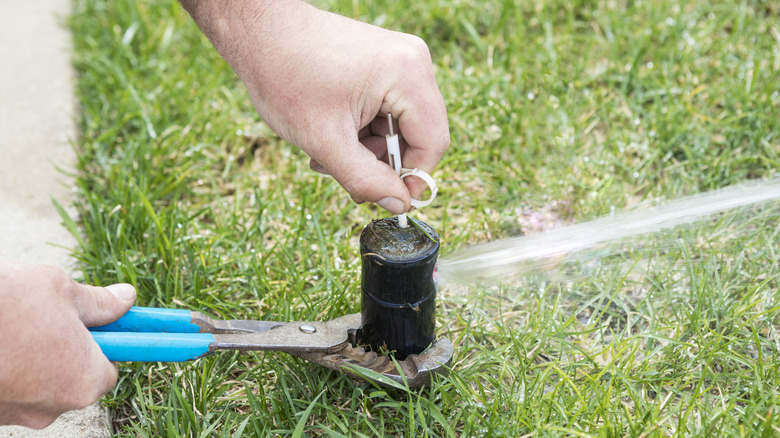
Before heading to your lawn, grab some needle-nose pliers, adjustable grips, and a towel. You will also need some soap, a bucket, and a brush if your sprinkler heads require a deeper clean. First, turn off your irrigation system and pull the sprinkler head up out of the ground, if it's not already in its elevated position. Use the grips to hold the sprinkler in this position while you work on its head. Remove the filter by unscrewing the sprinkler's head and pulling it from the rest of the part. You may need the pliers to extract the filter if it's too difficult to remove with your fingers. Once the filter is out, wipe off the accumulated dirt using the towel. You may need to run clean water over the filter to remove any stubborn debris.
Scrubbing with an old toothbrush can also give the filter a more thorough clean. Place the sprinkler head into a bucket of lukewarm water, letting it soak until most of the debris is loose. You can add a rust remover to your bucket of water for a deeper clean, which dissolves built-up calcium, rust, and other deposits. Next, turn the sprinkler system on to flush out any dirt that may have fallen into the pipes, reassemble the sprinkler head, and screw it back into the ground.
Why regular cleaning is important

Aim to flush out your system twice each year: once in the spring to prepare for summer, and again in the fall, before storing your sprinklers in the ground for several months during the winter. Adapting routine cleaning habits when caring for your irrigation system helps your lawn stay evenly green for a longer period of time, reduces your water footprint, and prevents your grass from succumbing to disease.
Some telltale signs that your sprinkler heads need cleaning are reduced water pressure, spotty distribution, and excessive leaking. Uneven water dispersal can cause your lawn to become patchy since some sections would receive more water than others while the system is running. Low water pressure has a similar effect on grass, as the water released from the sprinklers isn't able to reach as far as water dispersed at full blast. Reduced flow and uneven distribution of water can also lead to your household using more water than should be needed to irrigate your lawn. Therefore, clogged sprinkler heads may result in your water bill going up. Clogs throughout your sprinkler system can also cause leaks, which increase your water usage and costs even more.