The Best Way To Repot A Dried-Out Aloe Vera Plant
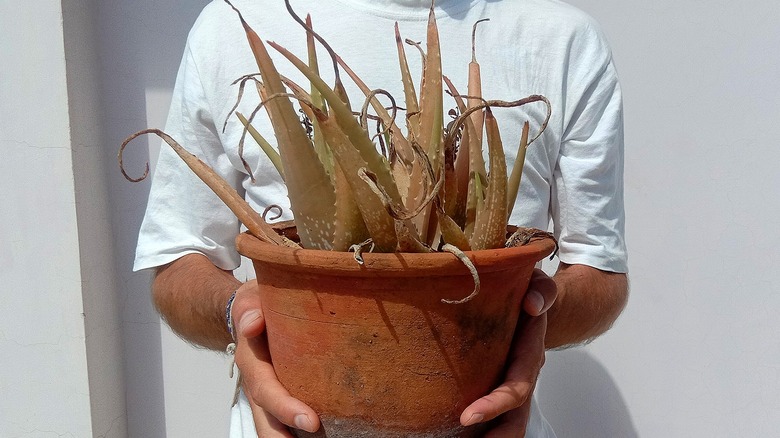
If your aloe vera is looking a little worse for wear, don't fret. When an aloe vera plant becomes parched and neglected, its roots bear the brunt of the damage. Aloe vera is renowned for its remarkable ability to store water in its succulent leaves, but if the roots suffer, the entire plant's health is jeopardized. Therefore, when you're ready to repot your dried-out aloe vera plant, the solution to breathing life back into the plant lies in reviving healthy roots.
Before we delve into the specifics of repotting, though, it's essential to understand that the health and vitality of your aloe vera plant are inextricably linked to the condition of its roots. Without strong, robust roots, your aloe will struggle to absorb moisture and nutrients from the soil, hindering its overall well-being. And even the most seasoned gardeners can sometimes neglect their aloe, leading to a dried-out, sad-looking potted plant.
Assessing and repotting your aloe vera
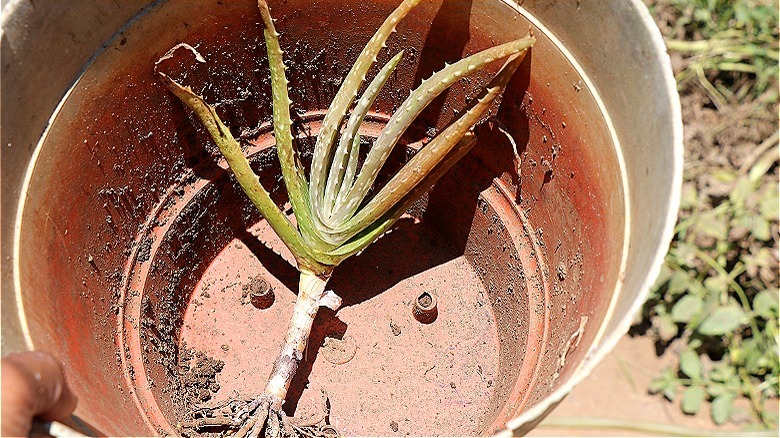
Dried-out aloe vera plants often display signs of stress, such as shriveled leaves and a generally unhealthy appearance. The most critical step in reviving your aloe is repotting it, and the key to successfully doing this is by checking the roots first. Healthy roots are crucial for your aloe to get a new lease on life. Start by gently removing the plant from its current pot. Shake off excess soil and carefully inspect the roots. Healthy aloe vera roots should be plump, fleshy, and a whitish color, and may sometimes appear with tiny, fine white roots. If these appear brown, shriveled, or mushy, they may be compromised.
Once you've assessed the roots, make sure you remove damaged or unhealthy roots and leaves with a clean pruner or knife. Now, it's time to repot your aloe. Select a new (or well-sanitized used) terracotta or ceramic pot with drainage holes that'll wick away excess moisture from the soil. Ensure the pot is only slightly larger than the old container, as aloe vera prefers snug accommodations.
Use a well-draining succulent or cactus soil or mix to promote healthy growth. Place a layer of small stones or perlite at the bottom of the pot to enhance drainage. Gently place your aloe in the new pot and backfill with soil, making sure the roots are evenly spread. Allow the plant to settle for a day or two before watering, ensuring the soil is completely dry before the first watering.
Proper care for a healthy aloe vera plant and roots

While it's good to know how to save and repot a dried-out aloe vera plant, it's also important to learn about preventative measures you can take. To prevent your aloe vera from drying out in the future, it's essential to provide it with proper care so that its roots stay healthy. To start, aloe vera thrives in bright, indirect sunlight, so place your plant near a sunny window. Also, water the plant sparingly, allowing the soil to dry out completely between watering sessions. Remember overwatering plants is a common watering mistake that can lead to root rot.
Additionally, aloe vera is sensitive to cold temperatures, so protect it from drafts and extreme cold. Fertilize your aloe with a balanced, water-soluble fertilizer every few months during the growing season, typically spring and summer. If your aloe becomes leggy or crowded with offsets, you can prune it by removing the outermost leaves or replanting the offsets in a separate pot. Keep an eye out for common pests like mealybugs, aloe mites, aphids, and scale insects. If you notice an infestation, treat it promptly with neem oil, rubbing alcohol, or insecticidal soap.