Easily Declutter Your Bathroom Counters With This Dollar Tree Hack
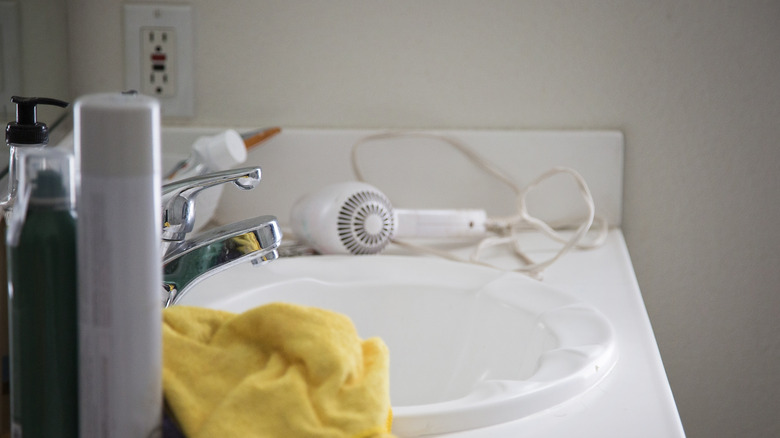
A cluttered bathroom is a recipe for disaster — not only does it make getting ready in the morning difficult, but it also poses real dangers, such as electrical cords getting wet on crowded countertops. If you're tired of operating in a bathroom with cramped countertops, you may have looked into organizational solutions to get on top of it all; sadly, many options are expensive to implement. Instead of opting for these pricier systems, you can say goodbye to cluttered bathroom countertops with one simple Dollar Tree solution that can give you back your precious space.
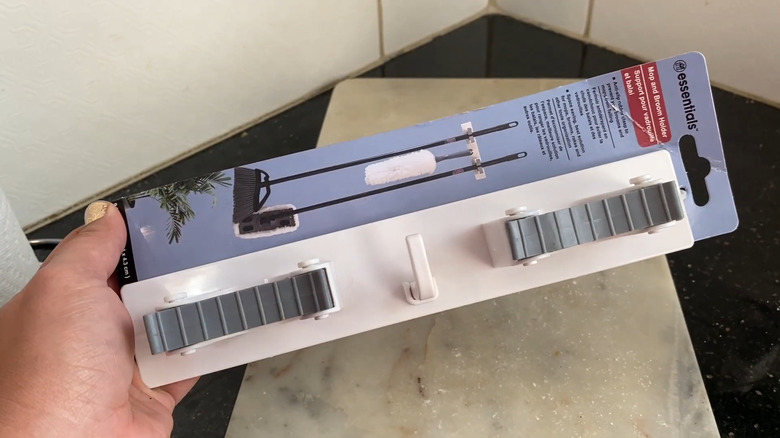
To free up your counters, all you need is a Dollar Tree Essentials Anti-Slip Mop and Broom Holder ($1.50). Equipped with an adhesive back, you can peel off the protective strip from the sticky portion, and then position the broom holder on the inside of a cabinet door, pressing firmly to ensure a good bond. Once it is securely in place, use the broom holder to store hair styling tools with handles that fit inside the holder. This can be everything from straighteners and curling irons to blow dryers or even hairbrushes. When you're ready to retrieve your items, all you have to do is open the cabinet door and remove it from the broom organizer.
How to pull this organization solution off seamlessly
Given that this hack will only cost you $1.50, it's an easy one to experiment with. If you're eager to see how it works in your space, there are a few steps that you can take that may give you the best chance at success. Firstly, since bathroom cabinet doors can suffer from a build-up of product film or dust, wiping them down thoroughly with a clean cloth prior to sticking the broom holder is a good idea. Secondly, measuring the space required for your various handheld styling tools before placing the holder should be done carefully — otherwise, you'll risk the cabinet door not closing if the handles protrude too high.
Lastly, if the items to be secured in the broom holder have much depth to them, be sure to clear enough space in your cabinets so the doors can close without bumping into the contents. Should you find that your cabinets are too messy to close fully, try our organization expert's best tips for getting your cluttered bathroom cabinets organized – starting with product management and tossing anything that is expired. With any luck and this Dollar Tree hack, your bathroom countertops will be clear and free from unnecessary chaos. You might even want to consider these 12 tips to keep your bathroom clutter-free for an extra organizational boost.
How does this Dollar Tree product fare?
Whenever purchasing something that is so affordable, it's worth asking if it is going to stand the test of time or not. For the answer to this question, a deep dive into reviews for this specific mop and broom holder lends some helpful insights. At first glance, the majority of the reviews are positive, with the average customer ratings for value coming in at 4.8 stars, and the product's quality at a 4.6-star average. One satisfied customer writes, "These are such a great deal and I definitely recommend buying them when you see them," a sentiment which is echoed by a number of other reviews.
It is good to note, however, that another review cautions against the product, stating that the adhesive backing failed after a short period of time and damaged their walls. If you're short on cabinet doors to secure the broom holder to or are concerned about ruining your walls, this customer recommends adding additional supports, such as thumbtacks (or perhaps some screws for more durable results). As with any product that is designed to sustain hanging weight, it's best to not overload it, especially at the beginning.