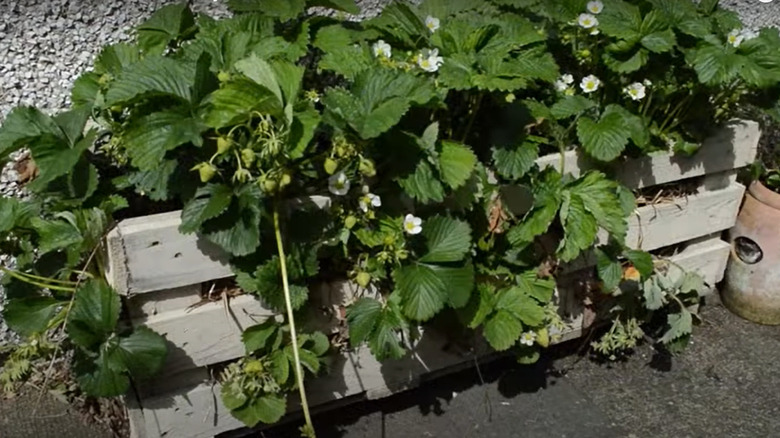
Grow Strawberries Like A Pro This Spring Using An Old Wooden Pallet. Here's How

You've probably seen those pallet planters before — you know, the ones where you attach the entire pallet to the wall (or lay it on the ground), fill the shallow horizontal troughs created naturally by the pallet's construction with soil, and plant your seedlings. Done! This may seem like an ingenious way to upcycle wood pallets for your garden berry path. Strawberries, after all, flourish in well-drained soil. There are, however, some distinct downsides; number one, for example, is keeping the soil in the thin pallet interior. To solve this and other problems, you'll need to do some sawing, prying, and drilling (or hammering) to transform the pallet into a trough or raised bed-style planter.
Erosion is one of the biggest issues that render vertical- or ground-based pallet planters less than ideal. Even if you line the base or back of the pallet, soil is bound to wash or crumble out of the wide gaps between the planks, which will require you to replace them. What's more, a standard, unmodified pallet is about 4.5 inches tall — that's not a lot of space for soil, meaning it dries out fast. Very regular watering is a must. Eventually, the pallet wood may get moldy and break down, especially in high-humidity areas. Of course, if you built the planter for free or cheaply, you could easily build another. Or, with just a little work, you could transform the pallet into something more practical.
Not all pallets are made equal
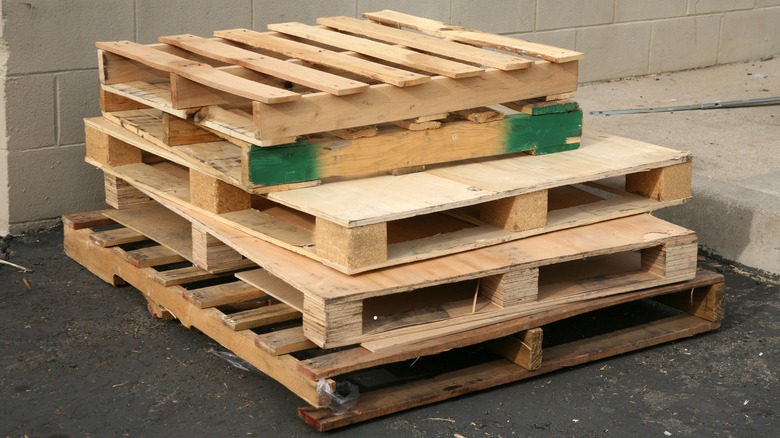
Any size pallet works, so long as you can cut it into three even pieces. (Most pallets used in America measure 48 by 40 inches.) Look for "block" or "four-way" pallets. The blocks will become the feet of your planter. Avoid stringer pallets — they're supported in the middle by planks instead of blocks. Another thing to look for with any pallet you plan to use in your garden is whether it's been treated, as indicated by stamps on the wood. Some treatments, like debarking (DB), kiln-drying (KD), and heat-treating (HT), aren't health-harming. Reject pallets with MB (methyl bromide treatment) or IPPC stamps. The former has been treated with toxic methyl bromide, and the latter is used for international shipping. These pallets are often chemically treated to meet border requirements.
Ideally, you'll get your pallet for free. Ask that friend or family member who works at a freighter or construction firm. Post an #ISO ("in search of") request in your local Buy Nothing Facebook group — the organization has a finder on its website. If you don't have any luck with the places to find free pallets near you, Facebook Marketplace is a great place to source cheap secondhand pallets. When sourcing them secondhand, there's always a small risk of landing a contaminated pallet. To reduce the risk, buy new. Uline sells heat-treated wooden block pallets for $99 each — you need to order five minimum. Get five new standard-size block pallets for $59.54 from Millwood Direct.
Construct your new strawberry planter
You'll need a few more materials and tools, including a carpenter's pencil, a wood saw (hand-controlled or powered), long nails or screws (in two sizes: 1.5 inches and 3 inches), a drill for the screws or a hammer for the nails, and a chisel and rubber mallet. Protect your eyes and hands with gloves and goggles.
Lay the pallet flat on the ground. Divide the planter into three even sections vertically, marking the divisions on the wood with a carpenter's pencil, front and back. Cut along the marks using your saw. You'll end up with three pieces — two that match and one that doesn't. Use your chisel and mallet to pry the blocks and wood off the latter, giving you a flat set of planks and some blocks. This will form the base and feet of your planter. Trim any overhanging wood on the other pieces. Attach them to the other part using screws or nails, close off the ends of the planter using the loose planks, and attach the block feet to the base.
You can leave the wood of your new planter bare or finish it with a few coats of non-toxic outdoor spray paint in your choice of color. Sand the wood first to ensure the exterior withstands adverse weather. Either way, line the sides with metal poultry netting, root cloth, landscape liner, or even trash bags, and fill it with potting mix or compost. It's ready for those strawberries!