We Made A DIY Terrarium Lamp And We Finally Know What To Do With Our Old Pickle Jars

We may receive a commission on purchases made from links.
I always loved the fillable glass lamps from places like Pottery Barn as a dynamic way to display special collections. As someone who collects plants, those lamps won't quite work for me, but they did spark an idea. I wanted to try making my own terrarium lamp. I looked online for glass jars that would work with a lamp kit, but most were too small.
At this point, I should probably confess that I am a jar hoarder. I love to keep jars in all shapes and sizes, but my favorites are large glass pickle jars. Although prices have increased, I used to buy pickles by the gallon for about five bucks and use the glass jars for storage. They are great for keeping creepy crawlies out of flour and rice storage and for the occasional fermentation project. Thanks to my hoarding tendencies, I have extras, so I decided to try to turn one into a terrarium lamp.
Collecting materials
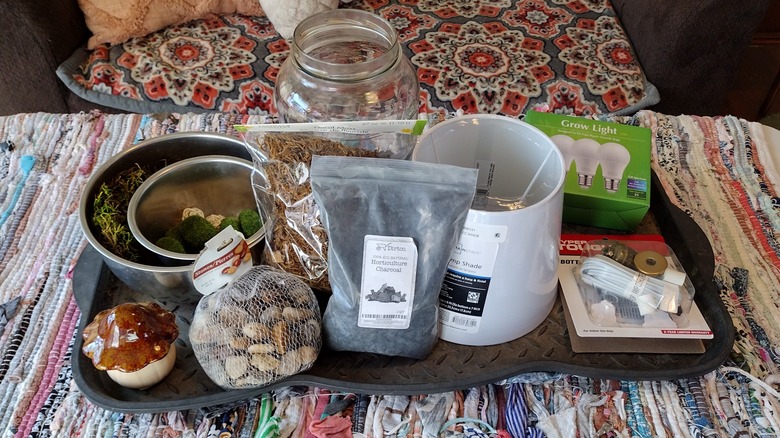
The materials list for this project was pretty long, but I had quite a few of these items on hand from other projects. For the terrarium, I started with a pickle jar, of course. The planting medium for terrariums is slightly different from a planter since it's an enclosed space without drainage. I needed small rocks, sphagnum moss, horticultural charcoal, and potting soil. I also wanted to add some decorative elements. The rocks, moss, and decorations came from the craft section at my local Dollar Tree, and I had horticultural charcoal and potting soil from previous projects.
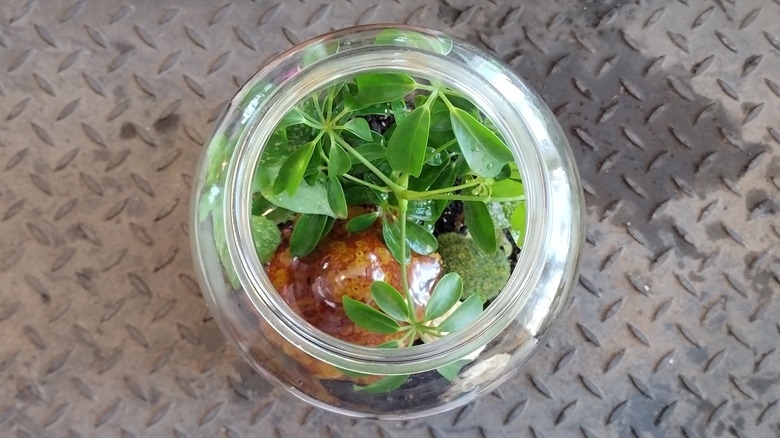
Plants are the primary features of any terrarium, and choosing the right ones for the type of terrarium you're making is important. Open terrariums are great for succulents and air plants that do not need much water or thrive in humid conditions. Since I was making a closed terrarium, I purchased a 4-inch Schefflera. I also added my two most drama queen polka dot plants since they are constantly "fainting" when I forget to water them.
Lastly, I needed to be able to turn my pickle jar into a lamp. There are several types of lamp kits, but I chose one specifically made for bottles in hopes that it would also work with my pickle jar lid. I bought a simple lampshade and full-spectrum white grow lights to help my plants grow well.
Preparing the terrarium
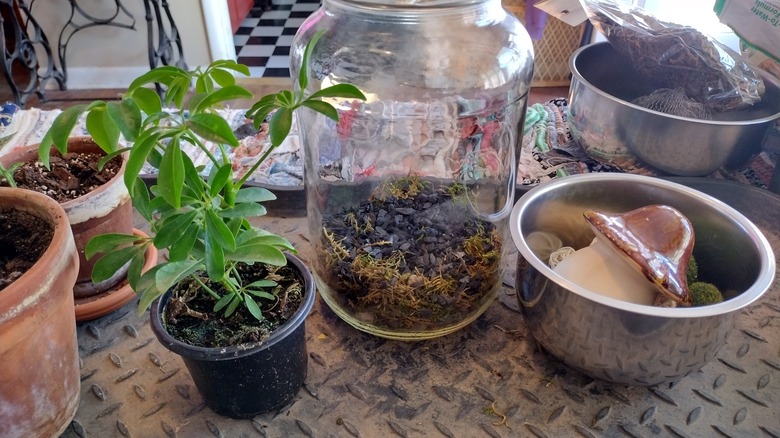
Before I could add plants, I needed to create the best possible foundation to provide an environment in which they could thrive. As with most plants, good drainage is vital to prevent root rot and since my closed terrarium would not have exterior drainage, the bottom few layers needed to be able to direct excess water away from plant roots. First, I put in a layer of rocks and topped that with about an inch of sphagnum moss, which compressed down after adding soil, plants, and decorations.
Although horticultural charcoal isn't absolutely necessary, it does help absorb excess moisture and prevent bacteria from growing. I figured I could use all the help I could get to make my closed terrarium a mini-greenhouse for plants instead of a petri dish for germs. With my foundation established, I added a thin layer of peat-based potting soil to prepare to add plants.
Adding plants to my pickle jar terrarium
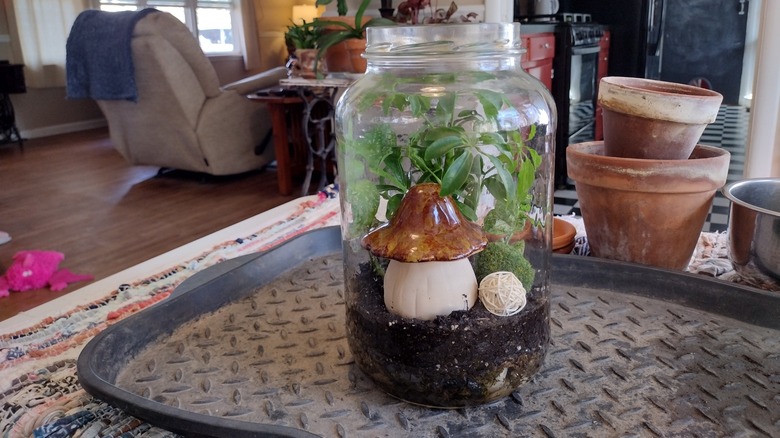
After adding those first few layers, my Schefflera suddenly seemed too big for the jar. I made it shorter by spreading out the root system and flattening it out so the top of the plant fit just perfectly. Although the mouth of a gallon pickle jar is pretty wide, having small hands is definitely a benefit for this project. Squeezing my two small polka-dot plants into the terrarium without damaging the leaves of the Schefflera was a challenge, but by working slowly and carefully, I managed to get my plants in place. I then added enough potting soil to fully cover their root systems and tamped it down before adding about a cup of water. This was just enough to soak the soil. I was a little nervous about that part because removing excess water would have been difficult.
With my plants in place, I added a few cute accessories to create the interesting terrarium I had visualized. It took some maneuvering around plant leaves, but I placed a small ceramic mushroom and a few other crafty items on top of the soil. This filled in the extra space and really made the design feel complete. The terrarium portion of this project only took about 45 minutes.
Turning a terrarium into a lamp
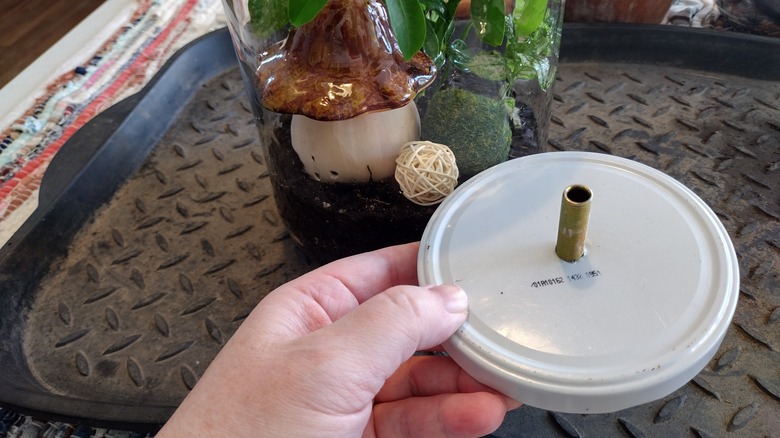
For someone experienced with growing houseplants, creating the terrarium part of this project wasn't particularly challenging or nerve-wracking, but making it into a lamp was. First, I had to figure out how to make a bottle lamp kit work with a metal pickle jar lid. Luck was on my side. I used a drill bit in the center of the lid to make a pilot hole — I used the largest one I had, ⅜-inch, hoping I could make it work with the lamp kit. Fortunately, that was the perfect size to insert the threaded bolt. I secured the bottom of the bolt to the lid with the included locknut, then tried to follow the enclosed directions to put the rest of the kit together.
After a few mess-ups and re-dos, I got the lamp kit functional and sturdy. This part took me about 30 minutes, mostly because I messed up the wiring and had to take it apart. Still, even for an electrical newbie like me, I got it done. I added my lampshade and grow light, screwed the lid on, and my pickle jar terrarium lamp was complete!
Results
I expected this project to take some time, although I was surprised at how quickly the terrarium part came together. The light kit was a challenge, but it's always nice to learn new things. The next time -– and there will be a next time -– I make some kind of jar lamp, I know what to do. If you decide to try this project, I want to offer a few words of warning regarding drilling into metal. Always wear eye protection because tiny shards of metal will fly, and work somewhere you can easily clean them up. No one wants to step on a tiny sharp piece of metal. Also, be careful when securing the lamp kit to the metal lid because the drilled area will have sharp edges.
This project was a lot of fun and I absolutely love the way it turned out. It's a unique addition to my living room decor, allowing me to have plants on a tabletop where they are protected from my cats. With some creativity, you could turn all kinds of jars into terrarium lamps, including storage items from the thrift store or half-gallon canning jars. Since I had some materials, this whole project cost about $30 which beats the price of those store-bought glass lamps while giving me a new way to add to my plant collection.