Give Plain Cabinet Doors A Stunning Upgrade With Simple DIY Trim Work
If you're trying to give your dull cabinets some more character, look no further than this quick and easy DIY trim hack. Simply pick an appliqué that makes you smile, stick it on with some wood glue, set with a heat gun, and you're good to go! Switching up your cabinet doors can make a big difference to your space, but understandably, not everyone is keen on going through the process of replacing them. Luckily, with this project, that's not necessary. We're not exaggerating when we say all you need to do is stick the trim to your cabinet door and call it a day. Sure, there may be some clean-up or additional painting required, but this truly is one of the easiest ways to bring some extra charm into your home.
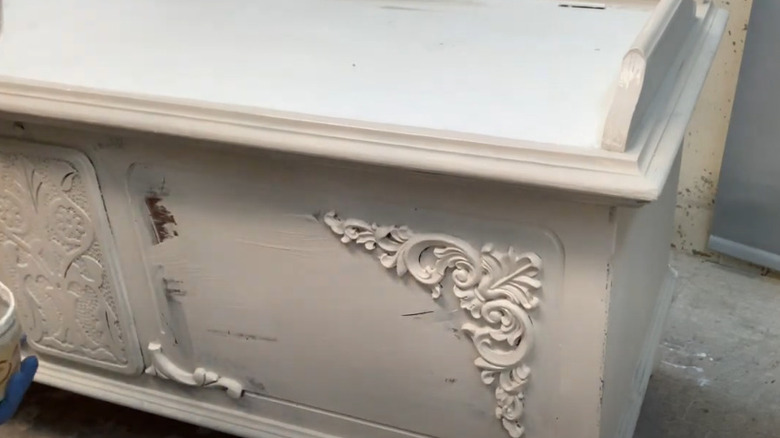
Best of all, you can play around with different styles of trim, depending on what kind of look you're trying to achieve. For instance, if you're into the bookshelf wealth interior trend, you could go for something more vintage-inspired. Amazon stocks corner wooden decals for around $10 a set, which would be ideal for giving your cabinets a more rustic feel. Alternatively, if you simply want to add some interest to otherwise flat and boring cabinet doors, you could even go for a super easy rope trim, also available on Amazon for less than $18 for a nearly 115-foot roll (good news if you mess it up at first). Willing to spend a bit more? You can also find incredibly beautiful decals and trims on the WoodUBend website.
Use clear glue to secure the trim to your cabinet doors
Your first step, when using trim to breathe new life into your cabinets, is to figure out where you want to put it. Remember that this is your DIY project, so you get to decide where you want things to go — and if you're thinking of also adding trim or decals to the inside-facing doors of your cabinet, that's totally up to you. Just be sure to measure how much space you have between the closed door and any shelves before doing so, to ensure you can still close your cabinet afterwards. Once you've decided where to place the trim, the next step is to stick it on. If you've opted for a WoodUBend decal or something similar, you'll probably need a glue gun.
Always use a glue stick that dries clear to avoid as much mess as possible. These are available on Amazon for about $6. Alternatively, if you don't own a glue gun, opt for a clear-drying wood glue, which you can also purchase on Amazon for around $10. Of course, referring to the instructions of the exact product you're using is vital here. However, it's a good idea to use a heat gun (or, in a pinch, a hairdryer), to set the glue regardless. There shouldn't be much mess if you've used a clear formulation, but if needs be, remove any residue with a wet cotton swab.
You can paint the cabinets (but you might not have to)
Once you've applied the trim to your cabinet doors, you can decide if you'd like to paint them or not. It's generally advisable to remove cabinet doors before painting them, but if you're comfortable tackling them where they are, that's your prerogative. Having said that, if you'd rather not paint or remove your cabinet doors, don't panic — there are still plenty of ways to keep this project as easy as possible. One option is to find a trim that already matches the color or stain of your cabinets. Obviously, that's not always possible, so if you can't find an exact match (or aren't a fan of a more two-toned look), check the manufacturer's directions to see if you can paint or stain the decal before sticking it to your door.
In fact, you may even be able to reach out directly to the manufacturer, if nothing comes up in the instructions. On the other hand, if removing the cabinet doors isn't a deal-breaker for you, go right ahead and take them off since it'll make any further customization considerably less difficult. Spray painting them will make for an effortlessly sleek finish, and if you use TikTok's beloved hanger hack to hold the doors up during the process, it won't feel like as much of a task, either. Evidently, simple is the name of the game with this DIY hack. But with finishes this chic, it'll certainly look like a ton of time and effort went into it!