A Decor Hack For Creating Stunning Lampshades With Shaving Cream Dip Dye
We may receive a commission on purchases made from links.
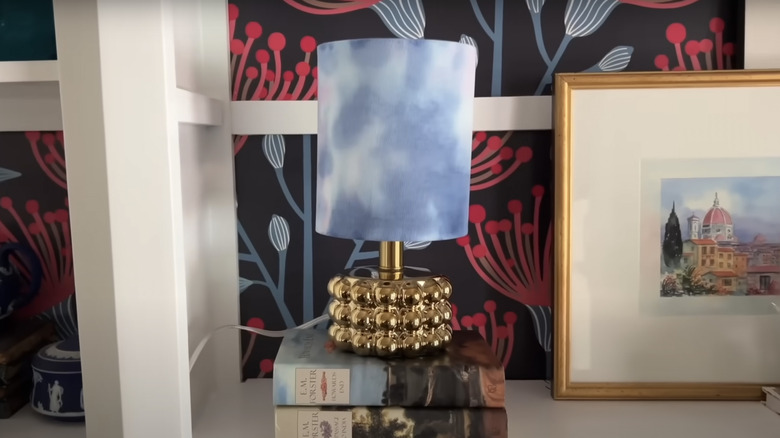
Bold accessories and pops of color are a few of the statement decor trends that will be booming in 2025, and upgrading your lampshades is a perfect way to get in on the fun. Although there are thousands of eye-catching lampshades out there, some of the most unique marbled, Ikat, and block-printed versions can cost hundreds of dollars. There's no reason to spend a fortune, though, when you can give your old lampshades a fresh new look with a quick and fun DIY project. Hometalk recently shared a video demonstrating how you can use a disposable aluminum pan, a can of shaving cream, and dyes in assorted colors to easily create a stunning lampshade with a simple dip dye technique.
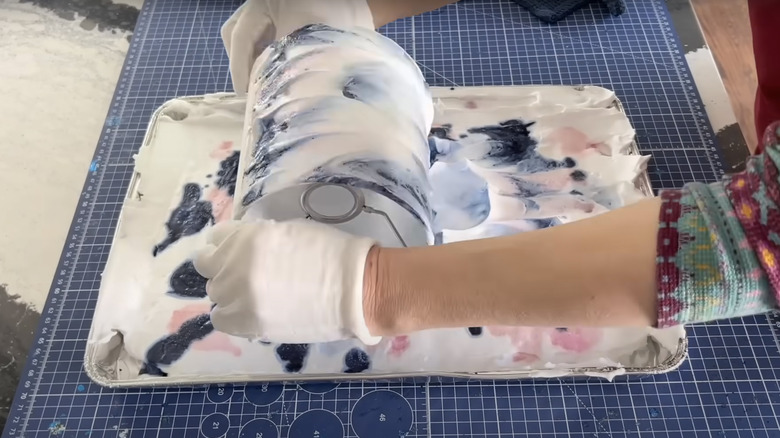
First, put on disposable gloves to protect your hands from staining. Then, get a disposable aluminum pan with high sides and fill it with shaving cream, spreading it into a smooth layer with a squeegee like this bestselling one from OXO Good Grips. If you want to customize mini chandelier lampshades you could use a pie tin instead, and for bigger lampshades, you may need to opt for a larger container like the HOMZ 41 Quart Clear Plastic Storage Bins. Next, add your fabric dye to the shaving cream using a dropper or turkey baster before gently rolling your lampshade in the colorful mixture until you reach the desired color coverage. After waiting for the dye to set, rinse your lampshade to reveal the result before letting it fully dry.
The materials for this DIY dip dye project are inexpensive and easy to find
Perhaps the best thing about this DIY project is its low cost. Since the shaving cream acts as a medium to hold the swirly dye in place while you apply it to your lampshade, you can use the cheapest variety you can find; it shouldn't cost more than $2. Hometalk suggested pre-mixing Rit All-Purpose Powder Dye, which comes in a wide range of colors, before applying it to your shaving cream layer. However, several Redditors who shared tips on dip-dying techniques say you can simply sprinkle the dye wherever you want because the shaving cream has enough moisture to activate the dry powder. To make more intricate designs or control where the powder goes, try using a spice shaker or Q-tip to apply it.
Whether you use wet or powdered dye, DIYers and pros alike suggest conditioning your lampshade fabric with soda ash before you roll it in your dyed shaving cream. Soda ash is inexpensive and easy to work with — just dissolve it in warm water before soaking your lampshade. However, you should take the precaution of wearing rubber or latex gloves to avoid skin irritation.
Here are a few tips and tricks to keep in mind to get the best results
To get the best results from this project, there are a few other tips and tricks to keep in mind. Remember to start with a fabric lampshade that will absorb dye. Natural fibers like cotton are ideal for any dip-dye or tie-dying project. You can create many patterns by dropping dots of dye across your shaving cream surface, or you can try achieving a marble effect by using a comb or chopsticks to create more controlled swirls. Don't forget to carefully read the instructions on whichever dye brand you use, and let it develop for several hours before rinsing for the richest color. A blow dryer works well if the instructions call for heat-setting your dye.
Your results will be softer and less defined if you moisten your lampshade with a spray bottle before starting the dyeing process, and more crisp if your lampshade is dry when you begin. If you want to build up layers of color, you can do the entire dyeing process more than once. The dyeing experts at Dharma Trading say shaving cream with aloe works slightly better than other versions, and they also suggest adding a little water to your shaving cream to make it creamier.
The shaving cream dip-dye technique also works on other home decor or articles of clothing you want to spruce up with colorful and swirly designs. You can use it to create curtains that reflect your personal style, one-of-a-kind pillow covers, or interesting T-shirts, hats, or canvas shoes. You can even try the process when dyeing Easter eggs or making handmade greeting cards.