The Clever Wood Mason Jar Opener You Can DIY For Your Own Kitchen
We may receive a commission on purchases made from links.
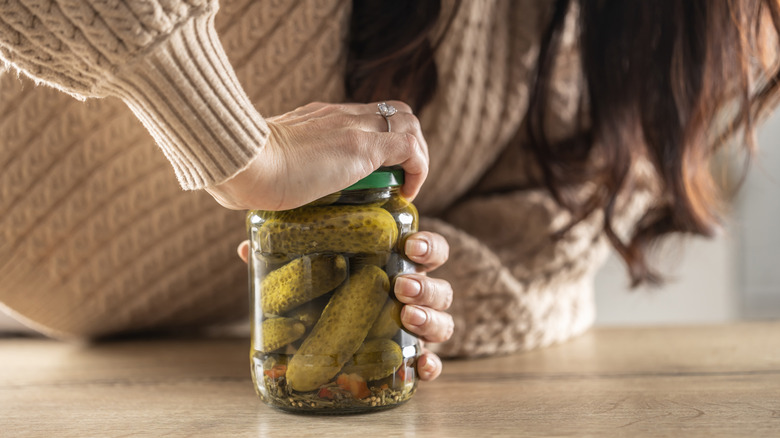
Having a Mason or other jar that simply won't open can be a different kind of kitchen headache, often leading to lots of twisting, groaning, and running it under hot water just to access the contents. If you're tired of asking someone to help or opening stubborn jar lids with a wooden utensil, it might be time to invest in a more dependable opener. With a simple DIY solution, you can create a jar opener out of wood that mounts directly to the underside of your kitchen cabinets. A V-shaped set of wood blocks with embedded bandsaw teeth provides the grip needed to open the toughest of Mason jar lids. And it does all that without taking up valuable drawer or cabinet real estate, while costing next to nothing.
The key to this DIY project is utilizing materials you may already have around the home. It requires a few simple tools, including a bandsaw or jigsaw, a nail gun, and a bit of wood glue. The wood and bandsaw or hacksaw blades can either be sourced fairly cheaply or reused from other projects. In fact, it can be the perfect way to make use of leftover scrap wood you have lying around your home. If you don't have access to any blades, Amazon sells FOXBC 6-Teeth-Per-Inch Bandsaw Blades that can be cut to the length of your opener, and run about $13 for a pack of two. This is the best option when creating multiple jar openers around your home, limiting your costs to basically just the blades.
How to build your own jar opener
To build your own under-cabinet jar opener, start by grabbing a piece of scrap or plywood. Mark out a rounded teardrop-heart shape that is about 4 to 5 inches wide at the largest point. This will allow for the average lid size (around 2 ¾ inches for Mason jars) to smoothly enter into the device. Using a bandsaw or jigsaw, cut the shape out of your plywood and sand the rough edges. If you're using bandsaw blades for the opener teeth, cut them to slightly less than the length of your opener. Ensure that you have at least two blades cut to the right size before continuing. Cut a few pieces of 1-inch thick scrap wood about the same length as the long sides of your teardrop-shaped base. Along the length of each piece, cut about a ¼-inch indent where your blade will slot into.
With all of your pieces cut, you're ready to assemble your jar opener. Dab wood glue into each slot and secure a blade, teeth side out. Allow them to dry completely before you continue. Lay your teardrop-shaped piece of wood on a flat surface and glue two bladed lengths of wood into place, in a V shape. You want to ensure the blades are facing inwards: It's the teeth that catch and hold the lid of the jar when opening. Flip the piece upside down and secure everything with staples or nails. At this point, you can add wood stain or sealant to your project, using these helpful tips.
Placing the jar opener, and why you might want more than one
The most obvious location to mount your newly-crafted jar opener is where it is most accessible while you cook. Try to think of the surfaces you often find yourself working at when struggling to open a Mason jar of homemade sauce or jam. The jar opener can be mounted to the underside of kitchen cabinets or pantry shelves, adding functionality to these underused areas. If you find yourself cooking at your kitchen island, mount one to the underside of a countertop overhang. You want to be mindful not to place the opener vertically, as this can cause the contents to spill.
There's no reason to confine a Mason jar opener to the kitchen: There are a surprising number of ways to reuse old glass jars around the house. For example, if you store screws and nails in jars in your garage, install an opener under a workbench or an open shelf unit to effortlessly access these items. You may use glass jars to store seeds in an outdoor shed, which can a perfect spot for an additional handy opener. Sure you can buy factory-made versions like the G Grip under cabinet jar opener for about $18 each. But think of the money you'll save making your own, particularly when multiple openers come into play, allowing you to introduce them into any space that may benefit from a helpful hand.