How To Give Vintage Hardwood Floors A Beautiful Tile Appearance
We may receive a commission on purchases made from links.
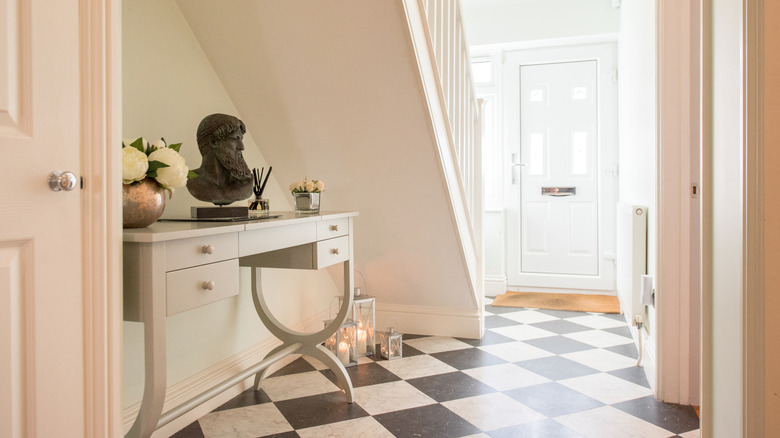
It's hard to imagine being upset about finding durable hardwood floors in a home you've just bought, but when you're envisioning a lovely checkered floor look, it might be a bummer to reveal a wood surface. At the same time, though, there are plenty of downsides to tiled flooring that lead homeowners to stick with the familiar hardwood and leave the patterned look behind. Luckily, there's a hybrid version of both options that could be the perfect solution. By using wood stain and painter's tape to create your own checkered pattern, you can get the beautiful, vintage tile look without needing to actually install tiles.
There are plenty of benefits to using wood stain instead of opting for new tiling. For one, cost: Wood stain typically costs about $20 per quart, and a quart can cover around 125 square feet, including the necessary two layers you should use of the stain. The average tile installation cost for 100 square feet of flooring is between $500 and $4,500, depending on the quality of tile. That means using the stain method can save you hundreds, if not thousands, of dollars. Plus, wood stain isn't impossible to remove — a simple chemical stripper is very effective at removing wood stain, so if you don't like the result of your patterned stain, you can remove it and try something else. Compared to the range of $320 to $1,120 that it costs to remove tile, stain is a cheaper risk.
How to create this look yourself
The process of creating checkered floors using wood stain is quite simple. This hack went viral on TikTok when @thebrickvictorian posted a video (which now has over 5 million views) about discovering a hardwood layer in her foyer, instead of the tile she had expected. Instead of putting tile over the hardwood, potentially wasting the long-lasting and durable hardwood flooring, she decided to create a checkered pattern on her own. To follow in her footsteps, you'll first need to use a reliable brand of painter's tape to lay down whatever pattern you'd like. Consider vertical, horizontal, or diagonal stripes, checkers, or get creative with your own intricate designs. Most painter's tape should work, but it might be worth splurging for reputable brands, like FrogTape Multi-Surface Painter's Tape, to make sure none of the stain seeps through and ruins your design.
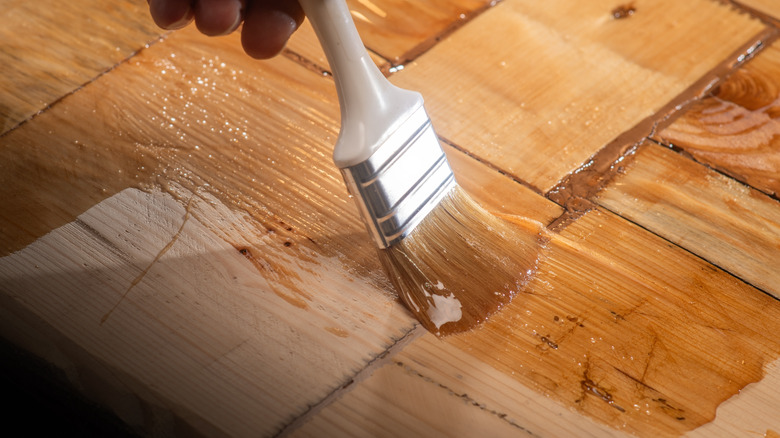
Once you're done setting out your tape outlines, you're ready to paint on the wood stain. There are a few helpful tips DIYers will want to know before using wood stain, including how to prepare the wood and how to roll on the stain. You should clean and sand the hardwood floors prior to staining, and make sure that you vacuum or use a broom to get rid of any dust on the floors. Stir the wood stain before applying it, and double check that the stain you've chosen is compatible with your floors. To apply, you can use a bristle brush, high quality cloth, or a foam brush, based on your personal preferences.
Pitfalls to avoid
If you're opting for a geometric pattern for your own wood stained flooring, there are a few common mistakes you'll need to avoid. Much of those mistakes happen in the process of laying out the painter's tape. Of course, choosing a painter's tape with poor adhesive could just about ruin the project by messing up the lines you've created and potentially allowing different sectioned-off areas to bleed into each other. But the other big issue could be around mapping out the perfect shapes and sizes. You should use a measuring tape and consider getting a laser to make sure your lines are perfect and spaced out correctly. You can also mock up your design to see how each shape will lay, and how the corners and ends will look, so that the pattern doesn't abruptly end. The TikTok creator avoided strange patterns around the sides by painting a dark layer on the borders.
Another way that this project could go wrong is if the color of your wood stain turns out different than you anticipated. Just like with paint colors, wood stains can look different in the store versus in your home, so you should take home samples of wood that's been painted with the stain to see how it looks in your space. You can also do a patch test in more hidden parts of your floor to ensure that your stain is the right color for your project.