Funky Accent Shelves Are The Latest DIY Trend We Are Loving
We may receive a commission on purchases made from links.
Adding shelves to your living space is always a fantastic way to bolster the functionality of your home. You get more storage, and you can keep all sorts of items within reach without any of them creating clutter. But what can be challenging when it comes to installing shelves is finding a way to make the fixtures look more visually appealing. You can, of course, add framed art pieces, plants, or other small decor items to your floating shelves to make the furnishings look neat and tidy. However, you can also go one step further, and allow the shelves themselves to become chic, elegant decor elements that catch the eye and modernize your interior. And if you DIY these trendy accent pieces, you can customize the design and color in all sorts of ways so that they perfectly match your style.
Eccentric, offbeat shelving in funky shapes and colors is a trendy way to give your home a bit more of a unique flair. You can paint your new wall-mounted fixtures with bright accent colors to make them stand out from the rest of your interior and add more contrast to the space. You could also switch up the cut of your shelves' edges so that they look less linear and perhaps a bit softer. If you make multiple bold accent shelves and pair them together, you can completely revitalize a blank, open wall. The only thing you'll need to look out for are common shelf styling mistakes you'll want to avoid.
Accent shelf styles to consider for your space
There are plenty of stylish designs to choose from when building or purchasing your accent shelves. For example, you can install a series of small, wave-edged shelves for displaying your quirky collection of knickknacks. Painting each shelf its own color adds to the bold, fun, and visually distinct look, but you can also pair shelves that are the same color for a more subtle look that lets your displayed items take center stage.
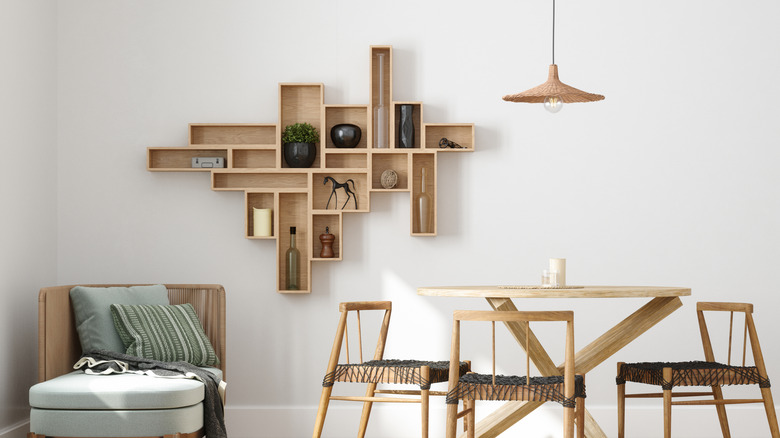
Another fantastic offbeat shelving option you might want to consider is a cubby shelf that has a staggered, asymmetrical design that almost looks like boxes of different sizes stacked together. The cubbies can be linked together at their corner points, rather than on their sides, and you can use the tops of their boxes for extra storage. Floating shelves that have arched or slanted surfaces can also look nice if your home utilizes a modern decor style. BUTUNITA black metal floating shelves, for example, have unique curved lines that make them look tastefully artistic.
If you get a funky shelf for one of your living space's corners, you might be able to turn dead space into storage. There are plenty of corner shelves to pick from that can simultaneously make a visual splash and serve a practical purpose. The LITTLE TREE small corner shelf, for example, has an elegant wavy design and could be great for books and plants. Don't have quite enough space for a large accent shelf? A series of staggered picture ledges could be an excellent choice for narrow rooms. These fixtures are small, compact, and easy to paint.
How to DIY your own funky floating shelves

One of the best ways to get a trendy floating shelf for your space is to make it yourself. You can customize the design to fit your room and bring your imaginative designs to life. For a simple shelf, you'll need just two pieces of wood for the basic structure: a back panel in your desired shape and a shelf piece that sits perpendicular to the back.
To create your shelf, first determine how large you want its surface to be. Then, decide on a pattern for the shelf's edge and a design for a back panel. The back panel will run parallel to the wall and hold up your shelf. You can choose any pattern or outline for both of the pieces, but the shelf shouldn't be wider or larger than the back panel. Draw your preferred designs on paper, and then cut them out to make templates. Use the templates to trace the shapes onto a large board of pine or MDF wood. Now you can cut the shapes from the wood with a jigsaw, and then sand them thoroughly, especially along the edges.
Next, pre-drill holes into the back edge of the shelf piece, about an inch away from each of the sides. Then, measure the distance between the holes, and pre-drill two more holes into the back panel that are spaced apart exactly as much as the ones on the shelf piece. Once that's done, line up the holes and connect your two pieces with wood screws. Prime and paint your project with a bold color. Drill the shelf directly to a wall stud, so that it can hold more weight. Alternatively, use a French cleat on the back side of the fixture.