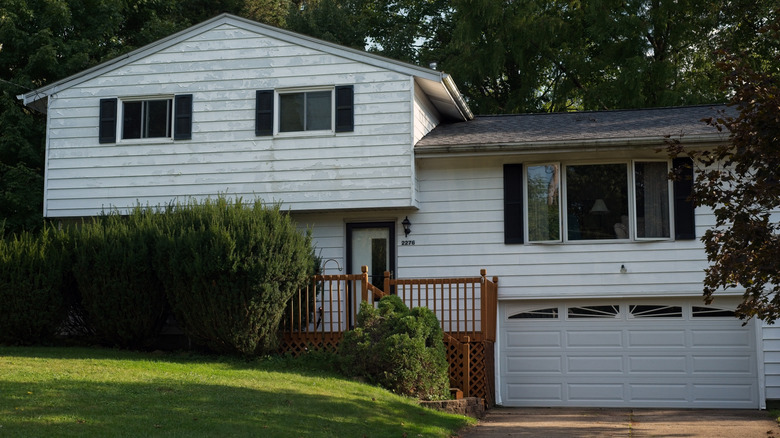
Make Your Split-Level Home Shine Again With These Budget-Friendly Fixes
We may receive a commission on purchases made from links.
If your split-level home feels stuck in the 70s, you're not alone — and you'll be happy to know that you're also not out of luck. Surprisingly, a few small tweaks, such as changing a light fixture here and there, can give an outdated home some resemblance to modernity. Good lighting is important in a home, not only because of functionality, but also because it can affect the ambiance and bring attention to certain designs or decor, leaving visitors impressed by your sense of style. So, if want to boost your split-level home's attractiveness, these wallet-friendly renovations are game-changers.
These multi-level home designs became all the rage in the 1950s through the 70s, as they helped save on space in suburban areas and offered a practical living solution that was less expensive than other home designs. Split-level floor plans have a number of pros and cons — they're known for being less expensive, but their unique design can make them challenging to renovate. But don't fret, there are ways that lighting can help.
You'll be surprised by how easily a few updated wall fixtures or outside spotlights can create an air of sophistication and on-trend appeal to your home. The right lighting additions can open up a house, highlight notable areas of its exterior, and make it appear more curated and up-to-date. The design and appearance of contemporary fixtures, such as those with polished metal or geometric shapes, can create bold looks that whisper style and character — and adding these updates doesn't mean you have to break the bank.
Modernize external lighting for an easy upgrade
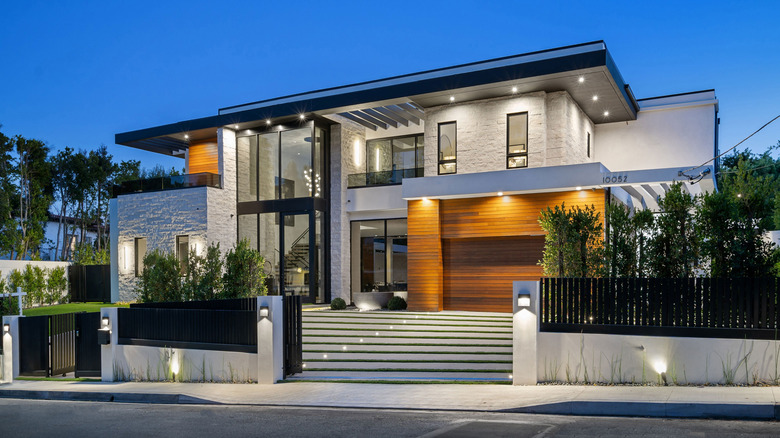
One way to easily update your split-level home is to give it a makeover with new lighting. Choosing the right outdoor lighting means first considering its purpose and location. For the exterior, try adding motion sensor-activated sconces to both sides of your exterior doors for an inviting touch. Plus, outdoor lights don't have to be exclusive to entryways. Try adding a glass wall lantern with a smooth matte finish, similar to the MAXvolador Outdoor Wall Sconce, to the side of your home for additional lighting near your garbage cans or porch. You can also swap out any huge flood lights on top of your garage door for a modern LED light with motion detection capability.
Landscaping lights can also upgrade the look of your split-level property. Introduce new metal path lights, like these BEAU JARDIN Stainless Steel Solar Lights, for the driveway edges leading up to your home, as this will help visitors arriving at night. If you have a large front lawn, try adding a few strategically-placed solar ground lights around your shrubs or trees. These lights are often inexpensive and can easily be found on Amazon in packs starting at around $25. Small lawn? No problem. Go for some uplighting by adding a handful of sleek, angled uplights to your home's front exterior to highlight a newly-painted door or shutters.
Mistakes to avoid and other considerations

DIY lighting projects should always be planned out carefully. For example, you never want to place new fixtures in your lawn if you have flooding or pooling water issues. You'll risk damaging the lights and exposing yourself and your family to a serious safety issue. In many cases, it may be best to have a licensed electrician come and install certain fixtures, particularly in situations where new electrical wiring is required, as opposed to just a fixture replacement.
It's always best to maximize outdoor lighting to improve home security and ensure safety. So before adding any new lights, consider other factors such as the location of nearby trees that may cause shadowing issues, or mounts that may be too high or low on the walls. And just like with other home types, it's advisable to first consider factors such as height, size, and positions of your split-home's exterior lights, as they relate to high traffic locations.
For example, for lights around your front door and garage doors, it's best to have fixtures that measure about 1/3 to 1/4 the height of the door. The light should be visible, but not so much that it overwhelms the door. For front doors, try to position the lights around 66 to 72 inches above the floor so that they're either at or a little bit above eye-level. The best position for garage door lights is centered in the middle, but will ultimately depend on its size. The illumination should be spread evenly across the entire space, so you may need more than one if you have a multi-car space.