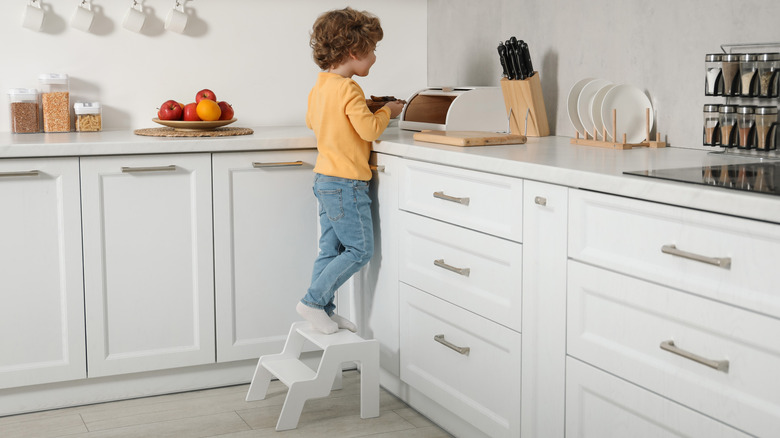
How To Make A DIY Designer Step Stool With Budget-Friendly Materials
We may receive a commission on purchases made from links.
It can be extremely satisfying and a lot of fun to make your own furniture, and a step stool can be a valuable addition to a kitchen, bedroom, or bathroom. They are great when you need to reach tall cupboards or for smaller family members to reach the sink (or dare I say it, the cookie jar).
Over on Instagram, Elise Hunter, who goes by @huntersofhappiness, saw a designer model she liked, but not surprisingly, $420 was more than she wanted to pay. So she decided to make her own version using budget-friendly materials. The result is attractive, strong, and can be stained or painted to match pretty much any decor.
As you can see from the video, Hunter has a pretty impressive set of power tools, but the project could be built using just a couple of the basic tools worth investing in to start woodworking at home: a drill driver and a jigsaw. Most people have the former, and you should be able to pick up a tool like the versatile Skil 6-amp Corded Jigsaw for under $50.
Designing and cutting the parts for the designer step stool
Elise Hunter spends time drawing up plans, and it's an important first step that avoids a lot of waste. To check whether your dimensions work visually, you could also make a mockup from old cardboard boxes. The project uses ¾-inch plywood, which experts tell us is one of the best materials to keep your DIY wood projects from looking cheap. Even if you don't have offcuts lying around, it's very affordable and widely available from home improvement or hardware stores.
Once you're happy with your plans, transfer the dimensions to the plywood. Don't rush this stage. There's an old woodworker's saying, "Measure twice, cut once." It will save you a lot of time, frustration, and wasted wood. If you have a table saw or miter saw, that will help, but all the pieces can be cut with a jigsaw. It's a good idea to cut the horizontal step pieces first, then use these to mark the holes for the sides. That way you can make sure they're nice and snug. Hunter uses a paper cup to draw the scalloped edges of the trim on the steps. Use sandpaper wrapped around a piece of scrap wood to smooth any rough edges.
For your own safety, make sure to wear protective glasses and a dust mask. These only cost a few bucks and are an investment in your health. Sawdust can be unpleasant if it gets in your eyes or up your nose, and some of the glues used when making plywood are toxic.
Putting the designer step stool together

Make a dry assembly so you know all the pieces fit, then cover all the surfaces that touch each other with wood glue. Titebond III is popular and seems to be what Elise Hunter uses. Wipe off any glue that squeezes out with some paper towels. She then uses a brad nailer to reinforce the joints. Her DeWalt costs around $270, but much cheaper corded models are available, or you could use a hammer and small nails. Be careful to keep them straight so you don't split the plywood or punch through and leave sharp points exposed. Finally, cut the scalloped pieces and glue and nail those in place.
Leave the step stool for 24 hours so the glue cures completely. Then it's just a question of giving it a final sand to make sure there are no rough edges and applying your chosen stain or paint. Find a home for any leftover bits of plywood in the garage or shed. TikTok has lots of fascinating projects for any pieces of scrap wood you have lying around, so it's much too valuable to throw away.