Transform Basic Materials Into An Adorable DIY Birdhouse Hotel To Beautify Your Yard
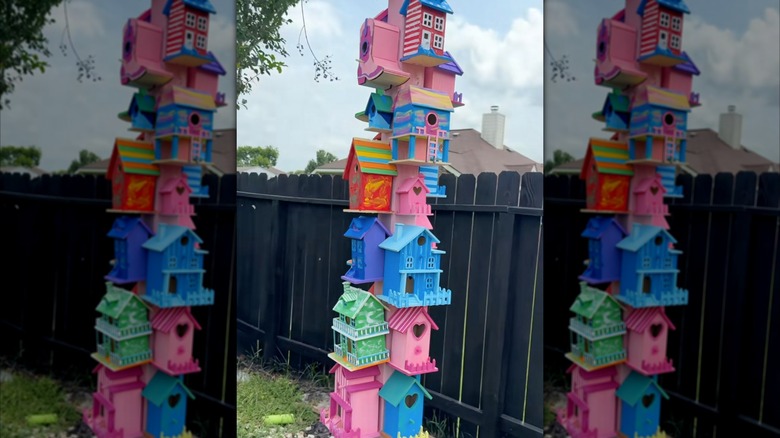
A birdhouse is more than just a safe, comfortable place for local birds to nest — when done correctly, birdhouses also make gorgeous backyard décor. And while there are many ways to DIY a birdhouse your feathered friends will love, this birdhouse hotel DIY is one of the cutest. Using a variety of basic wooden birdhouses, you can craft an adorable, colorful backyard feature that will beautify your garden and naturally attract birds to your yard.
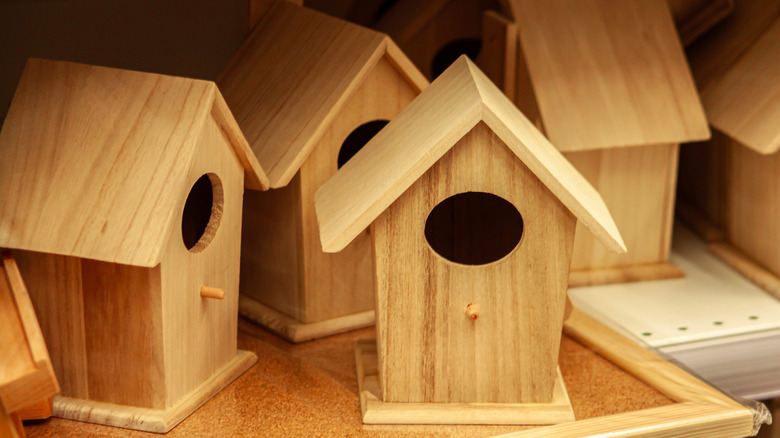
This project is great because it uses basic materials that you can easily source from dollar stores, craft shops, and even thrift stores. To assemble your birdhouse hotel, you will need one 4x4 post, a handful of plain wooden birdhouses, paint, tools for digging, a nail gun, screws, and optionally, some concrete. It is also a good excuse to get your favorite crafty people together for an afternoon of painting birdhouses. The assembly is pretty straightforward, but there is tons of room to customize this bird hotel with different colors and styles of houses. For a fun and eclectic look, choose birdhouses with different shapes and designs, never repeating the same one twice. For something more uniform, stick to a strict color palette or choose houses that all have a similar shape.
How to assemble the birdhouse hotel
Start by digging a hole in the ground for your 4x4 post. A garden auger or post hole digger will be helpful here, but you can also use a shovel. Dig the hole roughly 2 feet deep, then place the post in the hole. To secure your post, you can add concrete to the bottom of the hole and fill the rest of the way with dirt. For a less permanent solution, you can add gravel instead of concrete.
Then, it's time to start customizing the individual birdhouses. Paint them in any colors you like, then use a clear sealant to protect your houses from the elements. To further protect your painted birdhouses from the elements, you can use hot glue on the seams of each house to ensure they're water-tight. Once your paint has dried, begin adhering the birdhouses to your post using a nail gun. You can further secure each house by adding a supportive screw to the bottom. If you find the houses still don't feel sturdy enough to support real birds, try using wooden shelf brackets under each house to make your structure even more secure.
If your goal is to simply create a decorative bird hotel for your backyard, any common craft birdhouses will work. However, if the goal is to bring more birds to your yard, you will need to choose houses with thick walls, at least 3/4 inches. Water-tight seams, a large enough entry hole, and proper ventilation will also be required. To ensure your new bird hotel will have plenty of guests, knowing the best time of year to put out your birdhouses is a great start. Placing the bird hotel next to a food and water source will also entice birds to check in.
How to customize your bird hotel
For customization options, try incorporating a theme. For example, you can add cobwebs, ghosts, and pumpkins to create a haunted look. Alternatively, you can attempt to paint the houses to look like real life buildings — use the houses on your street or famous homes for inspiration. You can also try different configurations. For example, instead of adhering your birdhouses to a straight 2x4 pole, instead use a piece of wood with cross arms to create more dimension.
If you don't feel comfortable using a nail gun or installing shelf brackets, then you could also opt for hanging bird houses. Using a wooden pole with plenty of arms facing different directions, simply hang your birdhouses on the structure. This option may not be durable enough to support real birds but it is an easy way to create backyard décor without the need for hardware like nails and screws.