Create An IKEA Sideboard With This Clever LACK Hack
Sideboards are a classic furniture piece that can add instant elegance to any living space. They can either blend seamlessly into a room as functional storage furniture or serve as a conversation piece, turning a plain, boring wall into the main feature. One of the drawbacks to some of the sideboards that are for sale online is that they tend to either have a rustic, farmhouse look or a posh, showy appearance. Many of them are on the bulky side as well, which doesn't work for every home. For those with a minimalist-style home that features clean, modern lines, it can be a challenge to find a sideboard that blends well. There is a way, though, to get an ultra-sleek, modern sideboard that takes up very little space and costs under $50. Like many great furniture hacks, this one comes to you from IKEA. This DIY involves attaching dowel halves to the popular LACK shelf to create a sleek-looking floating sideboard.
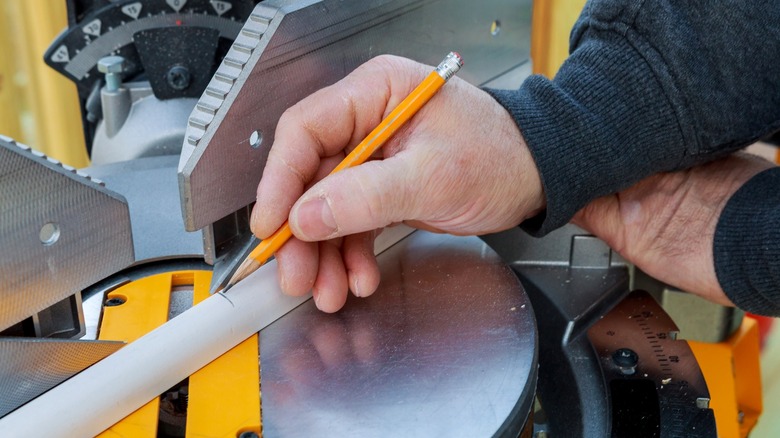
All you need for this project is a LACK shelf from IKEA that fits the space, some trim, wooden dowel quarters or halves, a miter box, a handsaw, and some paint and painting supplies. Of course, a drill and a screwdriver are also needed to install the shelf. After some measuring, cutting, drilling, and painting, you will have a unique sideboard that elevates the look of your living area and takes up almost no space.
How to DIY a floating sideboard from an IKEA LACK shelf
Making a DIY IKEA LACK floating sidebar isn't difficult. You just need a 2-inch-wide half round dowel rod (or two 1-inch-wide quarter round dowels), as this will match the LACK's thickness and create a clean transition between the shelf and the rounded edge. If you have trouble finding split dowels that size, you could try ripping a whole 2-inch dowel in half with a saw. Measure and cut the split dowel to span the LACK's length, and measure two smaller pieces to run along the shelf's sides toward the wall. Since the dowel pieces will connect at the corners, use a miter box and saw to create the corner angles. When you have everything measured and cut, use wood or construction glue to adhere the dowel pieces onto the sides of your shelf. Then, paint the whole unit, including the piece of trim. When the paint has dried, secure the LACK's hidden brackets to your wall before sliding the unit into place. Attach the trim to the back of the unit with wood glue, and fill any gaps with caulk.
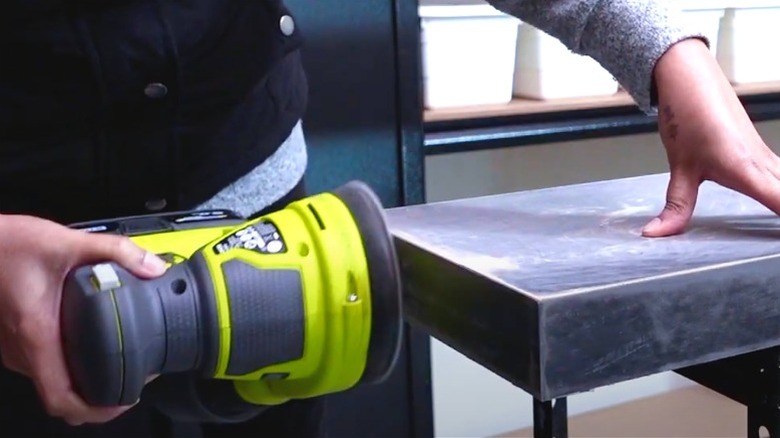
Since much of IKEA's furniture, including the LACK, is made of particleboard covered with laminate, special steps are required for painting it. First, you will need to sand it down a little with fine-grit sandpaper so the sideboard has enough texture for the paint to adhere to. Then you can prime and paint it. After the paint has dried for about 24 to 48 hours, apply a coat of sealant, and let it cure for an additional 48 hours. Ideally, you should do this before installing it; however, it can also be done afterwards.
Ways to customize this LACK sideboard hack
This creative way of using an IKEA LACK shelf is nice because it creates an area to store items without occupying floor space. If the price of this sleek hack appeals to you and you don't mind sacrificing a little of that floor space, you can add cabinets below it. You could either find shallow cabinets and mount the LACK shelf above them or make your own. Another customization option that would add more storage area to this DIY sideboard is mounting multiple shelves under the first one. You can then attach pieces of plywood to the sides of the shelves to connect them, creating a single, multi-shelf sideboard. To add privacy, a curtain track can be mounted to the bottom of the top LACK piece. Be sure to pre-drill holes for this, since particleboard can crumble if you don't.
If you want to expand the storage space upward on your wall, installing floating cabinets above your sideboard is another idea. Because the shelf is shallow, choose a shallow set of cabinets, or it may look awkward. If you are handy, of course, you could make your own. For a simpler modification that doesn't involve building anything or adding more storage, you can attach trim pieces to the sides of the shelf to create a lip that will keep things from sliding off. Adding a dark, elegant-looking, faux wood or patterned contact paper is another easy way to upgrade this hack.