The Essential First Step Mike Holmes Says To Do Before Any Bathroom Project

If there's one thing Mike Holmes never stops preaching, it's this: do it right the first time. And when it comes to bathrooms, that starts with proper waterproofing. Bathrooms are wet zones by design. Between daily showers, splashes, and humidity, they're the perfect breeding ground for mold, water damage, and rot. That's why Holmes insists the very first item on your renovation checklist should be building a solid moisture barrier. If you skip this step, all your hard work, no matter how pretty, can fall apart from the inside out.
Now, waterproofing goes beyond slapping on a bit of caulk or using mold-resistant drywall. You have to think of it as a precise system of layers instead. There should be a solid waterproof membrane behind every tile. Each fixture must be sealed off properly. And under your feet, especially in areas like the shower pan, it's extremely important to choose the right drainage for your bathroom design. The goal here is to build a watertight base before you even think about installing finishing materials.
That's because once moisture sneaks behind the walls or under the floor, you're essentially creating an environment for bugs and mold spores to thrive. And when that develops into a bad case of mold, fixing it usually involves tearing everything back out. So, in Mike Holmes' fashion, let's walk you through everything you need to know to get your bathroom project done the right way.
Start with the right materials
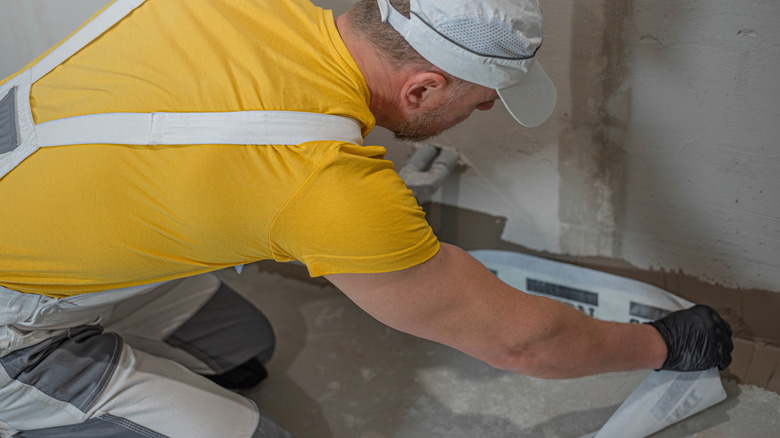
Pros usually use either sheet or liquid membranes for waterproofing. Some even combine the two. The biggest difference between these options is that sheet membranes come pre-formed, which makes them ideal for flat and regular surfaces. Liquid membranes, on the other hand, are brushed on like paint and are particularly handy around uneven or awkward areas. Your goal is to achieve complete, continuous coverage with no gaps or weak points.
For even more reinforcement, pair your membrane with quality backer boards. That's because these boards are water-resistant and designed specifically for wet zones like the bathrooms. Even then, you still need membrane tape, waterproof strips, and silicone sealant for the seams. That's because skipping over even the tiniest gap where the tile meets the tub or any other fixture can be the reason you find yourself dealing with swollen drywall, peeling paint, or mildew a couple of months down the line.
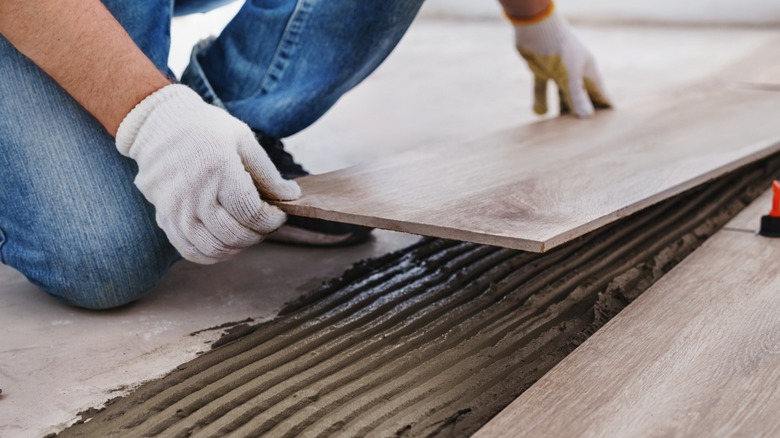
Now, how you layer your products also matters. With the bathroom floor, you want to go in this order: unmodified thin-set mortar, then an uncoupling membrane, another layer of thin-set mortar, and then your tiles. And for your bathroom ceiling, don't forget to pair the board with waterproof strips and corners. Once you lock in that waterproof base layer, what you install on top matters just as much. So, generally lean towards inorganic materials like ceramic, porcelain, and quartz because they are less likely to soak up moisture.
Avoid these common waterproofing mistakes
Even with the right materials, how carefully you use them matters. And unfortunately, this is where most homeowners, and even some contractors, tend to mess up. For starters, waterproofing products need a clean, dry, and solid base to bond to. If the substrate isn't properly prepped, the membrane won't stick, or worse, it'll peel or bubble later on.
Furthermore, if you're using cement backing boards, don't screw them directly into the studs without sealing each screw hole. Even with a waterproof membrane, unsealed fasteners around corners, benches, or niches basically create a path for water to run into your walls. Another area most people forget about is the top edge of the shower. If you're not tiling all the way to the ceiling, make sure you extend your waterproofing membrane above the tile, apply sealant, and finish with silicone caulk. If the gap is wider than 1 cm, use a backer rod to fill the space before caulking. In general, don't gloss over the corners and seams, even the points between the tiles and the window. Always reinforce these areas properly with waterproof tape or sealant.
And finally, don't rush the cure time. Every product has a specific drying window. So, read and follow the instructions even if it means waiting for a few hours. Otherwise, you may have to do this all over again. And don't forget ventilation. Waterproofing keeps water out, but without airflow, humidity still builds up and creates problems. So, determine what type of fan you need in your bathroom for excellent ventilation.