Use The IKEA Lampshade Hack To Create An Affordable Stone Light Fixture
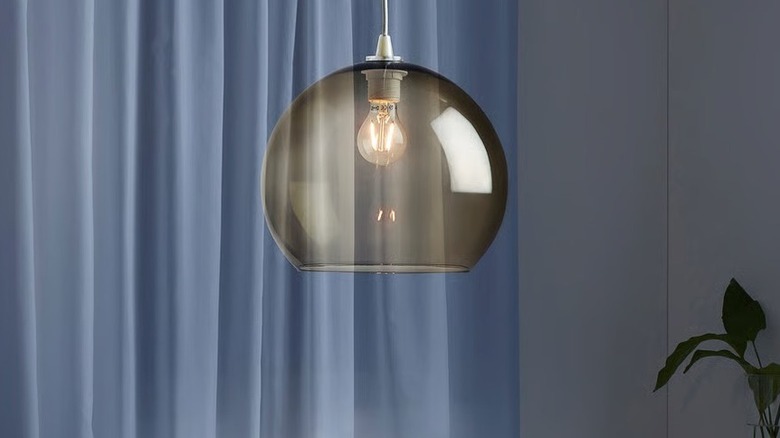
There's one particular homeware decor trend that is coming back around, and that is stone homeware, otherwise known as stoneware. As a trendy natural material, stone gives off an elegant, luxurious feel with a rustic edge. Stone has recently made its way into all categories of home decor. Vases, photo frames, dinnerware, decorative items, and even lighting. However, because of its luxury status, it also comes with a hefty price tag. That is where this impressive IKEA hack comes in. You can avoid spending a fortune on a stone light fixture and make your own using a $39.99 JAKOBSBYN lightshade covered in paper pulp to create a very similar effect for a fraction of the cost. What you're going to need is a lampshade, some newspaper, PVA glue, a light fitting, some cardboard, and your chosen color of paint.
This DIY light project will require some time and patience, but if you're willing to give it a go, you'll be pleased with the result. You'll want to start by making your paper pulp. Tear some newspaper into tiny pieces and put them into a bowl. Add enough warm water to cover the newspaper and let it soak overnight. The next morning, play with your mixture until it resembles oatmeal, removing any big lumps. Squeeze out any excess water and add a few teaspoons of salt and PVA glue to bind it together. You can store the pulp in the fridge for several days to keep it fresh before use.
How to make your own stone light fixture
Grab your JAKOBSBYN lampshade and cover it with cling film to act as a protective layer. Then, rip up some fresh newspaper into small pieces and cover the lampshade with it, sticking it down with a 1:1 mixture of water and PVA glue. Let it dry completely, then remove the lampshade and you'll be left with a papier-mâché shade.
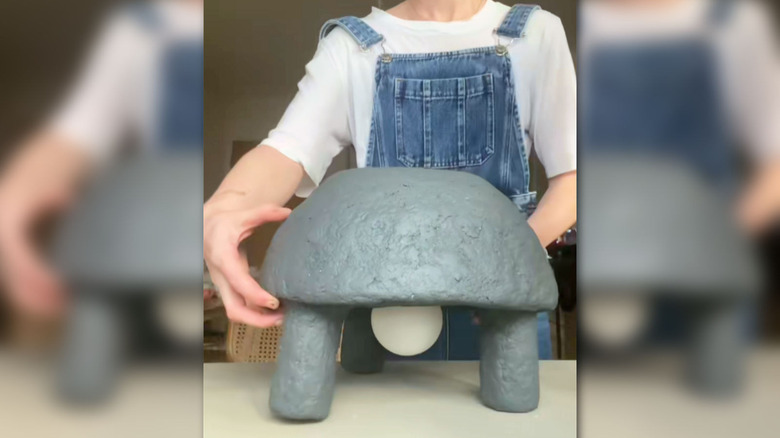
Make a base for your lamp shade out of a circular piece of cardboard and three toilet roll tubes to form the feet. Stick this to the paper lampshade using PVA glue. Now it's time to cover your lamp with the paper pulp you made earlier. Use your hands or a spatula to fully cover your new light with the pulp. It's important to let your lamp fully dry at this stage. We recommend placing it in the oven on the "keep warm" setting for at least five hours. Air-drying on your counter may lead to the lamp going "off" and smelling sour.
Once your lamp is fully dry, it's time to paint it. As the paper pulp imitates the look of real stone, consider using a neutral colored paint. Beige or gray would be a good option for this project. Acrylic paint will work best for painting the papier-mâché as it has a thick texture but will also dry pretty quickly, and can be found in most craft stores.