The Stunning Hack That Turns An Ordinary IKEA Find Into A Chic Bar Cabinet
Although some version of the bar cabinet has been around since the early part of the 20th century, they rocketed in popularity during the 1950s and 1960s, thanks to them being featured in movies like "Breakfast at Tiffany's." Suddenly, having a little Scotch, a splash of soda, and maybe even a bottle of red queued up and ready to go became très chic. And while the bar cabinets that loomed large in popularity during the Rat Pack days might be vintage now, there's a stunning IKEA DIY hack that allows you to turn an ordinary cabinet into the bar cabinet worthy of Hollywood during its heyday.
You'll build the foundation of this DIY from the IKEA IVAR cabinet. Normally, this cabinet hangs on the wall. However, you're going to pick the piece up off the floor, so to speak, by putting it on furniture legs. You'll also need a drill and possibly some screws, so that you can put it together. A circular saw is needed as well.
As is, the pine cabinet is plain. If you'd like it to add more color to the room it's in, add the stain of your choice to your supplies list, along with some cotton rags and sponge brushes. And it's not just plain in color. It's plain in design as well, which is why you'll want to pick up some Lugailly Square Wooden Dowels 3/8-inch by 15-inch and some Woodpeckers Square Wood Dowel Rod 36-inch by 1/2-inch. Also look for stylish wallpaper to decorate the inside. Finally, you'll need some wood glue, a nail gun, and nails.
Morphing the IKEA cabinet into a bar cabinet

Like most IKEA pieces, the IVAR cabinet doesn't come assembled — you'll have to put it together. In light of this, if you're going to stain it, you'll want to stain all of the cabinet pieces, as well as the square dowels, before you build the cabinet. Next, glue the dowels onto the front with wood glue. If you're worried that the glue won't be enough, reinforce the position of the dowels with small nails and a nail gun. You'll want to put the wallpaper on the inside back wall of the cabinet at this time, too.
To create visual appeal, vary the positions of the dowels by gluing them in a zigzag or staggered arrangement on the front to create a faux vintage IKEA piece that looks as if it came straight out of the mid-century modern era. The furniture of this era embraced simple geometric shapes. Once added to the front, the square dowels fit into this aesthetic.
The bigger dowels are longer than the front of the cabinet (where you'll glue them). As such, you'll need to trim them down a bit with the circular saw, so that they are only as long as the cabinet doors. Once the cabinet is put together, fit the piece with some furniture legs, like the Yes4All 4-inch Round Natural Solid Wood Furniture Legs, (or another kind that fits the aesthetic). Finally, due to the thin profile of the cabinet, you may want to bolt it to the wall to ensure that it stands securely once you add bottles of wine and liquor to it.
Leveling up the bar cabinet's design
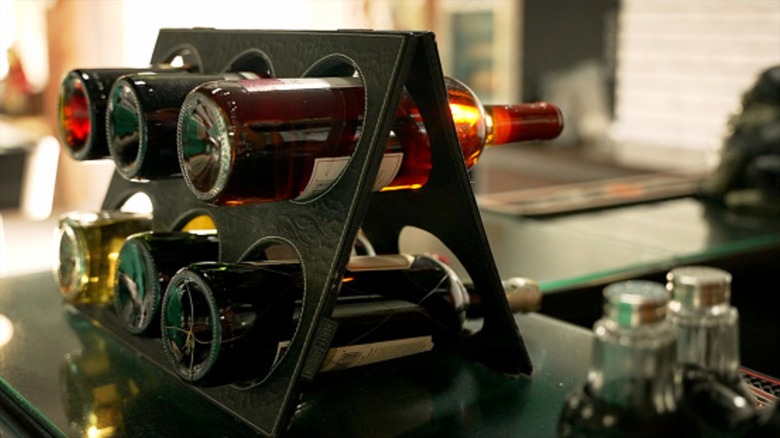
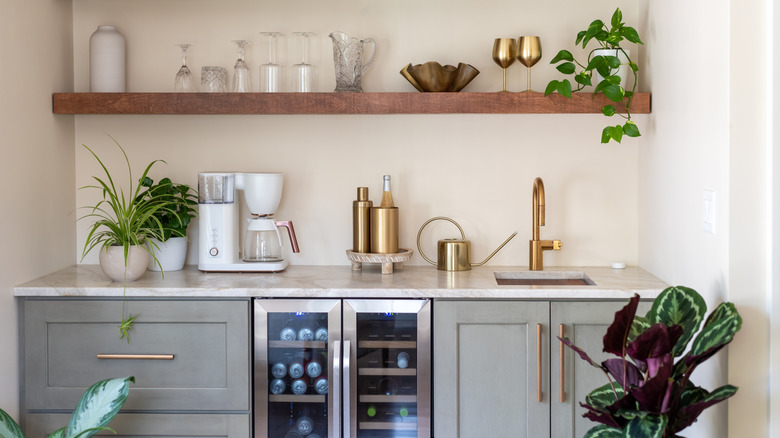
One of the most logical ways to make this piece a bonafide bar cabinet is to add bar features. For example, fitting the bar cabinet with a tabletop wine rack offers you another way to decorate the bar cabinet and elevate your serving station. The cabinet is only 11 inches deep, so keep that in mind when choosing what to place on top. The 12 bottle, TRUDING Three Tier Wooden Wine Storage Rack boasts a mid-century modern design and could be fastened to the top of the bar with a drill and some screws. And, because it's just over 6 inches deep, it'll fit on top of the cabinet with room left to spare. That said, do keep in mind that magnum bottles are as much as 14 inches tall, so you'll want to test the position of the wine rack on the cabinet before you fasten it to the top.
Once you fasten the wine rack to the top of the bar cabinet, add a GeLive Under Shelf Wine Glass Holder Storage Hanger to the inside of the cabinet. You'll screw the stemware rack on the interior's "ceiling." Finally, adjust the height of the first shelf so that you have enough clearance for the wine glasses, with room to spare to avoid chipping or breaking the glasses. Lastly, add wallpaper to the insides of the doors. It enhances the look of the cabinet's interior. More importantly, if you decide to leave the doors open during a party, the bar cabinet will enhance the room's decor, rather than detract from it.