Declutter Your Garage With A Clever Magnetic Storage Hack

For DIYers whose passion for making things has turned their garage into a mini Home Depot, storage matters. Especially if you still plan on parking your car in there as well. There are plenty of clever ways to increase storage capacity and accommodate bigger items, like your drills, saws, and hammers, but small items often get haphazardly stored or misplaced entirely. Take drill bits, for example. Not only do they come in different sizes, but there are also different types depending on the job. Thanks to this clever magnetic storage hack, you can clear that chaos and keep every bit neatly stored in one place, ready at hand for your next project.
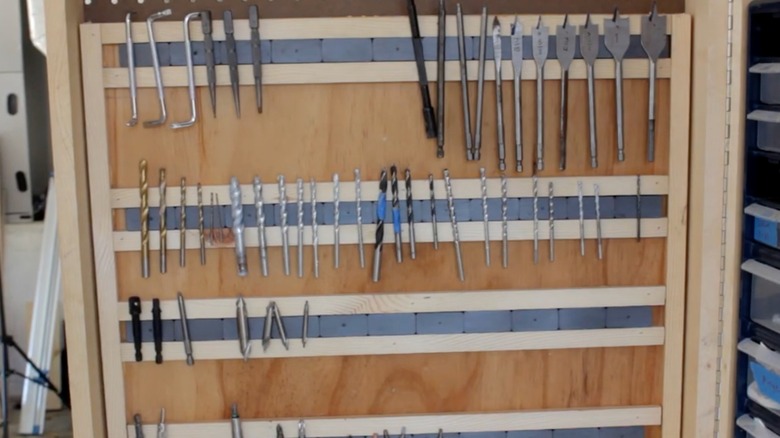
If you're even halfway serious about your DIY status, you're going to have a ton of them — and if they're scattered across shelves, drawers, and boxes, they're not just hard to find, they're adding to the clutter. The project is surprisingly easy to pull together. The stars of the show here are the magnets. Other than that, it depends on how and where you want to mount your storage solution. You could mount magnets on a board and attach that, or you could fix it directly to the wall. Like anything, there are simple and advanced approaches, depending on your preference. Which one you go with is up to you.
How to organize your drill bits using magnets
The first step is to round up all of your drill bits. If you're like most people, there's a good chance they're not all in one place. You might have some in their original storage containers, others in a toolbox, and still others on shelves around your workspace. Next, clear a space on your workbench and lay them all out according to type and size. This will let you know how much space you need for mounting them, as well as how many magnets you need to hold the drill bits in place.
When selecting magnets, opt for medium to high-strength options rather than lightweight magnetic tape, which often lacks the holding power needed for round metal pieces. Drill bits may seem light, but their shape makes them more likely to roll or slip if the magnetic grip isn't strong enough — especially in a busy workshop where vibrations or cabinet movement could send them tumbling.
You could stick the magnets directly to the wall, but then there's no flexibility if you ever want to move your workspace around. A better idea is to attach them to a piece of repurposed backing board, which you can relocate if needed. The lighter the color of the board, the easier it is to see the bits. Measure the space your drill bits have taken up on your workbench and get a piece of board that size. Next, measure out the rows for the magnets based on how many you'll need. Strong adhesives like epoxy work well for securing magnets to wood or metal; however, avoid using hot glue with neodymium magnets, as the heat can weaken their pull. Finally, mount the board to the wall and put your drill bits in place.