The Stylish Way To Hide An Unsightly Outlet (That's Also Childproof-Friendly)
We may receive a commission on purchases made from links.
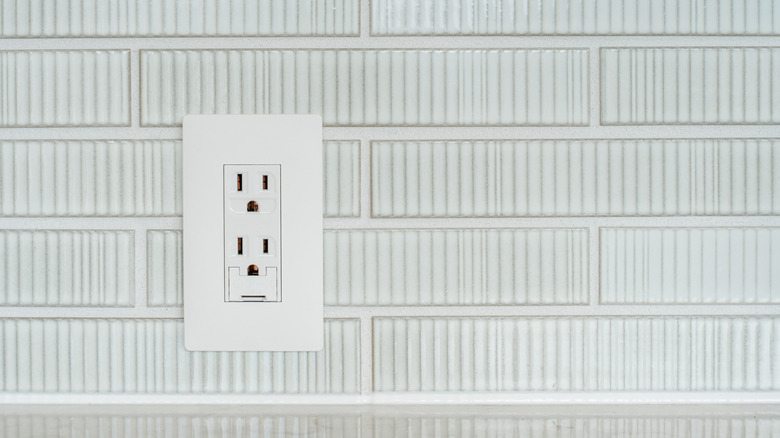
Anyone with a baby or a toddler knows that if they're not sticking their fingers in their mouth, they're likely jabbing them someplace else, and unfortunately, that someplace else is often an electric wall outlet. While plastic outlet covers can curb a kiddo's enthusiasm for outlet exploration and make your home more kid-friendly, those man-made accident-prevention barriers are pretty unsightly. If only there were a craft that allows you to combine the protection of a plastic outlet cover with the beauty of artwork. As it turns out, there is.
This project starts with a small piece of art of your choosing. The only real parameters are that it's large enough to cover the outlet and that it has a solid backing. For the former, art that's anywhere from 4 inches by 6 inches up to 8 inches by 10 inches ought to do it. Those sizes are big enough to cover an outlet, but small enough to fit into most tight spaces, like the inches above your wall's trim near the floor. For the backing, the artwork can have a thick cardboard back or it can be made of wood. You want to stay away from canvas art for this project.
You'll additionally need some Dreambaby clear outlet plugs or similar clear outlet covers. Buy two outlet covers for every outlet in your home you hope to hide. Finally, some E6000 craft adhesive, a pencil, this ENERLITES duplex wall plates kit, and a ruler are the final supplies you need to bring this kid-friendly project together.
How to assemble the artwork outlet cover
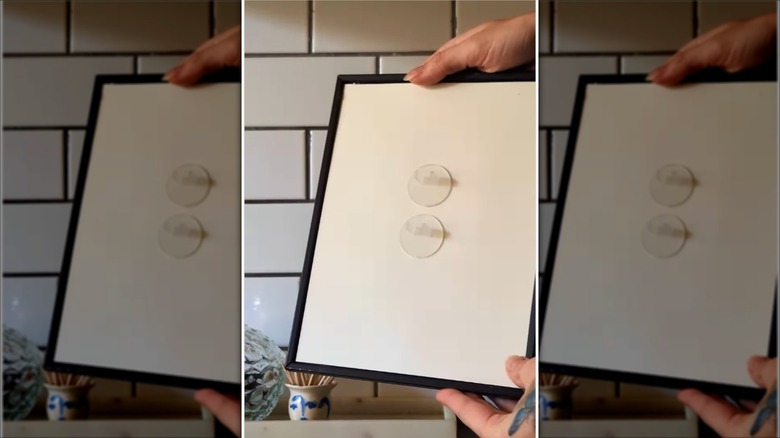
First, take the picture frame apart and draw a vertical line down the middle of the cardboard with the pencil and ruler, so that the piece will eventually hang straight. Next, draw one horizontally across the cardboard. This line's trickier. Its placement depends on how far the bottom of the outlet is from the floor or countertop. For example, if the bottom plug of the outlet is 7 inches off the counter and you have an 8-inch by 10-inch picture, then the outlet covers would need to be glued onto the lower-third portion of the cardboard. This would allow the picture to clear the counter, without looking like it's hanging too low. In other cases, you may need to mark the horizontal line right in the middle, or even on the upper third of the cardboard. At some point, the two lines will cross. You want this.
The next step is to place one of the wall plates on top of the cardboard. There's a hole in the middle of the wall plate. You want this hole to line up with the spot where the lines on the cardboard cross. The edges of the wall plate should be parallel to the edges of the cardboard to ensure the picture hangs straight. Next, trace inside the outlet circles to make two circles, remove the wall plate, and glue the backs of the clear outlet plugs inside the traced circles. After the glue dries, reassemble the picture frame and push the tongs of the covers into the socket to cover up your outlets.
More safety precautions you can take
One small Temple University study in 1997 showed that 100% of 2- to 4-year-olds could remove traditional outlet safety covers. In light of that, you may want to change the type of protective cover you use. You'll also have to adjust the type of picture frame you use, but there's a way to do this task that makes baby-proofing your home easier.
First, get a child-proof baby block outlet cover from the Baby Block Store. Instead of pushing the outlet covers into the socket, you're going to put a protective shell around the outlet. The design of this safety cover requires the box-style outlet cover to be opened with a key, which means that toddlers can't remove the outlet cover. The top of the box is flat, so you'll still be able to cover it with a picture. However, it's best to use double-sided removable foam tape for this.
You'll also want to go with a floating picture frame with a plexiglass cover instead of a traditional frame. With this style of frame, a photo "floats" inside of a plexiglass cover, which is, in turn, encased in a thick frame. The frame's design is such that you'll be able to see where to position the picture over the outlet. Place the double-sided tape on the front side of the outlet, position the picture over it, and stick it to the tape. This leaves enough room for you to stick the key in the side of the outlet cover, while keeping the outlet out of sight at the same time.