The Simple And Affordable DIY That'll Totally Transform Your Pantry Door
When you think about design opportunities around your kitchen, the pantry door most likely doesn't make the list. It's often plain, flat, and overlooked — a strictly functional feature that rarely gets the same attention as cabinets, countertops, or flooring. But that's exactly what makes it the perfect canvas for a dramatic yet affordable upgrade. A pantry door can take up a significant amount of visual space, so giving it a stylish facelift can shift the feel of the room. And the best part? This DIY doesn't require replacing your door or shelling out money on a pricey custom piece. With a few inexpensive wood strips and some finishing supplies and tools, you can create a design-forward feature that looks polished, modern, and made-to-order.
The reason this project works so well is simple: It delivers maximum impact for minimal investment. Instead of spending thousands of dollars on a speciality door, you're reimagining the one you already have. The strips of wood that you'll need for this simple way to upcycle a closet door are affordable — typically between $15 to $50 or more, depending on the size — and easily found at hardware stores. The techniques used are beginner-friendly, meaning you won't need any experienced carpentry skills to pull it off. What you're really doing is adding architectural character, giving a one-dimensional door plenty of personality. It can help turn practical storage space into an intentional element of kitchen design. Whether you add paint or stain to the surface, a simple pantry door makeover is proof that even the smallest changes can have a major impact on your space.
Creating a wooden herringbone pattern on your pantry door
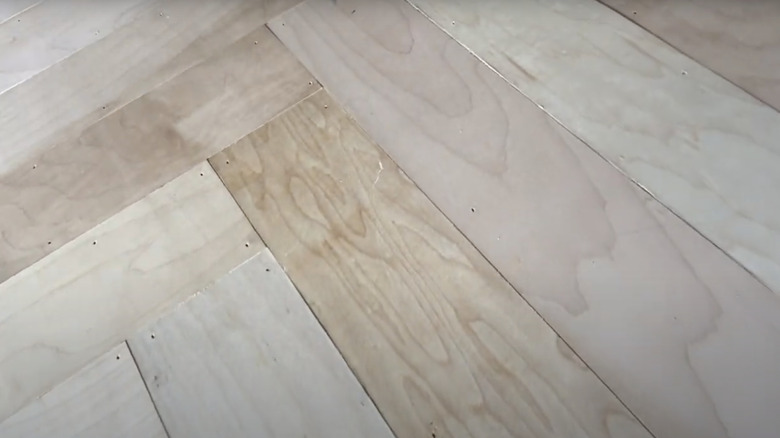
The herringbone design is back (with a twist), and it's at the heart of this DIY. The pattern instantly turns a flat, boring door into a textured, statement-worthy piece. Start by removing the door from its hinges and placing it on a flat work surface. Then, measure and cut the quarter-inch plywood into strips of your desired width. Arrange the slats flat across the surface of the door in alternating v-shapes that meet in the center, lining up the edges of each piece carefully to create that classic herringbone pattern. Once you're satisfied with the layout, attach the strips using wood glue followed by some finishing nails for durability. Continue until the entire door is covered, trimming excess where needed, and sand any rough edges. This prep ensures a surface that's ready for paint, stain, or sealant. By this point, you'll already start to see the transformation.
This project is packed full of customization options, but none of them are necessary for a polished look. The unfinished wood texture can, with a bit of sealant, provide a rustic, natural feel in your kitchen, especially when paired with other wooden accents. If you're drawn to warmth and richness, a dark walnut stain will give the door a timeless presence. On the other hand, if you prefer something bold and contemporary, paint or stain the herringbone planks in contrasting colors to create a vibrant mosaic effect. Don't feel locked into the herringbone pattern either. Experiment with a chevron pattern, reclaimed door-style verticals, or horizontal staggered planks if you want a different feel. It's striking how a simple pattern can elevate a door so dramatically.