You'd Never Know This Custom Built-In Coffee Bar Was Made From IKEA Cabinets
Getting custom built-ins for your home is often an expensive undertaking. However, it's possible to achieve a gorgeous built-in look by DIYing your own setup with some affordable alternatives. IKEA cabinets are the perfect place to start, allowing you to achieve the same vibe as custom built-ins without the steep upfront costs. Additionally, IKEA cabinets are perfect to turn into a coffee bar, thanks to the customization and variation you can achieve by mixing and matching different pieces.
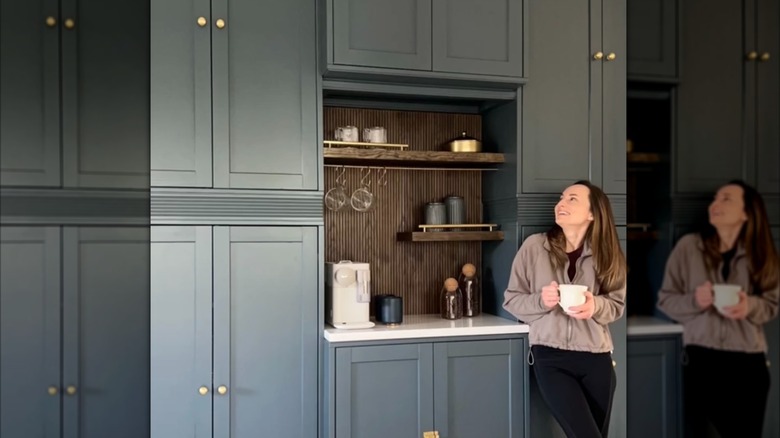
To create the DIY built-in coffee bar, you'll need four large IKEA HAVSTA cabinets, sized with a height of 52 ¾ inches and a width of 31 ⅞ inches. You'll stack two of the large HAVSTA cabinets, with one pair placed on either side of the wall. In between these cabinets, to create a coffee nook, install the smaller HAVSTA cabinets, one lower on the floor and one upper cabinet up at the ceiling, with space in between the two. The smaller HAVSTA cabinets are 35 inches by 31 ⅞ inches. The larger HAVSTA cabinets retail for $320 each, while the smaller cabinets cost $250. The final total will be $1,640 for the cabinets alone. It's important to note this estimate does not include the cost of paint, custom framing or shelving, or additional hardware and details used to complete the project. However, compared to a custom built-in alternative, which costs around $5,500, on average, you might be able to save a bit of money.
DIY a custom coffee bar with IKEA's Havsta cabinet
Before you dive into DIYing your custom coffee bar, it's a good idea to measure your space and draw up a plan for your ensemble. Depending on your space, you may need to increase or reduce the number of cabinets or reconfigure their layout. You can also mix and match cabinets in IKEA's HAVSTA series to achieve the look you want. Once you have your cabinets, begin by removing any wall trim, which will allow the cabinets to sit snug against the wall without any odd gapping. Next, you'll want to build supports and secure the cabinets to the wall studs. The IKEA HAVSTA cabinets have a thin backing, so it's advisable to add thicker plywood to the back of the cabinet for additional support. Building wood frames between the cabinets to attach to studs in the wall can also create support for the DIY built-in.
During installation, flip the upper cabinet upside down because the cabinet has a slight lip. By flipping it, the lip will be at the bottom, allowing the ensemble to be more uniform once all cabinets are in place. Once the cabinets are installed and secured, add trim pieces to clean up the look and hide weird gaps. Next, prime and paint your cabinets in your preferred color before installing hardware. Lastly, add any decorations or customizations you like so your DIY coffee bar suits your needs.
Other customizations to consider when DIYing a coffee bar from IKEA Havsta cabinets
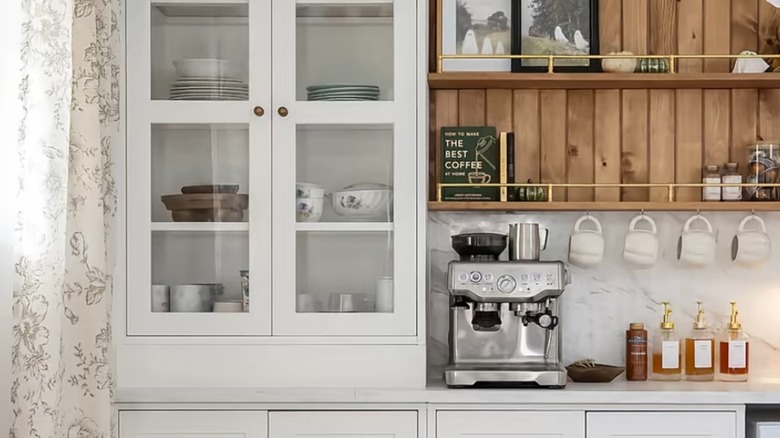
For added appeal, consider cutting trim pieces and attaching them to the sides of the cabinet to create a more three-dimensional look. Adding crown molding to the top and additional trim pieces in between the cabinets to hide the wood framing could also give the ensemble more polish. Additionally, if you want to add more contrast, you might consider adhering a backsplash to your cabinets — a wooden pole wrap with a darker stain can make for a luxe backsplash for the coffee bar. You could opt for tile, faux tile, wallpaper, vinyl, beadboard, or shiplap as a backsplash, instead. You also aren't limited to the HAVSTA series. Instead, you could create your ideal home coffee bar with a few fan-favorite IKEA items, like the BILLY bookcase.
Adding a small piece of quartz for a countertop can help to increase durability, but you could also leave the space as-is if you don't think it will get a ton of wear and tear. Other aesthetic considerations could include a pegboard, floating shelves, or a mug rack installed in the space between the smaller cabinets. Alternatively, you might choose to eliminate extra kitchen countertop clutter with a hidden coffee bar and nix the open shelving in place of an additional cabinet. For more functionality, consider drilling holes for cords and weaving them through the cabinet to hide power cords for your coffee machine or other appliances.