Upcycle An Old Baking Sheet Into Wall Decor That Doubles As An Organizer
We may receive a commission on purchases made from links.
Your old baking sheet may be too tired to bake cookies on these days, but you can still upcycle it into something equally useful and downright cute, to boot, like a family message board. Even better, the transition from worn-out cookie sheet to family message board and DIY wall organizer takes a couple of hours at most. And equally important for the budget crafter, this DIY can be pulled together at bargain basement prices.
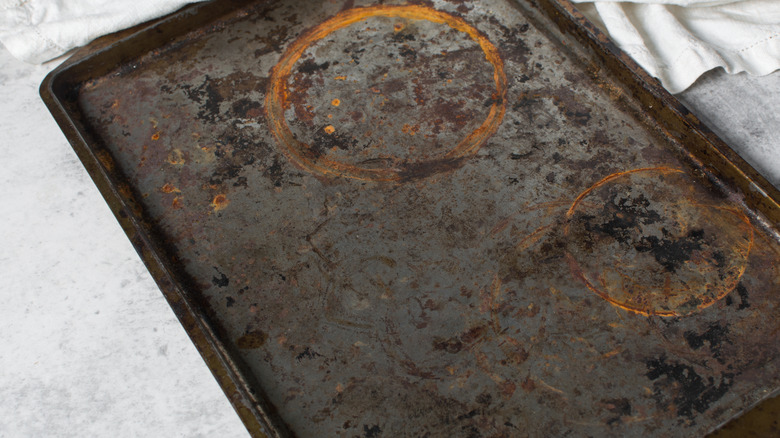
The baking sheet you'll need for this project can come straight from your cupboards if you have one you'd like to upcycle. If not, you'll find cheap thrifted bakeware for a DIY at a secondhand store or a local yard sale. You'll probably need a half-sized baking sheet for this project, which is 13 inches by 18 inches. A larger size than that might be too big and heavy to stay on the wall.
You'll cover the baking sheet with some Rust-Oleum gloss smoke gray spray paint (or another color of your choosing to match your room decor or the theme of the organizer). Wooden Crafter's Square clothes pins from the Dollar Tree, plus some Inc. 3D erasers, also from the Dollar Tree, are the raw materials necessary to add little clothing clips of cuteness to the board. Your project also requires Command strips, magnetic tape, a hot glue gun, scissors, and a small strip of cardboard to bring the project to completion.
Putting the wall organizer together
If you're of the mindset that a good coat of spray paint can fix just about anything, then you'll like this project. It requires a good amount of the spray-on pigment. But first, you need to prep the pan. After years of use, the baking pan may have baked-on residue and grease on it. Give it a good scrubbing with soap and water. If it's really grungy, try cleaning it with a paste made of hydrogen peroxide and baking soda. This allows the paint to stick better and helps keep the surface smooth.
Once the pan is dry, apply several thin coats of spray paint until you reach the coverage amount you prefer. Then, paint the clothespins. Clipping them onto a long strip of cardboard makes it easier to blast all of them with color mostly at the same time. When you're ready to paint the bottom side of the clothespins, all you'll need to do is flip the cardboard over. Attach some Command strips to the back of the baking sheet so that it can hang on the wall.
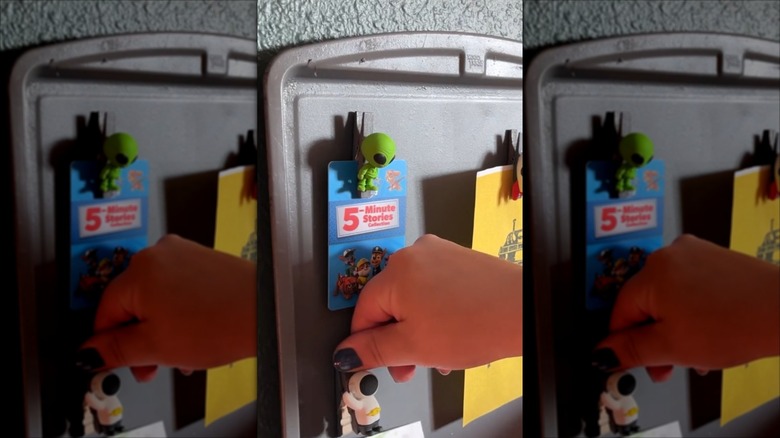
Next, glue some of the erasers onto the clothespins. (There's quite an assortment of them, with themes ranging from outer space to rock-n-roll.) You can also make decorations for the clips out of air-dry clay or glue on other embellishments. Or, simply leave them plain. Next, attach magnetic tape strips with 3M adhesive backing onto the opposite side of the clothespins. You might have to trim the tape down with scissors so that it fits the body of the pins. Finally, hang the baking sheet on the wall, and then, add the clothespin clips to the sheet. Any notes, photos, or recipes you want to keep in front of you can be clipped here.
Ways to take the piece to the next level
The spray paint typically covers metal just fine, but if your baking pan has a lot of blemishes, you may want to add a coat of primer to the cookie sheet before you paint it. This may be a better option for your DIY if you want more complete and even coverage because paint isn't a fix-all. In other words, it may not cover all the blemishes and wear off the baking sheet in time. And while you're still in the painting mode, you may want to stencil a message on the top or side of the board to indicate its function or to show off your sense of humor. For example, choose a stencil from the Keluna kitchen wall stencils — something along the lines of "Cooking is love made visible" or "Make tea, not war."
Finally, if you need more storage options for small items, consider buying some Jot magnetic round plastic containers from the Dollar Tree. If you'd like them to match the color of the baking sheet, tape up the window in the front of the containers, and coat the round containers with spray paint. Adding these to the mix gives you the option to store smaller items, like thumb tacks or rubber bands, on your message board. If you'd like to have some extra variety, paint them a different color than the one you used on the cookie sheet.