Declutter Countertops And Elevate Your Kitchen Decor With A DIY Solution

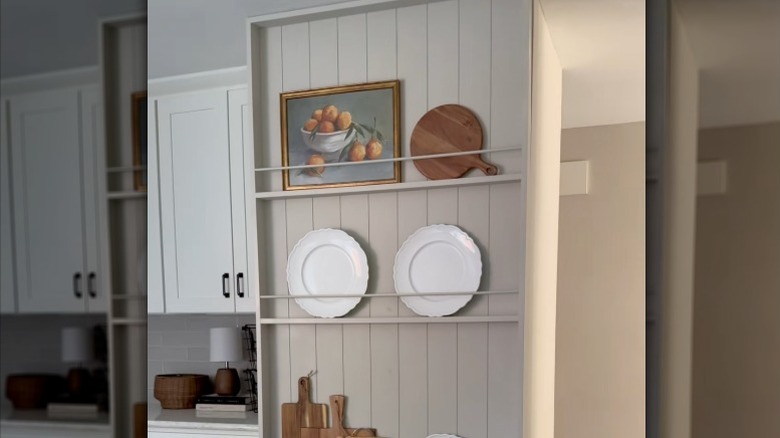
Designing a kitchen requires balancing functional arrangements and eye-catching elements. As a result, the decor pieces for this space often serve a practical purpose, such as upgrading storage or separating different countertop zones. One especially elegant example is the DIY plate wall rack designed by TikTok user everydaygracedesigns. The rack itself is an almost floor-to-ceiling shelf with shiplap backing that gives it unique visual character. By building this fixture and filling up the shelves with a vintage dish collection, some wooden cutting boards, or a couple of carefully selected art pieces, you can create a rustic aesthetic while clearing up the clutter that's plaguing your countertops and cabinets.
Though putting together your very own plate wall rack might sound like a daunting task, it's surprisingly straightforward with the right tools and supplies. For the frame, you'll need a selection of one-by-three boards, wood glue, and a brad nailer. To add the finishing touches, you'll also need some thick wooden dowels, shiplap wall planks or panels, cabinet screws, and a can of paint in the color of your choice. Hues that match your cabinets will ensure your project fits nicely into the room's existing palette. However, there are also plenty of unique kitchen color combinations to try out. This project could be the perfect springboard for doing just that.
How to put together your DIY plate rack wall
Before you begin, choose which wall you're going to situate your plate rack on, and measure it. The dimensions of the surface will inform you as to how large you can make your project. Next, you'll need to put together a box frame for your shelf using your one-by-three boards. Use your brad nailer and some wood glue to hold the pieces together. Once that's done, you can cut down more of the boards to use as shelves, and dry-fit them into place. Make sure to leave enough space between shelves for large dishes and framed decor. Also, consider using a level to make sure the shelves are perfectly straight.
@everydaygracedesigns DIY plate rack wall how-to! Follow for more simple home ideas. #diyplaterack #platerackwall #platerackorganizer #kitchenplaterack
When you're comfortable with the shelf arrangement, use more wood glue and nails to secure them in place. Next, attach your shiplap panels along the back of the frame with the same supplies and tools. Then, apply two coats of paint to everything you've assembled so far. With the main construction complete, you can cut down your dowels to match the length of the shelves. Paint the dowels and attach them to the frame just above the shelves, as far forward as possible. They'll function as railings. Use a stud finder to locate your wall studs and attach your plate rack to the wall using cabinet screws.
Tips for customizing your new plate rack wall
When you're assembling your plate rack, it's up to you to decide how many shelves it should have. However, if you try to cram as many as possible onto it, the fixture could end up looking cluttered. Limiting your rack to three levels should fix the problem. Also, during assembly, you should consider hidden kitchen outlets. Does the plate wall rack cover them up? If this is a concern, simply cut a hole in the shiplap backing that matches the size and location of the outlet.
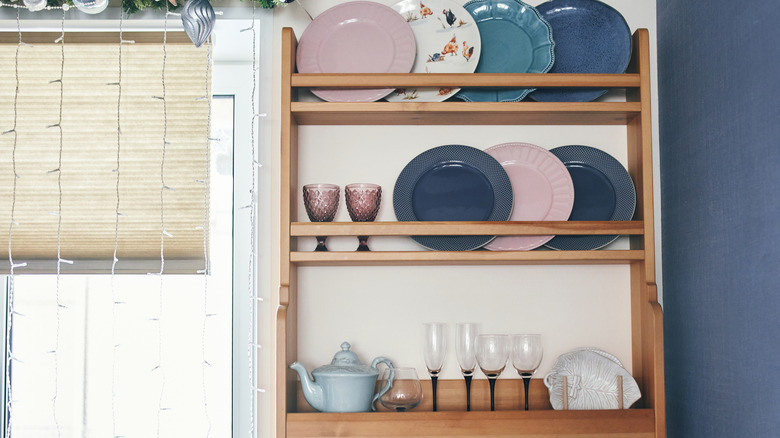
One of the best parts of this DIY plate rack wall is how easily it can be tailored to match the needs and aesthetics of your kitchen. You can use the rack for its most obvious function: displaying a set of dishes or fine china. Alternatively, use one of the shelves for oils, vinegars, and seasonings, making these items easy to reach. You could decorate the shelves with framed photos, an art piece, or other essential decor items for kitchen shelf styling. Go natural and place a few small house plants on them. Use small, thin containers or baskets to divide the rack's shelves, reducing clutter no matter what you choose to showcase.