The Easy DIY That Turns Dollar Tree Stickers Into Stylish Accessories
We may receive a commission on purchases made from links.
If you're a teacher or a parent making a chore chart, the Dollar Tree is probably your first stop when you're making sticker charts. The discount chain's assortment of stickers range from whimsical and quirky to downright pretty, giving you plenty to work with. However, if you're a savvy DIYer, then you also know to think beyond chore charts when you're in the sticker aisle. That's because with just a little ingenuity, the store's cheap stickers become stylish accessories, like earrings, when combined with items like Dollar Tree's plastic chopping mats.
Because the discount chain's assortment of stickers is so broad, you could feasibly make a new pair of earrings (or two) for every occasion or seasonal party you're invited to. Let's start with some Halloween earrings. For that, grab a pack or two of the Dollar Tree Halloween stickers of your choice. Do note that some of the sticker packs only include one of each kind of sticker. If you want a matching set of earrings, you'll need to buy two packs of the same kind of stickers to make a matching pair.
Next, you'll need to head over to the kitchen aisle to get some of the plastic chopping mats. While you're there, if the wooden cutting boards have caught your eye, you might be interested in a few other chic Dollar Tree DIYs you can create with those. A pair of scissors, some Dollar Tree earring hooks, and a UV resin and light kit from the OSBANG Store are among the additional supplies you'll need. Finally, add a lighter to your craft pile and find a clean surface to work on.
Putting this stylish DIY Dollar Tree accessory together
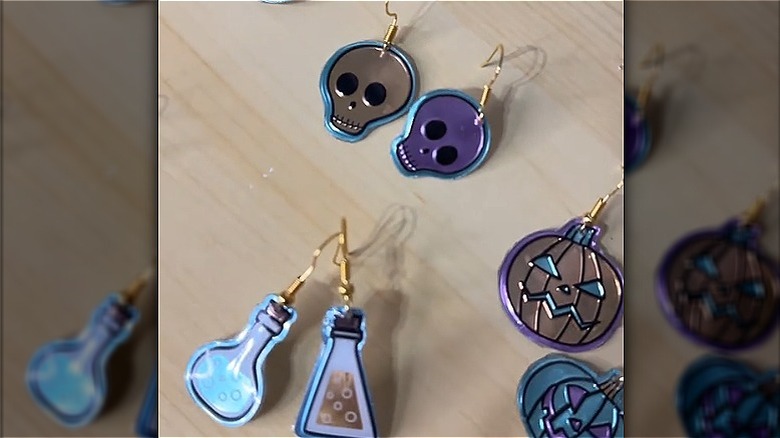
If you've ever used one of the plastic Dollar Tree chopping mats/cutting boards for food prep, you know that they're both surprisingly hardy and very flexible. That's why you're going to use them in this DIY as the backing for your earrings. The stickers are what you'll use to make the images for the front of the jewelry pieces. All you need to do is to stick two identical stickers onto the chopping mat.
After that, cut them out, using the sticker borders as the outlines for the earrings. When you're done, you'll have two stickers essentially mounted on form-fitted plastic backings. Next, puncture a hole in the top of the earring with a nail or the tip of your scissors. Or, if you'd like a more precise hole punch, use a tool like the revolving punch plier kit from the XOOL Store. To finish the earrings, treat them with the UV resin kit, if you'd like them to have extra protection, and then loop some earring findings (aka hooks) from the Dollar Tree through the holes.
You're also not limited to earrings with this DIY. Use them as decorative elements for a matching necklace or bracelet. And keep in mind that not all accessories belong on your ears. You can use this technique to make charms for bottles of wine and fancy wine glasses, too. Just add some bracelet and necklace findings from the Dollar Tree to a short chain or beaded string to create something cute and charming to decorate the bottles and glasses on your fall table display. Finally, you might want some clever ways to declutter and organize your jewelry to free up useful space.