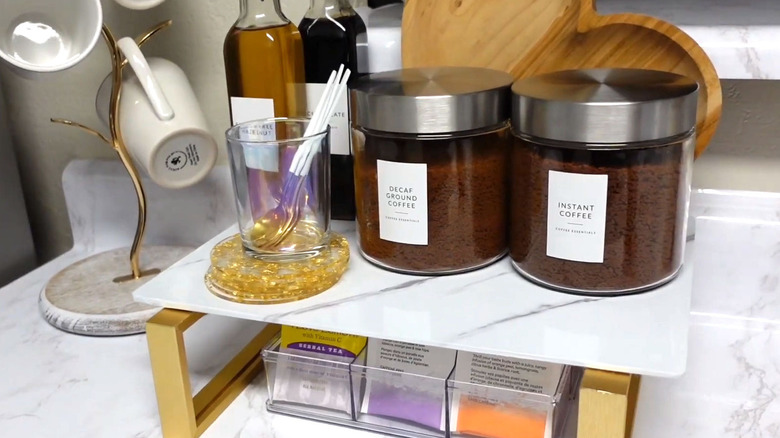
Organize All Your Coffee Supplies With A Simple And Stylish Dollar Tree DIY
For some, starting the day off with coffee is simple — no sugar, no creamer, just a quick cup out the door. For others, adding a variety of flavors and sweeteners is half the fun. However, when it comes to flavorful additives that personalize your coffee, bottles and containers can pile up, creating clutter that makes your morning routine more difficult. Fortunately, with this style-savvy DIY organizer, you can restore order to your beverage station by using just a few Dollar Tree supplies to make a creative home coffee bar.
This beginner-friendly DIY involves repurposing frames and wall art to create a simple but stylish stand to hold your coffee containers and add-ins. It also includes a storage container for holding any tea bags you might have on hand. If you want to recreate the look yourself, you'll want to pick up two rectangular frames, vinyl or contact paper, and a flat board — the Jot frameless chalkboard from Dollar Tree is perfect for this. For the tea holder, pick up three divided containers with a lid. Lastly, you'll need strong adhesive and a hot glue gun to hold everything together. You can even go the extra mile and make a DIY stylish mug display to go alongside your new coffee station.
How to make make an organized DIY coffee station with Dollar Tree supplies
The first step to making your own DIY coffee station is to prepare your supplies. For the chalkboard, you'll need to wipe it down to remove any dust and peel off the plastic label. If you're having trouble scraping the sticker off, you can use vinegar for an easier removal process that also helps cut some of the leftover residue. Next, if you weren't able to find plain horizontal frames for this project, you'll want to pop out any existing pictures or wall art. This may involve detaching the top of the frame, but don't worry — you can easily repair this with your adhesives.
Then, wrap your chalkboard with your choice of contact paper so that one side is completely covered. You may need a heat gun or dryer for this step. If you're unhappy with the color of your rectangular frames, you can also use spray paint for a custom look. Once everything has dried, use your adhesive to secure the frames to the bottom of your chalkboard, like legs.
The final step is to create your tea holder. If you're not into drinking tea, you can skip this step and start adding your containers. You can even add a jar for leftover coffee grounds to use in your garden. Otherwise, glue the lids together for a stable surface, then attach each container to its lid. This creates a divided holder perfect for organizing your different tea bags. You can also use it to hold coffee pods or even different packets of sweetener.

