Save Cabinet Space With One Genius And Affordable DIY For Coffee Mug Storage

We may receive a commission on purchases made from links.
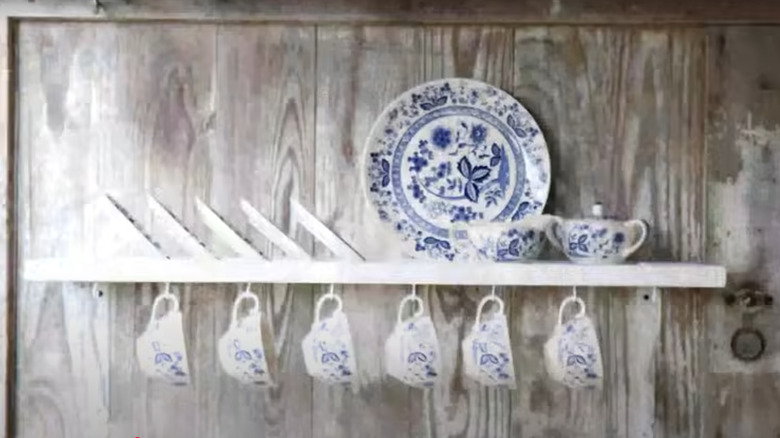
For those of us who are coffee mug lovers, collecting and showing off our cup collection brings just as much satisfaction as actually drinking out of them. As such, it's imperative that we find a cool way to display them. Enter the discarded window shutter. When MacGyvered just right, it becomes a quirky and cute coffee mug storage spot. And since this is a DIY that can be personalized, it's unlikely that you'll ever come across someone with a shelf that's exactly like yours.
This is a great project to try after a visit to an estate sale or auction, since they are both places you'll find items like discarded window shutters. They aren't just any shutters, but the old, beat-up-and-filled-with-character kind that works so well for shabby chic décor (and other similar styles, like country). You certainly can use newer shutters for this project, but if you want the mug shelf to be a bit more unique, go secondhand. For real authenticity for certain kinds of decorating styles, like rustic or vintage, opt for wood shutters instead of vinyl. That said, be sure to only get shutters with completely intact slats because they can be fragile. For this project, you will need a drill, a measuring tape, and a pencil. You will also need small PHITUODA Half-Inch Cup Hooks and IARTOPS Floating Shelf Brackets to transform the shutter into a mug rack.
Building the shutter mug rack
If you've purchased the shutter secondhand, there's a good chance it will need to be cleaned before you bring it into your kitchen. You may have to scratch off any loose paint with a scraper tool and give it a good sanding. If you want some of the shabbiness to remain, don't get rid of all the roughness –- just take off enough to ensure that paint chips won't drop onto your counter every time you pull a mug off the rack.
Next, take your measuring tape and pencil and mark spots on the shutter's frame. They should be about 4 to 5 inches apart. Drill holes on the marked spots and insert the cup hooks. You'll need enough space for each coffee mug or teacup to hang freely from the hooks. If you have tall mugs or feel like 5-inches isn't enough, make the distance between the hooks wider. During this step, you'll also want to measure spots for the L-brackets on the bottom of the shutter and mark them as well.
Both the marks for the cup hooks and the L-brackets will go on the bottom of what will become the shelf. In other words, don't mark both sides of the shutter. Once the holes are drilled, attach the hooks and the brackets to the bottom of the shelf. Hang the shelf up, then add the cups to the hooks. You can store items like bags of coffee, cups of creamer, or serving plates on the top of the shelf.
Gussying the shutter shelf up a bit
A paint job isn't just reserved for shutters outside of your house. Repurposing the shutters for this project can also involve a coat of paint or two. This is an especially good idea if the shutter's current color clashes with the décor in your kitchen (or wherever you want to hang the shelf). You can paint it all one color, or you can paint the slats one color and the frame another to make it more fun.
You can also use washi tape to make the shutter's frame mesh with your décor. For example, if you've gone retro in the kitchen, something like Songdao Vintage Washi Tape Pack would add a whimsical touch. Otherwise, go with a pattern on the tape that matches the decorative motif you've got going on in the space. Washi tape features just about every kind of color and pattern you could imagine from geometric shapes to Van Gogh-inspired scenes of sunflowers and starry nights. The sky's the limit when it comes to the design combos you can create from this inexpensive home improvement hack.