Keep Stove-Side Kitchen Essentials Organized With An Easy, Affordable Dollar Tree DIY
There's nothing better than a
where everything you need is within reach, especially those essentials you use religiously. No one wants to pace back and forth from a cabinet on one side of the kitchen to a drawer on the other just to grab a spoon. It's not the end of the world, but it does make the space feel a little more chaotic. So why not DIY a stove-side, turntable-style organizer using, drum roll, please...Dollar Tree finds? Because really, who doesn't love a good Dollar Tree hack with their super affordable items? This project can hold everything from stirring spoons and scissors to chip clips, straws, and even napkins.
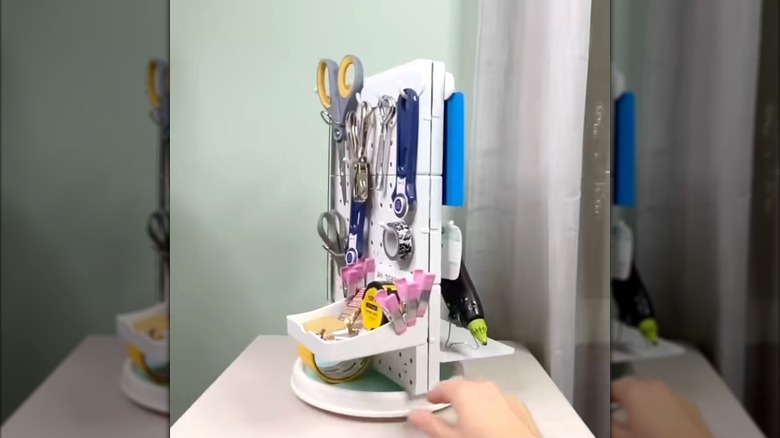
The inspiration for this kitchen turntable organizer comes from TikToker @emma.1993, though we're putting our own little spin on it (pun very much intended). While she used hers to hold craft supplies, it can work just as well in the kitchen. For this project, you'll need 12 Jot Large Square Peg Boards (each 8.75 inches square). They come in packs of four, so grab three packs. You'll also want one or two peg board cups (also available at Michaels), a few packs of Jot Loop Hooks (they come in sets of three, and how many you'll need depends on what you plan to hang), two or more shelves that clip into the pegboard, about 18 Jot Adhesive Rinks, an Essentials Clear Acrylic Rotating Kitchen Turntable, and a hot glue gun. With those supplies, you're ready to build a stove-side organizer that will have your guests asking where to buy their own. And that's when you get to casually drop your cool DIY story.
Crafting a DIY turntable for a stove-side organizer
To create a one-of-a-kind
organizer for your kitchen essentials
, TikToker @emma.1993 starts by hot gluing six pegboards together vertically so they stand tall rather than wide. You'll end up with two larger panels, each made of six pegboards. These boards usually come in black or white, but you can totally customize them, either by spray painting them your favorite color or covering them in patterned contact paper. Next, add Jot adhesive rinks to the outer corners of each large panel, then place about five more throughout the middle. Make sure to attach the rinks in the same spots on both panels so they'll line up perfectly when you stick them together. Press the two panels back-to-back, connecting them with the adhesive rinks to create one extra-large pegboard with pegs on both sides.
Then, glue the bottom of the shorter edge of your pegboard to the top of the acrylic rotating kitchen turntable. Now for the fun part, decorating and organizing! Add your small shelves and hooks, arranging them based on what you plan to store. You could hang measuring spoons, spatulas, or scissors, or rest rolling pins across two pegs. Use cups to hold chip clips, straws, or baking tools like hand mixer attachments. The shelves are great for small plants, leftover sauce packets, or measuring cups without hanging holes. Just like that, all your kitchen essentials are neatly within reach, and you probably maximized your kitchen countertop space in the process!