Incorporate The Scallop Trend In Your Garden With This Adorable DIY
We may receive a commission on purchases made from links.
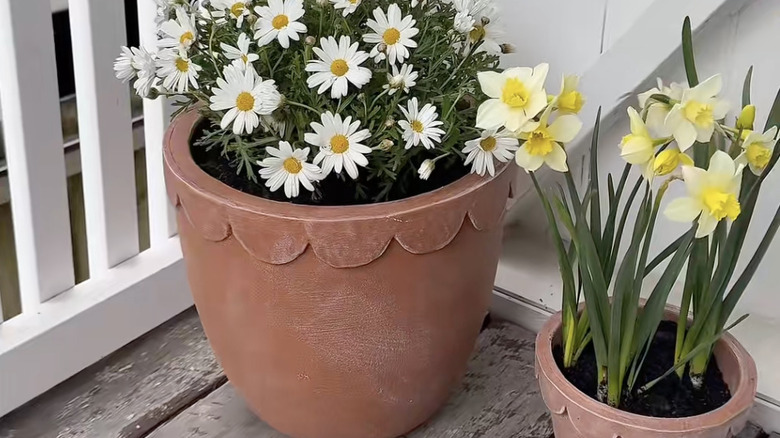
If your plain garden pots are boring you or you're tired of staring at the same terracotta planters every season, this is your sign to give them a quick and affordable makeover. You may already be familiar with some of the trendiest ways to incorporate scallop designs into your home. However, the scallop trend has now officially made its way into the garden. The look is easier to achieve than you might think. You shape some air clay into flat scalloped edging and lay it around the rim of a terracotta pot of any size. Once the clay is dry, paint the pot and your DIY embellishment to match.
This project is perfect for anyone who wants to refresh their outdoor space on a budget — and all without having to buy all new pots. You can completely transform even the most basic planter into something that looks chic and custom-made. The best part is that the materials are cheap, beginner-friendly, and available in any craft store or online. A 5-pound container of Crayola Air-Dry Clay costs less than $14, a set of Linphcey Clay Sculpting Tools costs about $7 (or you can use a butter knife), and a jar of terracotta-hued FolkArt Super Thick Textured Finish Acrylic Paint costs about $6. You probably already have a rolling pin. It's a fun project to do on a quiet weekend, and it adds some whimsy to your garden.
How to use air-dry clay to create a scallop-patterned planter
Start by rolling out your air-dry clay until it's about ¼ inch thick with your rolling pin. Using a clay cutting tool or butter knife, cut out a scalloped strip long enough to fit the circumference of the pot — measured at the rim, not the base if your terracotta pot tapers. If freehand cutting feels intimidating, try sketching a scallop pattern on paper first, cutting it out, and laying it flat on the rolled-out clay. Then trace around the paper template before cutting out the strip.
Gently press the clay strip onto the surface of the planter and smooth down the edges with your fingers. If you're worried about it coming loose, use a small amount of E6000 adhesive to help it stick securely. Leave the clay to dry out completely — about 24 hours. To kill some time, and while you've got your rolling pin and air-dry clay out, you could make these cute DIY clay leaf dishes that bring the fall vibes indoors.
After the clay is dry and firm, paint the entire pot with the terracotta-colored acrylic paint. Alternatively, this is where the fun part comes in. Choose a different color to paint the pot, perhaps one that better fits your existing garden aesthetic: a clean white finish, a soft pastel, or go bold with gem tones. Add a speckled finish for texture. Or you could give your planter a two-tone look by painting the scallops in a contrasting hue. Store leftover acrylic paint with a simple Dollar Tree DIY hack: build a storage tower from wire napkin and paper towel holders.