DIY Spinning Shoe Storage With A Budget-Friendly Idea From TikTok

We may receive a commission on purchases made from links.
When it comes to maximizing shoe storage space, the savvy home organizer would do well to look beyond the obvious. This is particularly true when living in a tiny abode where you need to work with vertical storage and unconventional ways of accessing shoes due to space constraints. Take the spinning shoe rack. It can be made tall enough to fit in a corner that's not much bigger than 14 or 15 inches across. It also taps the whirly bird function of the lazy Susan. The fact that these storage units have this unconventional feature is exactly why they're perfect to maximize your shoe storage space. Their design basically doubles your shoe storage space.
The basic build for the turntable shoe rack involves — unsurprisingly — TamBee 12 Inch Lazy Susan Hardware, (or something like it), which you put on the bottom of the unit to make it spin. The turntable bearing is the same kind of hardware you'd use if you were inclined to make your own lazy Susan. The shelves of the shoe rack are made of round boards. They can be as wide across as you need them to be, and if you're handy with a jigsaw or bandsaw, you can make them yourself.
If you're not big on sawing stuff yourself, use some PONGJA 4-Pack 12-inch Round Wooden Plaques. The 1-foot diameter of the wood rounds should be big enough to hold a couple of pairs of shoes. The project also requires a drill with some long screws, perhaps some 2 ½-inch ones or longer, a saw (maybe, depending on your preferences), and some 1-inch dowels.
Putting the spinning shoe storage rack together
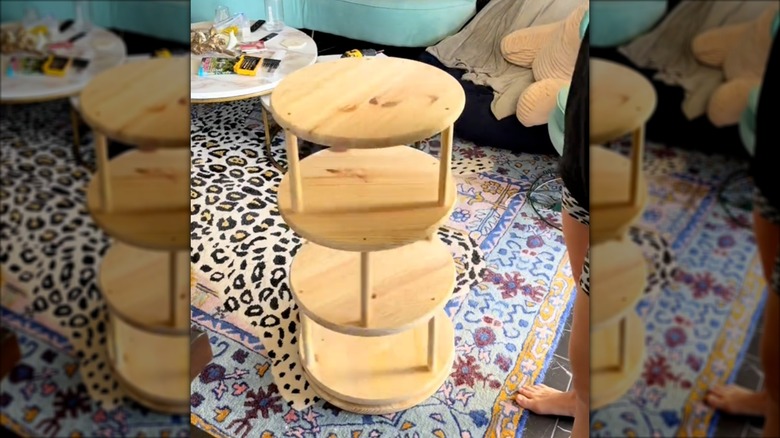
The shelf needs legs, which you'll make from the dowels. To make enough room between each of the stacking shelves, cut the dowels so that they're long enough to give your shoes plenty of clearance room. Making them between 9 inches and 12 inches long each ought to do it. If you'd like some precut dowels, try Yaliuliu 1-Inch by 12-Inch Unfinished Round Wooden Dowels.
Once you cut those to size, drill three holes in one wood round that are equal distance apart. You'll add holes to all of the wood rounds. However, you'll alternate where you put the holes. If you don't, the holes you drill in the tops of the rounds will hit the heads of the screws and the dowels on the shelf below. One round, the bottom one, will have only three holes for the dowels. The others will have six holes.
Next, drill a hole on each end of the dowels, right in the middle. Pre-drilling holes in the dowels stops the dowels from splitting when you put the screws in them. Add the dowels to the wood rounds. When you're ready to add another shelf to the unit, it'll be easier if you screw the dowels into that shelf before attaching it to the whole unit. Stack the new shelf on top of the dowels of the previous shelf and screw the shelf on. Continue stacking the shelves until the unit is built. Attach the turntable bearings to the bottom of one of the wood rounds and then fasten that to the bottom shelf of the unit to make it turn.
Personalizing the spinning shoe rack to fit your space

In a pinch, the spinning shoe rack will work without embellishments. If you're storing it in the closet, this will be less of an issue for you as a home decorator because the unit will be out of sight. However, the plain wood shelf has the potential to be an eyesore if the raw wood look doesn't match the rest of your decor. Fortunately, tools like paint, contact paper, or decoupage designs help you to cover the plainness of the shelves and even have the potential to make them look like an intentional part of your design style.
To create visual contrast on the shelves, paint the dowels and the outside edges of the shelves a bright color, like bright red or teal. Then, to protect the surface of the shelves to keep your shoes from scuffing them, trim some ZRJT Peel-and-Stick Vinyl Floor Tiles so that they custom-fit the top of each round shelf. If you go this route, you may find it easier to fit the shelves with the tiles before you add the dowels. That way, you're not trying to cut around the dowels as you trim the tiles.
Or if you'd like to turn furniture into art, try painting the shelves and then decoupaging the tops of them. This allows you to tailor the design of the shelves specifically to your taste. It's also a pretty budget-friendly way to go, particularly if you use items like old magazines or scraps of contact paper that you already have in your craft supply room.