Instantly Elevate Your Kitchen Cabinets With This Affordable DIY (It's So Simple)

We may receive a commission on purchases made from links.
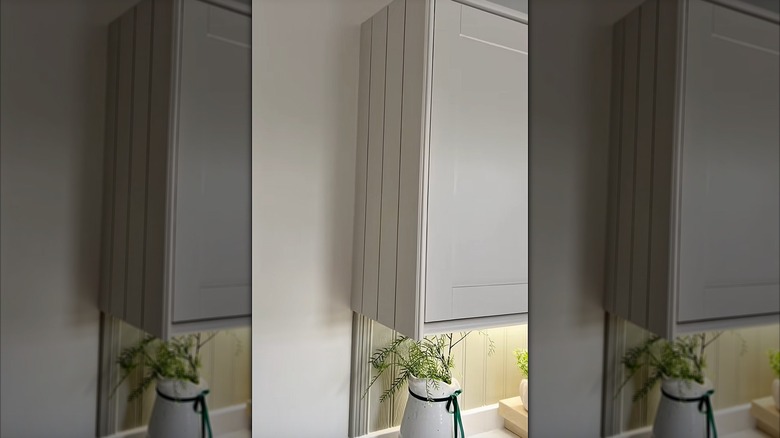
Kitchen cabinets are incredibly useful for keeping all your cooking tools and pantry staples neatly tucked away. Sometimes, however, the side of a cabinet is left exposed, maybe even one that's unpainted. Unfinished cabinet ends are flat-out ugly, and having one in plain sight can really put a dent in the cohesive kitchen vibe you're striving for. While you might have thought you just have to live with it, at least until your next kitchen reno, you don't. You can switch things up with a simple DIY. To decorate the boring sides of your kitchen cabinets without tearing anything out or getting overly crafty, just add paneling and paint it.
For this clever cabinet upgrade tip, you'll need some wood panels. Measure the cabinet side so you know exactly how many planks to buy. Full-coverage panels should line up evenly with the side of your cabinet. Wall cabinets, for example, are typically 12 to 42 inches high and 15 to 24 inches deep. Get some raw timber planks, like these 3-inch-wide by 4-foot-long White Pine Wood Boards. You'll also need some decorative Cinnvoice Wall Molding Trim or IKEA BODBYN contoured deco strip in off-white. This hides the vertical, front-facing cabinet edge, so you're not left with an awkward, unfinished look. You'll also need a measuring tape, a pencil, a hand or electric saw, and adhesive (like a quality wood glue). Don't forget to buy some primer and paint or wood stain in your choice of color, too.
How to hide the exposed side of your kitchen cabinets
If you plan to stain the wood or create a pop of color in your kitchen with paint, choose any hue that catches your eye — maybe trending sage green or bright and cheery sunshine yellow. However, if you want your new decorative cabinet end to match your existing cabinets, take a photo of a cabinet door to bring with you on a visit to your local home improvement store. To find the closest match, pick several paint swatches closest to your cabinetry color. Once you've matched the color, head back to the store to purchase your paint or stain.
Once you've measured and cut your wood planks and trim to size, prepare the surface of the cabinet end for the adhesive. Wipe away any dust and then clean the cabinet with warm water and mild dish soap. Once the cabinet is completely dry, apply the wood slats in a neat vertical row using the adhesive. Finish off the edge with your piece of decorative trim for a clean, flush edge. Now, prime and paint or stain the cabinets, and let the finish cure before using the cabinet.
@idealhomeofficial ✨ We're obsessed with this DIY trick from @Jillyshumblehome, it's so simple, yet so incredibly effective! #Homehacks #IdealHome
If you find simple panel and trim boring, create a custom design — for a modern farmhouse look, try a border of Luxdecor White Shiplap Boards with another panel down the center. Alternatively, use an already finished paneling product, like self-adhesive Inno Stickers 4-Piece Wood Slat Wall Panel in Natural Oak. The latter option will save you a lot of time on application and painting or staining. Voila! Your cabinet just got a major upgrade for far less than the cost of the tools you need to get started making custom cabinets.