Easily Fix Cracks In Shower Grout With A Quick Solution
We may receive a commission on purchases made from links.
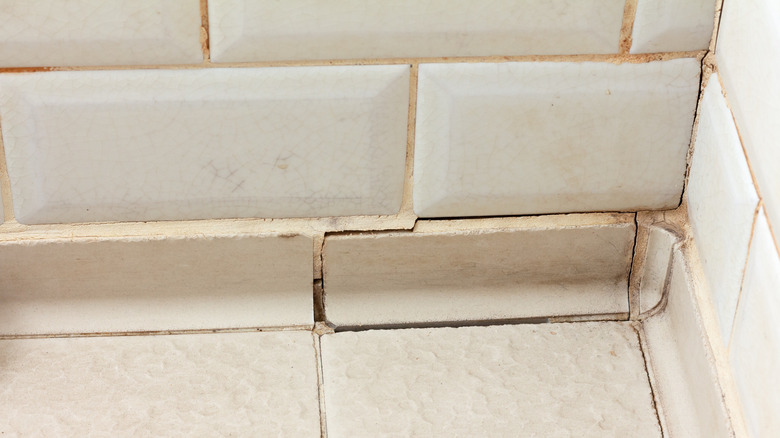
Your bathroom is a somewhat paradoxical space; it's where you go to clean yourself up after a long day, but it's also one of the places that can become your biggest health risk if left unchecked. Having an enclosed space with excess humidity and moisture from hot showers — not to mention standing water in the toilet – is a recipe for mold growth. Prolonged exposure to indoor mold can lead to health concerns like asthma, mood changes, and an afflicted immune system, according to Harvard Medical School. Unfortunately, you're not always going to see those black or pink splotches in plain sight. Your shower might be full of hidden mold, and one place where it hides is within unsightly cracks in the grout. Luckily, this kind of shower damage is an easy DIY fix if you get your hands on some grout powder. Simply mix the grout, apply it generously to the crack, wipe off any excess, and allow it to dry.
Mold development isn't the only reason to be concerned about cracks in your shower's grouting. Grout is a dense filler material that seals the gaps between tiles. This not only prevents water and grime from getting inside those joints; it also makes your tile installation more durable. For example, grout can act as an energy absorber to take on damage in place of your wall during an earthquake. Thus, fixing any cracks you find in this filler should be of the utmost priority. Doing your own grout repair is a cheap fix, requiring little more than some water and grout powder, such as this 10lb Polyblend Plus Non-Sanded Grout. For more extensive cracks or crumbling grout, you may also want to use a grout saw to remove some of the remaining grout and give yourself a fresh slate to work with.
Using non-sanded grout powder to fix cracks between shower tiles
There are some key differences between sanded and non-sanded grouts. The sanded variety is grittier, thicker, and more durable, making it the perfect grout for filling the gaps between floor tiles where you'll get frequent foot traffic. However, non-sanded grout is stickier and less likely to damage or grind down surrounding tiles, which makes it ideal for vertical spaces with joints that are smaller than ⅛ of an inch. Because of this, non-sanded grout is generally the best route to take for filling in cracks around your shower tiles.
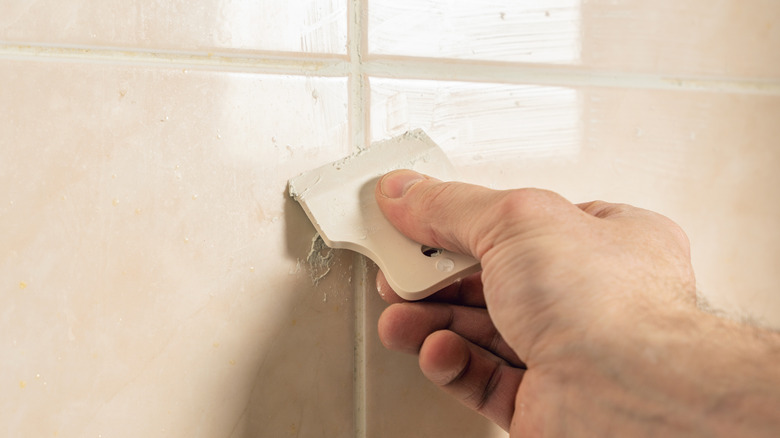
The actual process of "patching" this grout is about as simple as it gets. The grout powder you buy should come with explicit instructions on the ratio of powder to water you need to mix. For a small shower repair job, you can easily mix the grout by hand in a small container like a Solo cup, using a trowel or other similar tool. The grout should be mixed to the consistency of peanut butter with no visible dry clumps, and you can sprinkle in extra powder or water if your concoction is too moist or too dry. The mixture should sit undisturbed for about 10 minutes to set, but it will harden completely anywhere from a half-hour to an hour after setting, so only mix your grout when you're ready to apply it. If the cracks are in an awkward corner of the shower or too small to need a trowel, you can scoop the grout directly onto the cracked area and push it in with a gloved finger. Be sure to wipe the excess clean with a damp sponge after about 15 to 30 minutes, and then leave it to cure for about 24 to 72 hours.
Experiment with grout color and watch for future discoloration
It's also worth noting that grout powder comes in a variety of colors to match or accent the shower tile. If you're repairing pre-existing grout in the shower, you'll want to buy a color that seamlessly blends with the existing grout to avoid any visible signs of a repair job. However, this opens an opportunity to further customize your bathroom during the repair stages. If the cracks are extensive or you want to completely reinvent your space, you can buy a funky grout color to either replace every joint or just add pockets of interest in the shower. You'll want to be careful with your color choices, though. Mold can blend into some grout and caulking colors just as easily as it hides in cracks. While it can be frustrating to wonder why your grout is turning red, it's better than not noticing the "Pink Mold" (technically a bacterium) in the first place.
You might also consider an epoxy grout for your shower tiles, as mixing epoxy does not require any water and the material is water-resistant. Unfortunately, epoxy grout usually creates an obvious contrast to traditional concrete-based grouts because epoxy is more stain-resistant, so it's best not to mix-and-match if your bathroom is already built using one or the other. Regardless of how you choose to fill those cracks, it's important to do so as soon as possible. Few things are more important than getting your shower in tip-top shape so you can feel better about spending (probably) a little too long relaxing under the hot water.