The Creative Hanger Hack That Instantly Gives Any Closet An Elevated Look

If you've been wanting to spruce up your closet, you don't necessarily have to depend on IKEA supplies to pull off a luxury upgrade. While those pieces are definitely nice, maybe you're seeking something quick and creative that elevates the look of your closet without requiring a full overhaul. That's where this little hack comes in — giving your wooden hangers a simple makeover. You might not realize it, but your hangers actually play a big role in the overall look of your closet. Matching hangers, for example, instantly make the space feel neat and cohesive, while wooden or velvet ones add that extra touch of luxe.
For this hack, we're taking the wooden hangers you may already have and giving them a little extra charm. All you need is a paintbrush, Mod Podge Matte, a wooden hanger (or a few), and a decorative napkin, or more if you want to make multiple or switch up the designs. And the best part is you don't need to be super crafty to pull it off. With just those supplies, you'll be able to transfer decorative napkin designs onto the hangers, leaving you with a beautiful piece to drape your clothes on. And if you don't have any wooden hangers on hand, consider swapping in a set of wooden hangers from IKEA.
How to turn plain wooden hangers into functional luxe closet decor
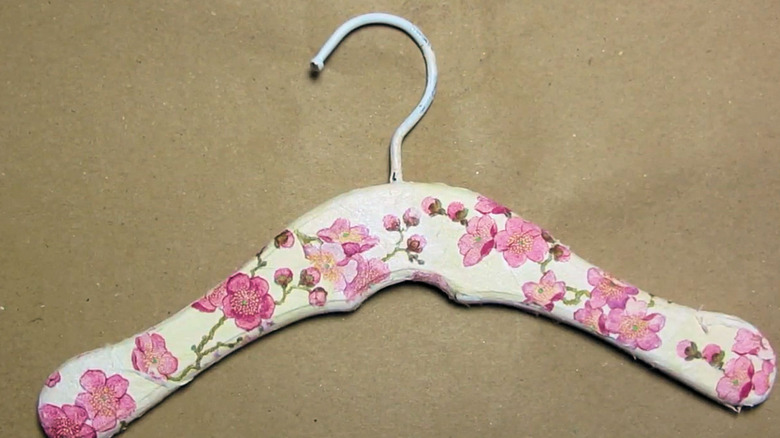
This chic DIY hanger upgrade, which repurposes decorative paper napkins, is so simple and stylish. To start, choose a decorative napkin with a design or pattern you'd love to see on your hanger. Cherry blossom napkins would be adorable, but florals, festive holiday prints, or any pattern you love will work. Once you've picked your napkins, gently peel off the backing (the plain layer without the design) and toss it. Then, cut out the parts of the napkin design you want to feature and set them aside. Just make sure you have enough to cover the entire hanger. Next, grab your Mod Podge Matte and paint a thin layer over the entire wooden hanger.
Once that first coat is on, press your cut-out napkin pieces onto the hanger until it's fully covered. A helpful trick for smoothing everything out is to place a piece of plastic, like the cut-off side of a Ziploc bag, over the design as you work. This gives you more control, keeps your hands clean, and helps the design lay perfectly flat. After your hanger is completely covered and smooth, apply another coat of Mod Podge over the top and hang it to dry. And that's all there is to it. Just remember you're working with napkins, so go slow as they're flimsy and can tear if you rub too hard. If you're gifting your crafty creation, you might even consider attaching a matching ribbon around the top for an added touch.