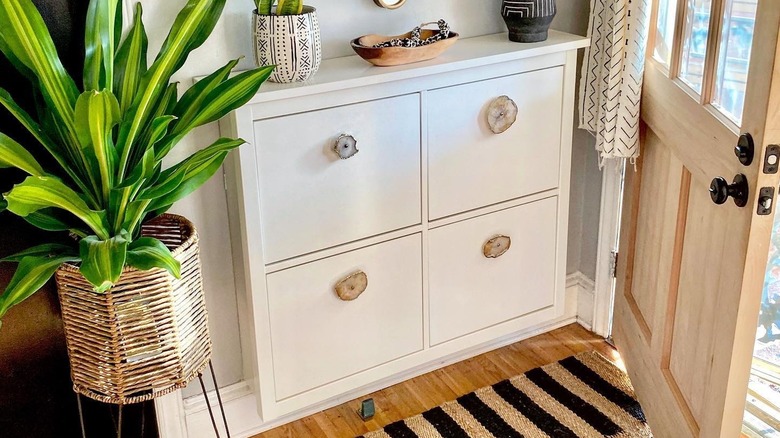
How To Turn An Old Shoe Cabinet Into The Perfect Place To Charge Your Devices
We may receive a commission on purchases made from links.
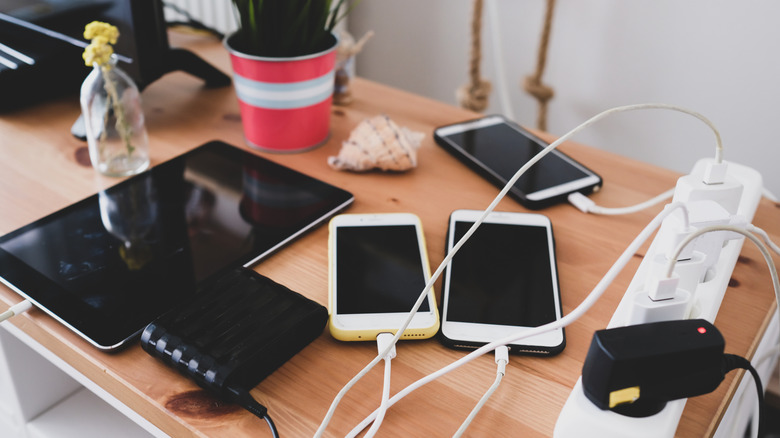
Home organizers who feel frustrated with all the unsightly tails that come with phones, laptops, and tablets get an unexpected bit of organizational luck when they bring IKEA's STÄLL Shoe Cabinet into their space. The drawers in the wall-hugging cabinet work as well for sorting out a jumbled mess of electronics cords as they do keeping shoe clutter hidden without taking up much space. In other words, the IKEA piece becomes the perfect place to charge all of your devices.
The key lies in how the IKEA STÄLL's drawers are constructed. The front facade of the drawers is made from a solid piece of particle board. However, the backsides boast a plastic wall that's filled with large holes. When shoes fill the cabinet, the holes allow the footwear to get airflow. When a four- to six-outlet plug extender sits in the drawers, the holes in the back of the panels allow for easy access to the wall outlet. There's no drilling involved, thanks to this design feature in the IKEA piece.
The project's supplies require the IKEA shoe storage cabinet and a TESSAN Surge Protector Flat Extension Cord (or something like it). From the factory, the IKEA piece is white. If you'd like to paint it so that it matches your decor, you'll need some painting supplies: paint and primer, roller brushes, a roller pan, a sander, and fine-grit sandpaper. Finally, you'll also need some Art3d Hook and Loop Tape, (an item that's more commonly called by its brand name, Velcro).
Turning a shoe cabinet into a charging station
If you're planning on gussying up the IKEA shoe cabinet with a little paint, you'll want to do that step first. Otherwise, you'll have to work around the power strip that's going to go into the bottom of each drawer. Start the painting process with sanding: The IKEA piece is made from particle board, which won't hold onto paint and primer as well unless it's sanded a bit first.
@rinerevisions Shoe cabinet turned media storage! If I trip over one more charging Chromebook in the middle of the room, I might actually lose it. 😂 Since I no longer needed this for shoes (if you missed the shoe cabinet I built a few weeks ago—go check it out!), I decided to give it new life as tech storage. It had some wear and tear, so I lightly sanded, primed, and painted the whole thing black—inside and out. It's the perfect fit for our narrow hallway and finally hides all the cords and chaos. Swipe to see the before + after! Would you have guessed this was once a shoe cabinet? #FurnitureFlip #DIYFurniture #FurnitureMakeover #RepurposeWithPurpose #SmallSpaceSolutions #HomeHack #PaintedFurniture #BeforeAndAfter #BudgetFriendlyDIY #TechStorage #NarrowHallwayHack #rinerevisions #akron #akronohio #ikeahacks #ikea
Next, paint the piece in a shade that matches your decor. If you'd like to embellish it even further, add a peel-and-stick wallpaper, like this Laatse Dark Floral Wallpaper, to the front facade of the drawers, and then paint the rest of the cabinet. This is a fun way to go if you've jumped on the vintage pattern-drenching bandwagon and want to make the charger station a key part of your pattern-drenching plans. Adding fun drawer pulls on the front is another way to customize the look.
While you wait for that to dry, stick a piece of hook-and-loop tape to the bottom of one of the power strips. Place the tape's counterpart on the bottom of the drawer. Place the power strip inside the drawer, matching up the pieces of hook-and-loop tape. Do that in all of the drawers. Next, push the cord on each of the power strips out of one of the holes in the drawer, and plug the cord into an outlet. Place your electronics in the drawers and plug them into the power strip to charge. Finally, you may want to reserve the bottom two drawers for bigger items, like laptops, to ensure the storage unit remains balanced.