The Affordable Trick To Make A Vanity Feel More Rustic
From antiques and textured walls to handcrafted details, rustic design trends are certainly in vogue at the moment. The definition of "rustic" or what qualifies as rustic decor can be a bit ambiguous, but you'll generally know it when you see it: a cozy look incorporating items and materials that feel rich in history, lived-in, or handmade with little imperfections that exude character. One defining feature of rustic design is a commitment to making use of reclaimed materials, especially when it comes to furniture, and giving new life to old pieces with a little TLC.
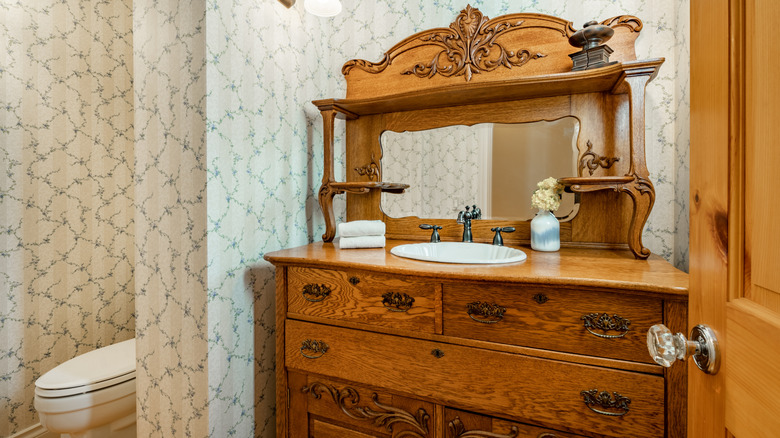
That's why we love the idea of adding feet to a standard bathroom vanity to transform it from a conventional, modern-looking piece into something that feels bespoke and rustic. Jennifer Kopf, executive editor at Country Living, did just that while restoring her great-grandparents' 1908 farmhouse. Rather than replacing the existing vanity in the bathroom for an antique cabinet, her contractor "suggested we just modify what was already there by swapping the flat front base for wood feet." The result: a totally unique vintage bathroom look that resembles a rustic antique, yet doesn't involve throwing out a perfectly good cabinet and buying a new one.
One of the best parts of undertaking this DIY rustic home decor project is that it's more affordable than paying for and installing a whole new vanity. In fact, if you opt for the simplest route for adding feet to your vanity, it can even cost less than $10! You can't get much cheaper than that, but depending on your skill level there are several ways to undertake this project.
How to add feet to your vanity
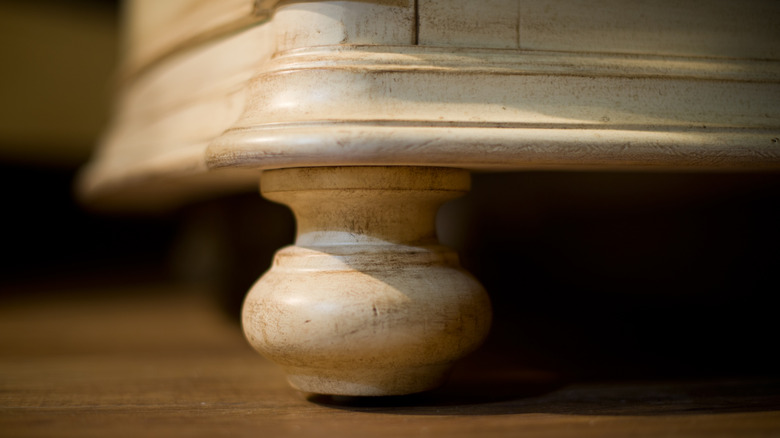
The cheapest and easiest way to add feet to your vanity without doing any (literal) heavy lifting is to make some pretend feet using wood brackets and attach them as decorative details. As blogger Diane Henkler explains, for her DIY trick that requires only $8 worth of supplies, take two wood shelf brackets, measure and cut them to the size you need, and remove the hanging hardware. Then, paint the brackets to match the color of your vanity, apply a heavy-duty construction glue to the flat ends of the brackets, and carefully attach them to the bottom corners of your vanity. When it's dry, fill any gaps with drywall, and smooth it all out with some sandpaper and a little more paint.
Another inexpensive trick — if you have the DIY savvy and time — is to remove the vanity, replace the existing base with feet (which you can inexpensively purchase from Home Depot or Lowe's), and reinstall it. While this may be the more labor-intensive approach, those little vanity feet will be functional and not merely decorative. After turning off the plumbing and detaching the pipes, design blogger Kate Riley's DIY approach involves taking off the existing base and building an elevated base using 2 x 4s custom cut to fit the bottom of the vanity, then attaching them to the bottom with screws. If you have an extra-large vanity, cut another 2 x 4 the same size as the feet you're working with, and attach it to the middle of the vanity for added support and stabilization. Then, screw in the feet, flip it over, and paint before reinstalling.