The DIY Winter Upgrade That Boosts Value And Protects Your Home

We may receive a commission on purchases made from links.
If drafts whistle through your home and windows freeze over as temperatures plummet to subzero levels, it's time to consider installing storm windows. Unlike full window replacements, which can run thousands of dollars, storm windows are an affordable solution for easily insulating your windows this winter. The best part, though? You can DIY them if you've got basic woodworking tools. Indeed, you can build your own for under $75, depending on the material and size (readymade or customized storms can run between $100 and $400 each).
Storm windows are secondary window systems that overlay an existing set of windowpanes, creating an insulating air pocket that reduces heat loss, drafts, and noise. This helps cut down utility bills by over 10%, with the entire investment usually paying for itself in three years, according to Energy Star. Given the improved heating and energy efficiency, this DIY winter upgrade can help boost your home's value. This is especially the case for century-old or historic homes, where you'd like to preserve the original windows but also improve their thermal insulation.
Storm windows can be mounted on your window's exterior or interior side, with the former offering protection against weather damage, though you may have to make additional efforts to ensure they match your home's exterior. However, if you don't experience harsh weather, have outward-swinging windows, and prize ease of installation and use, pop them on the interior.
How to build and install your own storm windows
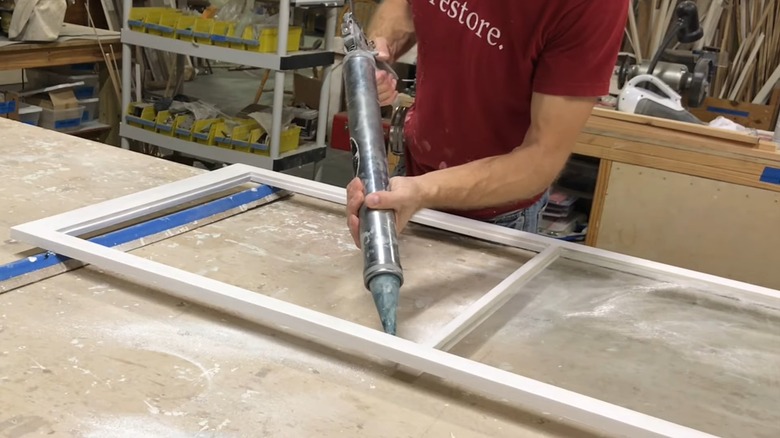
To build your own storm windows, you'll need rot-resistant 1-by-2 wood planks, wood glue and screws, putty, wood stain, and basic hardware. You'll also need glass cut to size — check in with your local glass shop or Lowe's. Measure your window's dimensions and subtract ½ inch from all measurements to account for weatherstripping. As for the glass, leave an additional margin of 1/16-inch on all sides for expansion. Cut the planks into two vertical side pieces and horizontal rails at 45-degree angles using a miter saw to match the measurements. Assemble them into a rectangular frame using wood glue. Ensure the corners are square before further securing the frame with screws. You may stain the wood while the glue dries.
Next, cut a shallow groove along the inside edge using a router with a rabbiting bit where the glass will rest. Apply the putty into the grooves and place the glass. After the putty cures, add weatherstripping along the sides of the storm window. To retain the option of removing it after winter, consider suspending it with heavy-duty hangers like the Prime-Line L 5777 Stamped Steel Heavy Duty Storm or Screen Window Panel Hangers.
Skip the building hassle for ready-made storm windows

If you're feeling overwhelmed by the idea of building a storm window from scratch, you can explore ready-made windows instead and DIY their installation to save on labor costs. In fact, they may work out better in the long run, as they're now fitted with low-emissivity (low-e) glass. Low-e is a thin, metal layer that radiates the interior heat back into the home, further reducing your energy requirements and costs. It also filters out UV rays, delaying how soon your window treatments fade.
Apart from wood, they're also available in vinyl and aluminum, which better fit the modern home aesthetic. Plus, you can leave them on permanently for protection against the hot sun. Since manufacturers also offer operable models, you don't even have to compromise on your windows' functionality. Look for options with the Energy Star label for maximum energy savings. Also, ensure they have weep holes. Otherwise, the storm windows may trap moisture, leading to condensation, which may block out all visibility.
Before installing readymade windows, clean the glass on your primary windows. Leaving out the base of the windowsill, apply caulk, such as Red Devil's Pro Butyl Rubber Sealant, on the remaining sides to improve insulation. Center your storm window, push it against the casing's top, and drive in the screws, but don't tighten them yet. Adjust the storm windows expander so it's tight against the windowsill. After ensuring the windows work (if operable), tighten the screws.