Create Adorable Decor For Your Home With This TikTok Creator's Tile DIY
One of the best ways to create a truly bespoke look in your home is to take the time to create DIY decor. While there are plenty of Etsy artists offering custom pieces to buy as is, the savvy crafter can create something similar for a fraction of the cost with a little effort. If you're on the hunt for a low-budget decor idea that is sure to impress, TikTok creator abby.jasper has a stunning project for you to try out: a custom last name tile mosaic.
Whether you're on the hunt for wedding decor you can reuse after the big day or you're just eager to find a stylish way to display your family name, this tile mosaic project is certainly a beautiful option. Similar custom decor can run you upwards of $300 when you have someone make it for you. You can slash the overall cost in half if you're willing to roll your sleeves up and do the project yourself.
For this project, you'll need a printer, tile netting, mosaic tiles, tile glue, tile nippers, grout, a sponge, half-inch-thick plywood, sandpaper, wood glue, wood stain, and framing wood. The TikTok creator did mention that this project took her roughly 80 hours to complete from start to finish, so strap in for a long process. Now let's get into how you can recreate this design and make it your own.
Create your tile mosaic
Your first order of business is designing your last name mosaic. Use free tools such as Canva to figure out how you want the piece to look. Make sure the canvas size matches your desired project size in inches. Play around with different fonts and colors until you're satisfied. Before you export your project, be sure the piece is properly centered, with the same amount of distance on all four sides of the text.
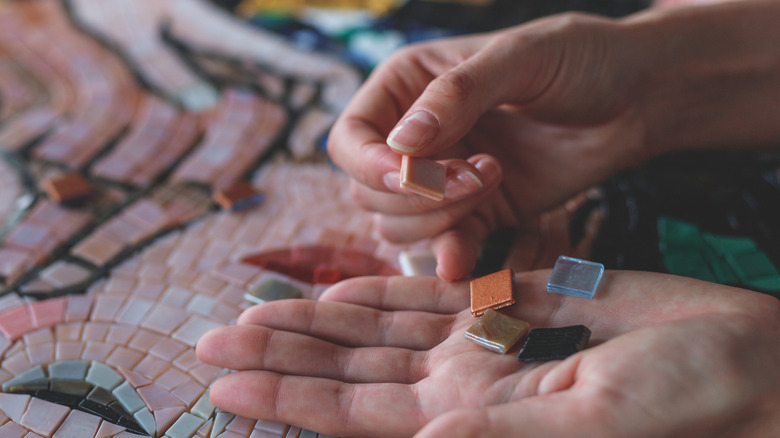
Once you finalize your design, it's time to print it. Send it to a professional print shop for a true-to-size template. You can also print out each section of the piece on regular printer paper, but this can be a bit time-consuming. Pin down the tile netting on top of the printed template. Now it's time to paste down the tiles. Start with the last name. Lay out tiles to match up with the shape of each letter. Use tile nippers to shape each piece as you go.
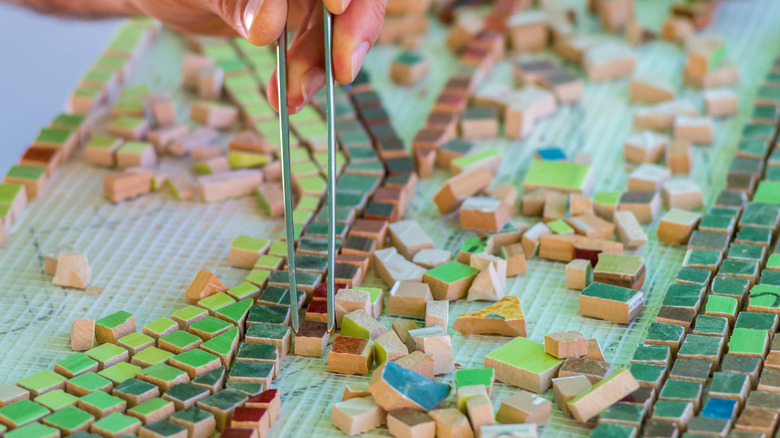
After you finish the name, it's time to tackle the background. @abby.jasper used a sort of scalloped design in the background of your piece. For a different look, opt for another simple, repeatable pattern. For a more eclectic pattern, throw in different types of tiles or lay them down in an unpredictable fashion.
Put the finishing touches on your project
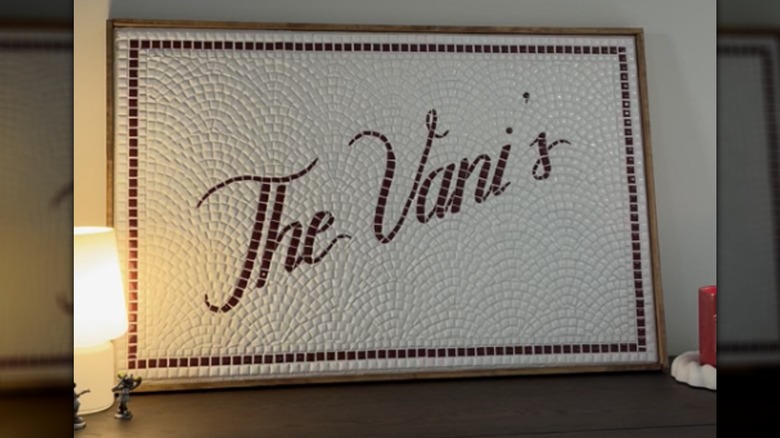
Once your tile work dries, prepare your grout. @abby.jasper uses an off-white color, but feel free to use any color that matches your design. Smooth down the grout, careful to fill all the gaps between the tiles evenly. Use a wet sponge to smooth your work as you go. Once you're satisfied with your results, allow it to dry overnight.
The next day, use a cloth or small brush to clean the grout dust off the tiles. Now turn to your plywood. Make sure it matches up with your tile mosaic. Sand the edges of your plywood. Now glue your entire mosaic to the plywood and allow it to dry. Once it's dry, use your framing wood to create a border. Be sure to cut it to size so the edges create a seamless frame. Stain it now if you would like to.
Use wood glue to adhere the frame to the edges of your mosaic. Use tape to keep the frame tightly held together while the wood glue dries. After the frame is secured, attach mounting appliances to the back so you have something for the art piece to hang from. And there you have it, a custom DIY wall art piece you'll cherish for years to come.