The Upcycle Flip That Turns An Old Desk Into Matching Vintage Nightstands
We may receive a commission on purchases made from links.
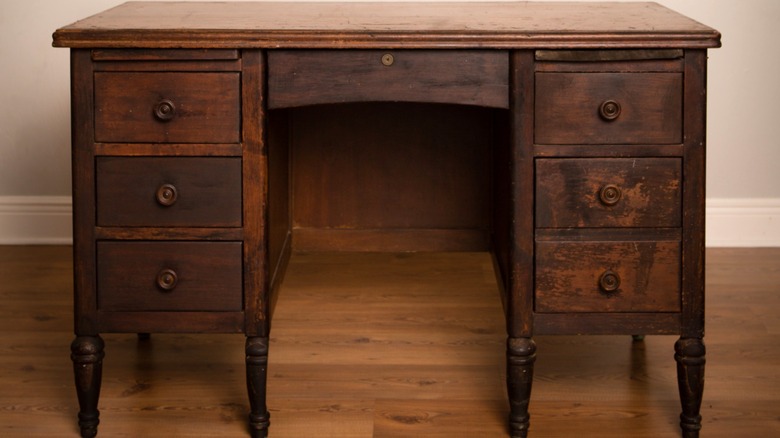
One of the most incredible things about taking on a DIY project is that you can take an item and turn it into something completely different simply using some elbow grease and the right materials. So, if you have an old, outdated desk that isn't being used, you don't necessarily have to send it to the dump. You can actually upcycle your old desk into a pair of matching nightstands for the bedroom, complete with the vintage features of the original piece. If you don't already have a desk, sourcing one from a thrift store is also a great option because the older and worn ones tend to be marked down to relatively affordable prices.
There are a few different ways to go about completing this DIY, but you will need a saw to cut the top of the desk in half, some putty to fill in damaged areas, and nails to reattach the top of the desk to the prepped nightstands (if you end up removing it as you break apart your desk). You may also need an orbital sander or a chemical stripper and a scraper if you plan to remove the existing finish, as well as some paint to change up the color scheme of the nightstands. This is really a project of two halves — disassembling the original desk and crafting the new matching nightstands — so be patient and plan carefully to pull off this simple bedroom upgrade you can DIY in a weekend.
Disassembling the old desk
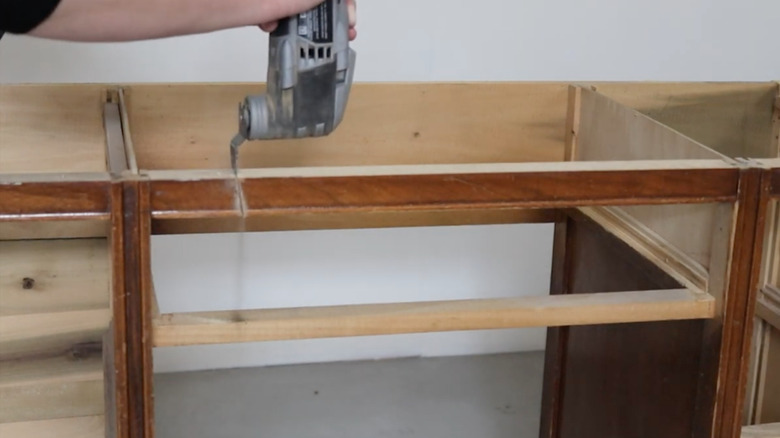
The first thing to tackle in this project is cleaning. Make sure to remove any dust, dirt, and cobwebs so that your finished product will come out looking polished. The nightstands will be crafted using the two drawer towers on either side of the desk, so after you are done cleaning, you will need to cut the top of the desk in half. This can be done a few different ways. First, you could take the entire top off by loosening the nails, removing it from the frame, and cutting it down so that you end up with two pieces that will top the nightstands. Alternatively, consider saving a step by simply cutting the top of the desk down to size while it is still attached to the two ends. You will also likely need to remove a backboard, aprons, and other supports that hold the two drawer towers together on the back.
If the desk has a tired finish or lacquer, remove the existing hardware and prepare it for staining or painting. You can sand or strip your furniture to get it down to bare wood, using a chemical stripper like Max Strip Paint & Varnish Stripper if you go the latter route. Scrape the finish off, and use a sander to remove anything that remains on top of the bare wood. Remember to read the product instructions when working with strong chemical strippers, and always work in well-ventilated areas while wearing chemical-resistant gloves. So, now that your desk is resembling two bare nightstands, how can you finish them off to create a beautiful matching set?
Crafting new nightstands from an old desk
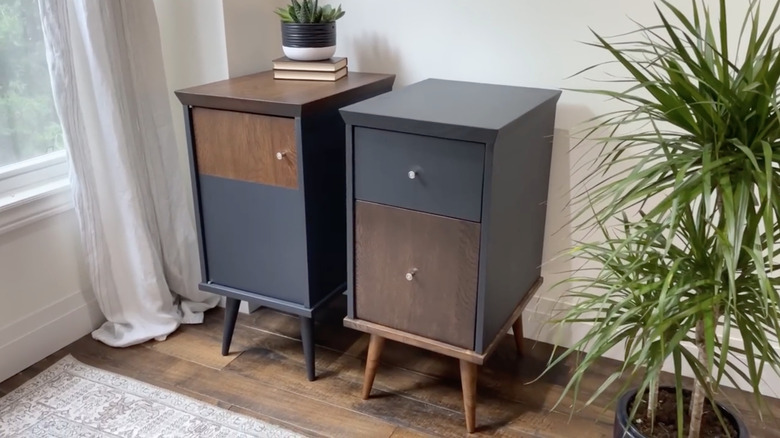
Once your desk is in two halves and stripped down to bare wood, you can begin rebuilding them into nightstands. Start by using wood filler to fill any holes or cracks that have occurred over time or while you have been disassembling the desk. After sanding these smooth, add your chosen stain or paint. The paint may need more than one layer, depending on how much wood grain you want to show through. Since the cut side of the nightstand top will be flat, it may not match the edge profile of the other sides. To fix this, shape the cut side using a router with a bit that matches the edge profile, giving the top symmetry.
Finish off the nightstands by adding new hardware that is in a style that echoes the vintage feel of the original desk, such as ones made of brass or antique copper. Alternatively, if you like the original pulls and knobs from the desk, you can carefully remove the existing pieces, clean any tarnished cabinetry hardware, and reattach them. You could even opt to change out the legs for ones that feel more suited to your personal style, such as clean mid-century tapered supports or quirky colorful ones. And you're done! This DIY is great for people who have bedrooms with limited space because the dimensions of the nightstands tend to be relatively tall and narrow, meaning they will be more likely to fit even if there isn't much width beside the bed.