Press Flowers Into Clay To DIY Garden-Inspired Custom Plates That Look Valuable
We may receive a commission on purchases made from links.
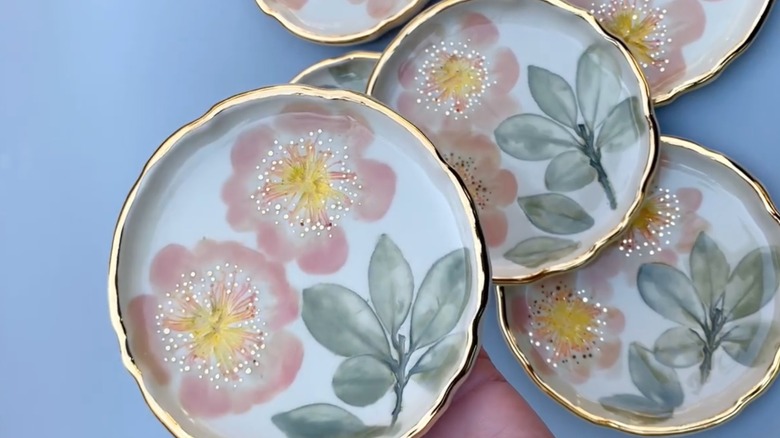
Some DIY projects are so impressive that they look like they belong on the shelves of a fancy boutique. A handmade DIY garden-inspired clay plate is a perfect example of that. These pieces feature cute, delicate floral imprints, the kind of detail found in items sold at local gift shops and artisan markets.
The idea is from Instagram creator @vuvu_ceramics, who pressed florals into clay to create indents in the shape of petals and leaves. They fill the floral imprints with colorful underglazes before firing the piece in a kiln. When it comes out, the imprints, filled with color, are visible. It makes the piece look detailed and incredibly unique, with a mixture of stunning colors, organic shapes, and dimension. This is a great technique to make beautiful, one-of-a-kind bowls, plates, and trinket trays. It's always so lovely to decorate with pottery in your home, especially if it's hand-made.
Now, we know what you're thinking. Who has a kiln at home? Well, there are some ways you can still DIY this without being a professional potter. First, you can bring this technique to a local pottery workshop or private class and use their kiln. Class-like workshops offer some advice from professionals, but some studios will also allow you to rent kiln time and work on your own projects autonomously. Another option, if the studio route seems too complex, is to apply the same method to air-dry clay or modeling clay. The difference with this approach is that, instead of using glaze, you'll use a bit of paint and some varnish to create a similar effect. Nonetheless, the imprint of the flowers and leaves will look similar no matter which technique you use.
How to create floral imprints
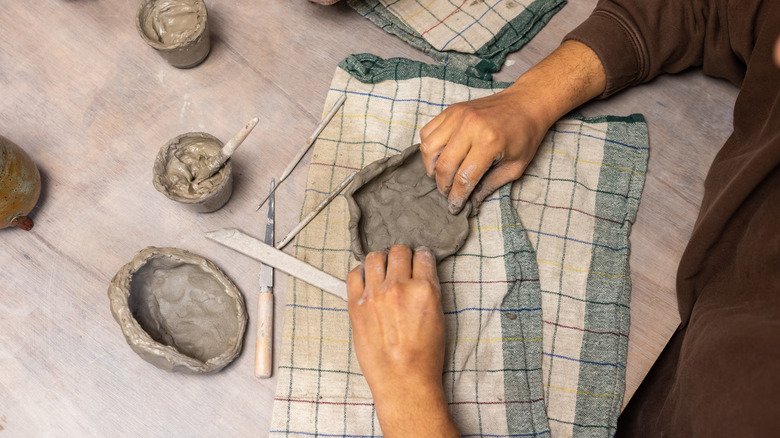
No matter whether you are using clay, glaze, and a kiln, or opting for a more at-home DIY approach with air-dry clay, the first step is the same. Gather some flowers that you like the shape of. Flowers with different layers, like those with pistils and stamens, are perfect. The idea is to press the flower, face down, into the clay to make an imprint. The pistil and stamen of the flower will be at the center, with the petals around it. You can use your fingers to gently press and make sure the flower shape is visible. Repeat this step with individual leaves or with leaves on a stem.
Removing the flowers and leaves is tricky because you don't want to make any deep marks or scratches in the process. Use small crafting tweezers to gently grab onto the leaves and petals and remove them. When in doubt, leave pieces behind rather than ruining the imprint. Whether it's pollen or full pistils, they can stay in the clay. When you fire your DIY in the kiln, the organic matter will magically disappear (burn off). And for air-dry clay, you can let it harden before wiping off the petals and pollen. If you're not satisfied with the shapes that you've created, you can smooth the clay out by working it in circular motions with a wet sponge.
How to bring color to your DIY with glazing or paint
If you're working with the true clay-and-kiln method used by the original creator, you'll want to let the clay dry before moving on to glazing. The exact time for this step ranges from 24 hours to three weeks, depending on factors like humidity and environmental conditions. Then, once the clay is bone dry, you can start applying colored underglaze with a paintbrush to fill the imprints. The benefit of underglaze is that you can wipe the excess away with a sponge, which lets you get really sharp, clean edges. Then, you'll apply a layer of transparent glaze over the top and fire the piece in the kiln. Once your piece is fired with a food-safe glaze, it can be used with food and water. These pieces can therefore be used as plates, cups, bowls, you name it.
If you aren't using a kiln, then you can use regular acrylic paint to fill the flower and leaves imprints. Here, there are a few things to keep in mind. First, you'll want the clay to be completely dry before applying paint. Secondly, remember to seal your creation with varnish when you're done painting (with something like DecoArt Triple Layer Gloss Varnish). And finally, keep your DIY away from water. Even with the varnish, air-dry clay isn't made for water. In fact, it's also not recommended to use it with food. Therefore, this technique is best suited to make trinket trays or decorative bowls, rather than plates for food.