Try Martha Stewart's No-Mess Solution For Decorating Easter Eggs
We may receive a commission on purchases made from links.
Decorating Easter eggs is a beloved spring activity, but it can also be a pretty messy one. The traditional method of using the store-bought dye kit can end up with rainbow hues everywhere you look, and even using food coloring may stain a surface. One sudden move, a knocked-down container, and whoops, your countertop might look like it was in a season of Rainbow Brite. Domestic decor icon Martha Stewart has a fun alternative to decorating Easter eggs without dye: stamping them. By stamping your eggs with whimsical designs, you can still customize them for the season for an eye-catching holiday display.
Stamping eggs for Easter is a kid-friendly, less fussy way to get beautiful eggs. By following Stewart's lead, you can set up your egg station in minutes, without needing to use staining dyes in the process. This egg-cellent activity requires only eggs, a set of good stamps, and the ink pads in your chosen colors. If you don't have any ink stamps already from a DIY project transforming your walls, you can find kits at any craft store or online. If you are decorating with children, you may opt for a more playful style, such as the ArtCreativity Easter Egg Stampers. Adults may prefer more subtle designs, you may prefer more subtle and muted designs, such as Decora Floral Round Stamps.
How to stamp Easter eggs as a mess-free decoration choice
With crafting supplies ready, you'll need some good eggs to decorate. Many people prefer to hard-boil eggs for Easter, but it's not required. Raw eggs need a softer touch, so if decorating eggs with children, consider hard-boiling to avoid smashing the eggshell. You can hard-boil your eggs by filling up a saucepan with cool water, with the eggs covered by the water up to an inch. Bring the water to a boil over medium-high heat, then remove from heat and let the eggs sit covered for 12 to 15 minutes. After the eggs finish cooling, rinse them with water, let them dry, and you're ready to ink.
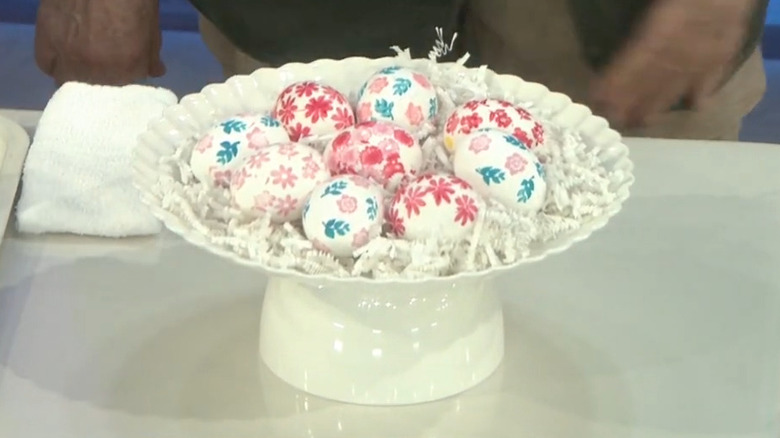
Stewart's method is rolling the inked stamp gently across the eggshell. Use a light touch, and don't press too hard, or else you may crack the shell. You can then stamp all over the egg, covering the surface, or make a band around the middle; it's up to you. Ensure you let one side of the egg dry before you stamp the other side, or you may smear the ink in your haste.
You can also do this Easter DIY with a set of wooden craft eggs, creating decorations that can be reused next season. Wooden craft eggs, such as these SallyFashion Wooden Eggs from Amazon, provide a smooth white surface that you don't have to worry about breaking! You can display your finished stamped eggs in a decorative bowl on your table or mantel. For a bit more whimsy, try making the cutest Easter egg holder with Dollar Store items.