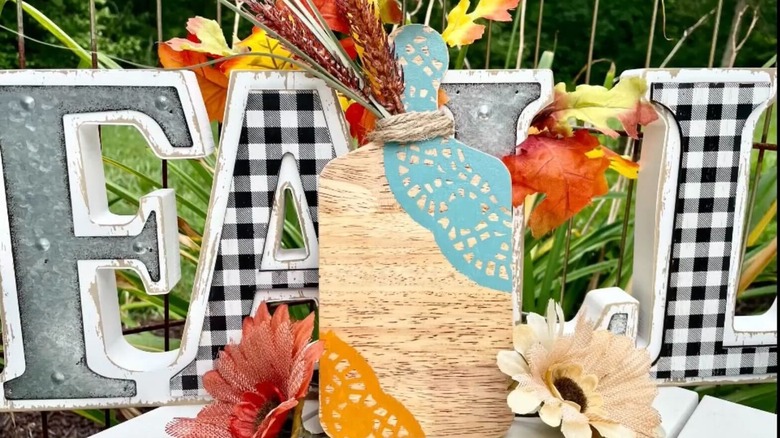
Turn An Old Cutting Board Into Cute Kitchen Décor Using Dollar Tree Paper Doilies
Over time, wooden cutting boards crack, warp, and suffer surface damage. If you have a board that you no longer want to use for its intended purpose, don't throw it out. Use it for this quick and easy DIY project. With just a few paper doilies from the Dollar Tree, a few simple supplies, and a little crafty know-how, you can turn your cutting board into a cute piece of kitchen décor. Basically, you use the doily as a stencil to paint on some decorative patterns.
While you can use any style of wooden cutting board, a board with a handle arguably looks the most quaint. Head to the Dollar Tree to pick up a Multipack of Round Paper Doilies in Assorted Sizes. You get 32 doilies for $2, which means you could decorate multiple cutting boards if you wanted. While you're there, get a Tool Bench Hand Sanding Block Kit (or a nail file), some Garden Collection Jute Twine, Mod Podge, and your favorite artificial flowers and greenery. Let the colors you want for your project inform your floral stem choices.
You'll also need some acrylic paint and a hot glue gun. Additional tools that are handy but not required include a heat gun to quickly dry the project and a brayer for smoothing things out. Once you've gathered all of the supplies, all that's left to do is make and customize this chic Dollar Tree DIY you can create using a cutting board to display in your kitchen.
What you need to do to create cute kitchen décor with a cutting board and doilies
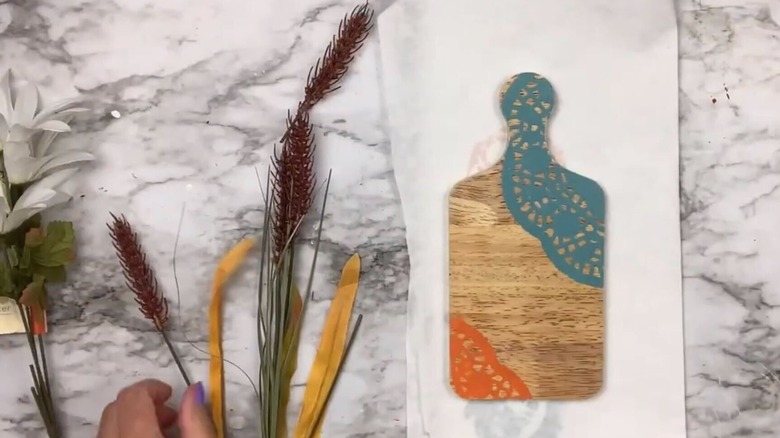
To decorate your cutting board, you'll start by figuring out where you want the paper doilies to sit. You could, for example, decorate just the handle and the opposite bottom corner of the board for a symmetrical design. Or you could haphazardly place multiple small doilies across parts of the board to create a repeating pattern, overlapping them as you work. Play around with arrangements, photographing the ones you like best, then cut the doilies down to size. Lay them on a protected work surface and coat them in acrylic paint in your chosen colors.
After the paint has dried to the touch (up to 30 minutes), apply Mod Podge to the areas on the cutting board you want to decorate with the doilies. Apply the sealer in sections so that it doesn't dry too quickly. Adhere the doilies to the Mod Podge, smoothing everything out carefully with your hands or a brayer. You don't want any wrinkles or air bubbles in the doilies. Add another layer of Mod Podge over the top of the painted doilies to seal them and allow the sealer to dry. Then take the sanding block or nail file and, in a downward motion, file the edges of the board to remove any loose doily paper. The last step in this project is to cut the floral stems to size (if needed) and use hot glue to attach them to the handle at an angle. Wrap twine around the handle to hide the stems, gluing the end of the twine to the back of the board.
Ways you can customize the cutting board to make this décor your own
Creating the cutest cutting board décor for your kitchen is easy with supplies from the Dollar Tree, and it's fully customizable. You can, for example, play around with paint colors to match any season or interior design style. Instead of choosing just two colors, you could use one color for a monotone look. Or you could cut up more Dollar Tree doilies, placing them all over the board so less of the wood shows through.
You can also customize your decorated wooden cutting board with different faux flower pairings. Dollar Tree has a wide variety of artificial greenery, including butterfly-adorned Floral Garden Onion Grass Floral Picks, Halloween-themed stems, and quirky plants, like the Floral Garden Artificial Eucalyptus Bush. With so many options to choose from starting at just $1.75 each, you could create a few themed boards for the holidays and a few neutral designs for everyday display.
This project still works well if your old cutting board doesn't have a handle. You could, for example, attach the floral stems to a top corner and wrap the twine around the entire width of the board or coil the twine into a flat circle — or any other shape you prefer — and lay it over the glued stems to hide them. Alternatively, cover the stems with a painted doily for a more cohesive look.