Say Goodbye To Bathroom Clutter With This Unique DIY Hanging Storage Tote
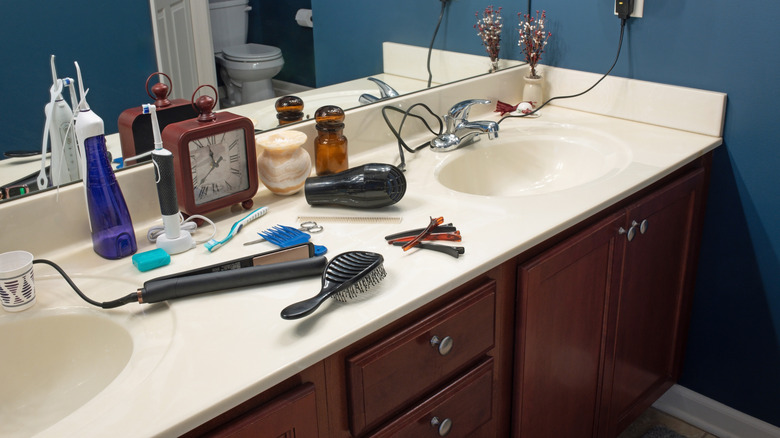
If you haven't seen your bathroom counters in years because it's always so crowded with clutter, it might be time to reassess your storage situation. Whether you have a small bathroom and are trying to maximize your storage space or all the cabinet drawers are filled to the brim (or both), there is a way to manage clutter without renovating the space. This simple DIY can help keep your bathroom clutter-free with a creative tote that hangs on the wall.
This unique storage tote is a great way to utilize vertical wall space to organize all the little things that seem to land all over the place. They look adorable and are customizable, so you can use them as an accent piece to add a playful touch (hello, leopard print) or match your current color scheme. This tote can be hung next to the mirror to corral makeup or by the toilet to hold hygiene products. You can also make multiple totes and assign one to each family member, creating a stunning organizer wall that holds all your essentials.
For this DIY, you will need fabric, a sewing machine, and ribbon. Snaps are optional, depending on whether you want the bag to hang open or be able to close it. If you don't have a sewing machine, you can use a needle and thread to hand-sew the tote. You can also use extra fabric instead of ribbon. For snaps, you can sew on metal ones with a needle and thread or use plastic snaps with pliers and an awl or other sharp object like a seam ripper.
How to DIY a hanging storage tote for the bathroom
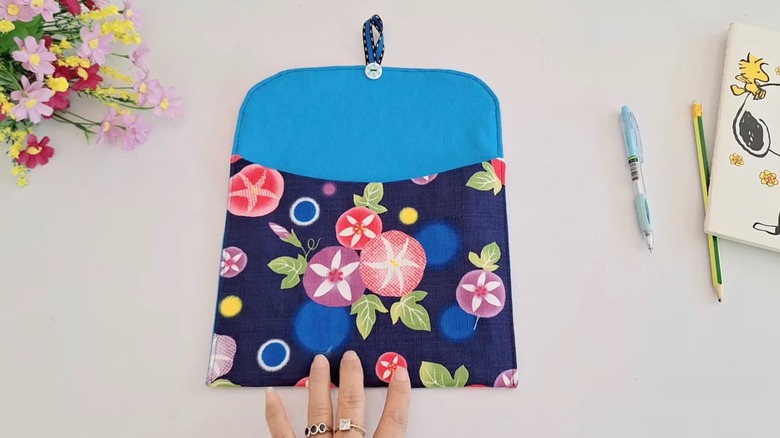
Cut two 10-inch by 20-inch pieces of fabric; one for the outer layer and one for the lining. Lay them together with the right sides facing each other. Sew around the edges, leaving a 3-inch opening near the bottom. Use the opening to turn the fabric right side out. Tuck the un-sewn section in and iron it so the raw edges stay inward. Measure 8 inches from the bottom and fold the bottom section up, creating a pouch. Sew around the folded pouch section, closing the 3-inch opening left earlier.
If you want the tote to hang open, take the ends of a 5-inch piece of ribbon or extra fabric and draw them together, creating a loop. Sew the connected ends of the ribbon to the back of the bag, about half an inch from the top. Now your open bag is ready to be hung up.
If you want the bag to close, fold the top flap down and mark where you want the snap to go. If using plastic snaps, use an awl to poke a small hole at the mark, then attach the snap with pliers and repeat for the other side. Alternatively, sew on a metal snap with needle and thread where you made the mark (without poking any holes) and sew the other half of the snap to the bag. Close the snaps together and sew the looped ribbon onto the back of the bag about half an inch below the flap fold.