Turn Pistachio Shell Scraps Into Stunning DIY Fake Cherry Blossom Decor

Pry the shell open, retrieve the nut inside, and trash the scraps. You might have this entire sequence pat down when having pistachios. But what if you made one small change toward the end? Instead of throwing the shells away, you could preserve them and give them new life. For instance, there are several beautiful DIY flowers you can make using pistachio shells, including cherry blossoms. Just paint them and arrange them on a dried stem to create stunning decor for your home.
Start by grabbing your paint palette and keep pink and white acrylic paint ready. You might even need yellow, red, brown, and green colors. You'll also need a slim paint brush, like the ones included in Yflln's 6 Pieces Miniature Paint Brushes Set. Also, keep a few paper towels or a white craft paper handy — this will serve as the flower's center. You can even create leaves out of them or use masking tape for a textured look and feel. You'll also need a sharp pair of scissors, an old dried stem, and a pair of rubber gloves to keep your hands paint-free. Most importantly, you must have enough shells ready to craft several gorgeous cherry blossoms. Once you have everything, lay down an old cloth or newspaper on your workstation to get started.
How to make cherry blossom flowers using pistachio shells
The first step is to give your pistachio shells a good wash. This will remove salt and any leftover debris from the shells. When you're satisfied, strain the water and spread the shells on a clean microfiber towel to let them air dry. Then, don your gloves and give each piece a coat of white paint. Cover both sides and let the paint cure. Next, mix pink acrylic paint with a little white; the exact ratio will depend on how light or dark you want your cherry blossoms to be. After you coat both sides, set the shells aside and get started on the filaments.
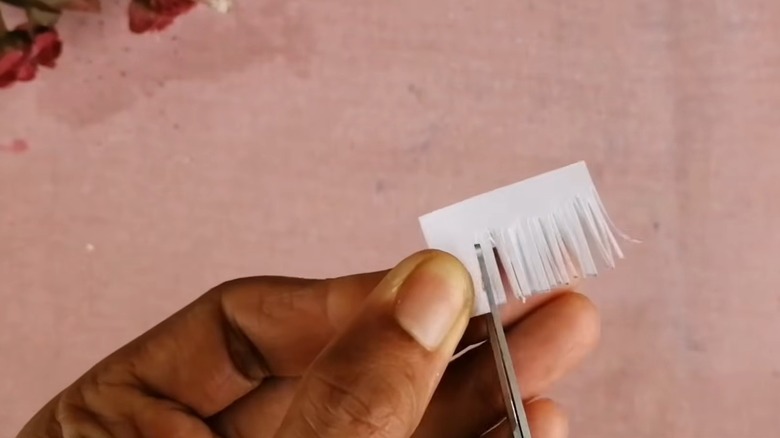
Cut a thin strip of white tissue paper (or craft paper) and use scissors to create fine fringes along one side. The cuts don't need to be spaced exactly, but try being as uniform as possible. You can either twist the fringes slightly and roll the strip tightly, then glue the ends and lightly color the tips yellow to resemble pollen. Alternatively, you can cut a thin yellow thread (or twine) into itsy-bitsy pieces, dip the fringed ends in craft glue, and adhere the imitation anther in place before rolling the strip up. You can go with either style based on how realistic you want your flowers to look. Glue the colored shells to the stamen's base and your cherry blossoms will be ready for display.
Give finishing touches to your artificial cherry blossom flowers
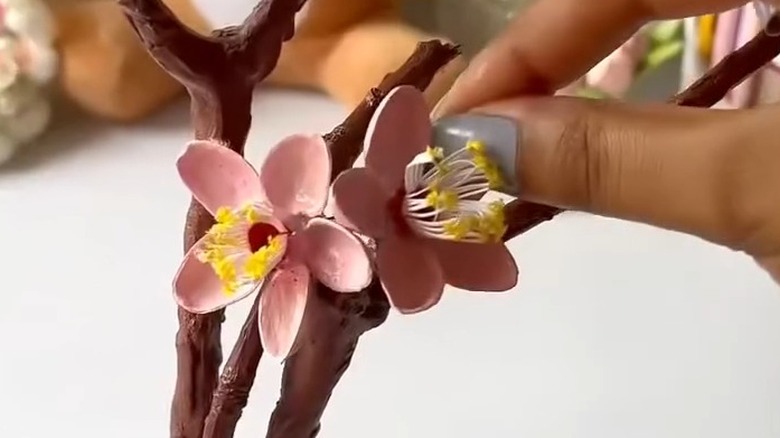
To ensure your crafted blooms match real cherry blossoms as closely as possible, give them a few finishing touches. For starters, brush the stamen's base in a light red tone. You can even paint each flower's bottom in a light green color so it looks more natural. While you're at it, draw a few leaves on craft paper or masking tape strip. Cut it to shape and color it in layers to give it a lively appearance. You'll also want to coat the dried stem in a little brown paint so it looks more natural.
Now, for the fun part: arranging your flowers on the painted stem. Find spots that resemble nodes and glue your blossoms there. Continue until the stem is evenly filled. Then, slip in the leaves under a few florals to make your artificial flowers look real. After you have a few stems covered in cherry blossoms, put them in a pretty vase to display them around your house. You can even put in colorful stones or other filler to give them a boost or hide their base. Another option is to turn an old container into a small bonsai-esque pot, put the decorated stem(s) in, and hide their unsightly base with clay or moss so it looks like you're growing a cherry tree indoors.