We Upgraded A Plastic Pot Into A Rustic Planter With An Ancient Building Technique
As an avid gardener, when I start my seedlings each spring, one of the first steps I take is to sort through the old nursery pots that I keep in the shed. Last year, I had purchased a few apple trees, and I saved the large 7-gallon pots they came in, so when I dug into my potting supplies this spring, my first thought was, "What in the world am I going to do with these?" Well, it turns out they were exactly what I needed for a DIY I stumbled across a few weeks later to turn your leftover garden supplies into stylish outdoor accents. This idea takes the gabion basket, which is an ancient landscaping technique, and applies it to planters.
Gabions are simply wire mesh with a filler, which is usually rocks. They're most frequently used in retaining walls, but they're useful for everything from walls and fences to fire pits and benches. Where I live, I've even seen them used to support fence posts. When I saw the idea to turn them into a planter, I quickly realized that this was the solution to not just one, but several problems I currently have, starting with the fact that I've wanted some large planters for my yard, but they're not really in my budget right now. Also, I had a large pile of rocks leftover from a recent gravel-bed septic installation and a stack of old nursery pots.
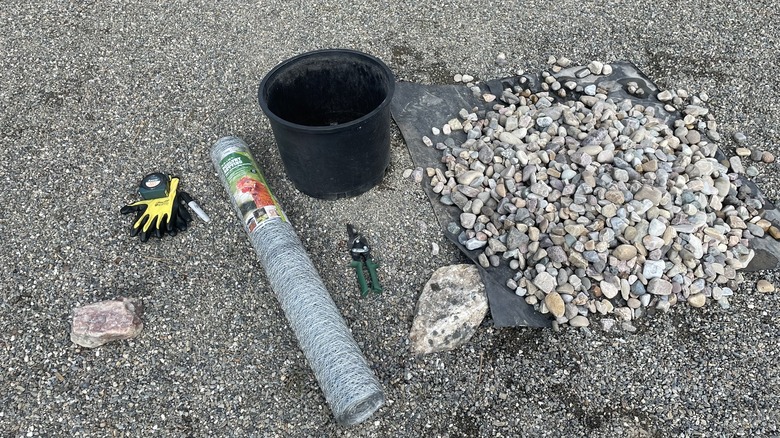
Collecting materials for a DIY gabion basket planter
The planters I'm trying to cover are 15 inches in diameter and 11-¾ inches tall. To make a gabion basket to cover them, I need to create two metal mesh cylinders and fill the space between them with stone, tucking the old nursery pot inside. The rocks leftover from my septic installation were river rocks, just one of the different types of rocks used in landscaping. These septic stones have assorted, interlocking and drainage-friendly shapes that make them perfect for this project.
The rocks I have are about 1 to 2 inches, and are a very pretty rainbow of colors. Since I'm focusing on drought-tolerant landscaping, I've used some of them to cover parts of my yard, and I'm hoping the matching planters will add a cohesive touch to my overall design. I filled my wheelbarrow roughly halfway and washed the rocks to get rid of any fine dirt and debris.
Depending on your garden design goals, you could also use lava rock, crushed stone, Mexican beach pebbles, or any other decently sized stones, but small pebbles and gravel won't be ideal. When making a gabion basket, the openings of the mesh must be tight enough to secure the filler. Since many of my rocks are smaller than 2-inches, I decided to go with 1-inch chicken wire. Chicken wire can be repurposed into DIY decor, and I needed some for another project, so I purchased a 36-inch-by-50-foot roll of poultry mesh for about $40 after tax. My only cost was the wire, which was about $0.26 per square foot or $3.75 total for this project, but if you needed to purchase rocks, you might expect to spend around $5 to $15 per bag. I also gathered gloves, wire cutters, and a tape measure.
Assembling and filling the gabion basket planters
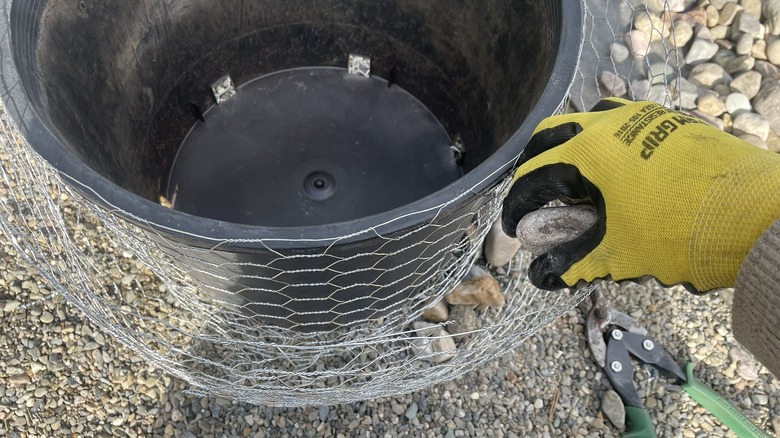
For the inner circle, which has a diameter of 15 inches, I calculated the circumference at a little over 47 inches. I added a 4-inch overlap and cut a piece of chicken wire at 51 inches. Since the wire I purchased was 36 inches wide and had a natural midpoint in the center, I cut it in half, giving me two 18-inch wide pieces, perfect to cover the 11-¾-inch pot height. For the outer circle, I needed to factor in a two-inch gap that could be filled with rocks, giving me a diameter of 19 inches and a circumference of about 60 inches, so I cut a piece of wire 64 inches long to include some extra overlap.
Working with the pot upside down, I bent the smaller of the two metal cylinders into shape around the container, making sure the finished edge would be at the top of the container. I extended the edge about 1-inch past the top of the pot so the rocks would hide the nursery pot rim once the basket was full. At the bottom of the container, I snipped and folded the ends of the wire into the center so any pokey edges would be hidden.
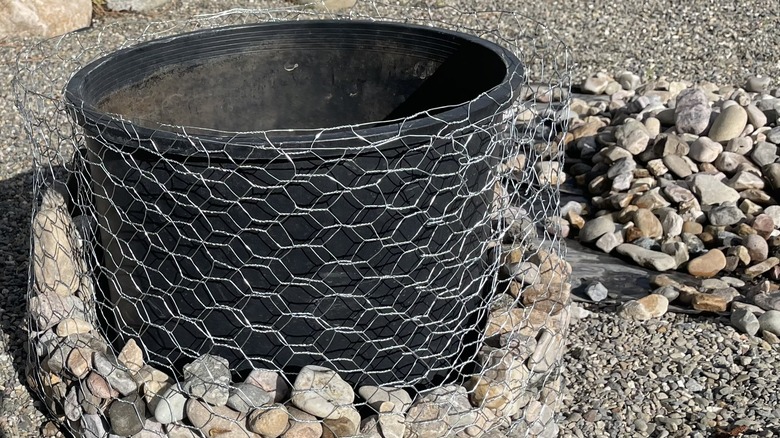
To add the outer circle, I formed the cylinder shape, then slid it over the inner one, still working upside down. I repeated the same processes to extend the top edge and fold the ends in at the bottom, and secured everything in place by bending the wire ends in. Then, I turned everything over and started filling the basket with rocks.
The final result was rustic and easily repeatable
Filling the planter went pretty quickly, and the entire project only took about 45 minutes after I had all the supplies together. One of the downsides of this DIY is that these gabion-style planters are not easily portable. I figured it would be quite heavy, and since I used almost all of the rocks I had washed in my wheelbarrow, it definitely was. Luckily, I planned ahead and decided to build the planter in place because I wasn't sure how I would move it once complete.
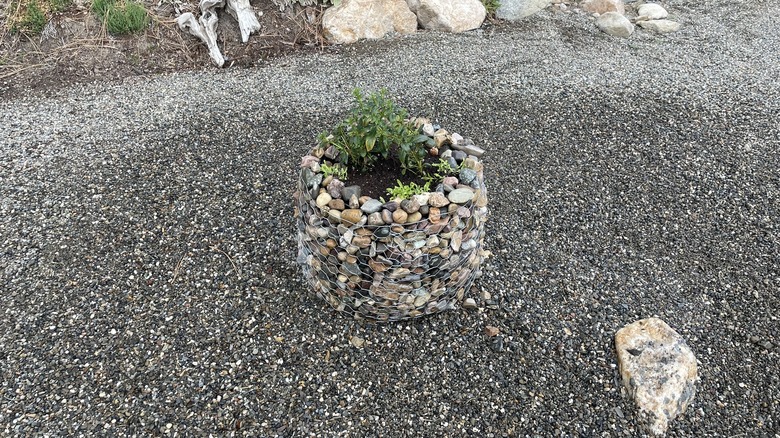
If I made one of these again, I would using hardware cloth, which is stiffer. Chicken wire bends and sags somewhat, so even though I kept pulling up as I filled the basket, the weight pulled it down, and it didn't end up as tall as I wanted. If you decide to use chicken wire to make your own version, keep that in mind when forming the basket. I'd recommend including some extra height to allow for any sagging. Next time, I may even build a wood frame to create a rectangular gabion-style planter.
The final result looks a little more like a mound of rocks than a planter, but the natural look is still better than an old plastic pot. After filling it with potting mix, I transplanted some snapdragons, one of the annuals that overwintered well in my USDA zone 6b garden. I also included some 'Royal Carpet' sweet alyssum that I started indoors in March, a vibrant flowering companion near snapdragons. The flowers will be bursting into bloom soon, and this could quickly become one of the best features in my garden.