Turn Scrap Paper Into An Easy-To-Make Wall Hanging Solution
Have empty wall space and an abundance of trinkets that need to be organized and stored? Try making the most out of your unused vertical space with wall-hung storage solutions. For those with a knack for crafting, you can utilize a budget-friendly hack to create a wall organizer out of items you may otherwise consider trash. Whether you are big into paper crafts like origami, scrapbooking, and card making, or just have a lot of scrap paper lying around from reports and documentation, you can repurpose your scrap paper into an easy-to-make wall-hung organizer that doubles as decor. This DIY wall grid is perfect for displaying photos, lanyards, and even bag accessories without occupying valuable floor space.
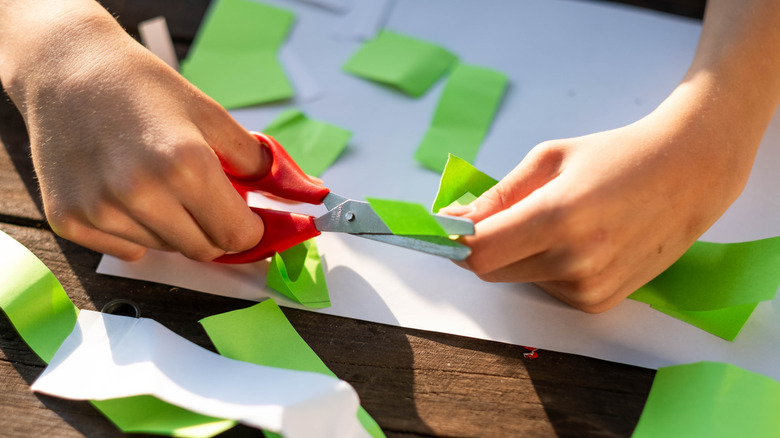
All you'll need for this scrap paper DIY is a stack of scrap paper or cardstock, wood skewers, craft glue, scissors, and paint. For a sturdier wall storage solution, you can also take a papier-mâché approach to this craft, using old newspaper and a DIY paste made from water and white glue. For thicker, larger wall grids, you can substitute wood skewers for wood dowels. To get even more creative with your wall grid, you'll also need wood craft sticks, some rubber bands, and some stickers or wooden shapes, like these Crafter's Square Assorted Wooden Shapes, which can be found at your local Dollar Tree. These items can be used to DIY your own clothespins that can be used to secure items onto your crafted wall grid.
Assemble your paper wall grid
Start by trimming the pointed ends off your wooden skewers and making sure they're all an equal length. Wrap strips of scrap paper around a stick diagonally, securing the paper in place with craft glue. Repeat this step until you have enough wrapped sticks for the size of the wall grid you want. For a simple 4-by-4 wall grid, you'll need 10 wrapped sticks. When your sticks are wrapped and the glue dried, position four sticks in a square for the frame, then create the grid by laying three sticks horizontally and three sticks vertically. Glue them together and allow the grid to thoroughly dry. For more wall-hanging space, you can make it wider or longer.
@curatedartist This diy changed my whole room 💕 #satisfying #origami #DIY #asmrvideo #easyorigami
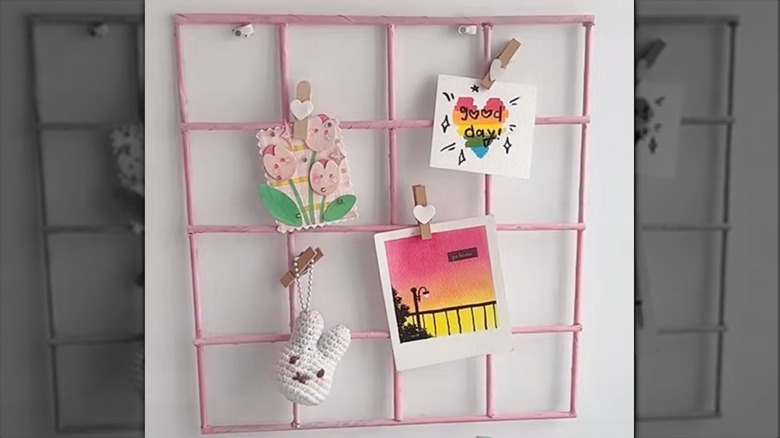
Once dried, you can either leave the grid as-is or you can paint it the color of your choice. Make sure you apply generous coats of paint to keep the color vibrant and allow adequate time for it to dry. While you wait, you can create fun clips to attach items to your grid. Take a craft stick and cut it in half. For a smaller clip, you can just cut the rounded ends off at equal lengths. Take a small piece of scrap paper and roll it into a small tube. Place the paper tube in between the craft sticks and secure it in place with a rubber band.
You can decorate your DIY clothespin by painting it or by covering the rubber band with a sticker or wooden shape. When everything is dry, hang your grid on your wall using adhesive wall hooks, push pins, or screws, and use it to hang and display photos on your walls. It's also makes a great place to organize and store jewelry.