12 Innovative Garden Path Upgrades That Can Make Your Yard More Inviting
We may receive a commission on purchases made from links.
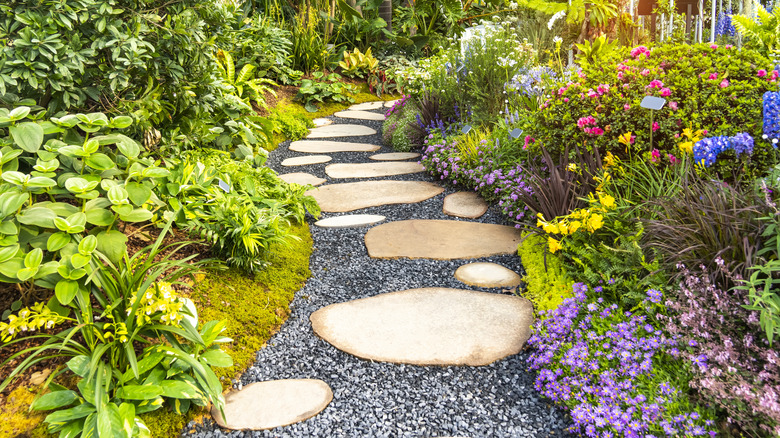
If you're anything like me, you probably take your garden path completely for granted. It's such an integral part of your yard and yet it is undervalued and often one of the last things to be repaired. I'm a master gardener and have visited gardens where the beds are extraordinarily beautiful, the planting is layered and full, and real thought and effort has been put into them. Yet, the path that threads through all this flower-laden splendor is ragged, full of holes, holds water, and is a trip hazard. For all the trouble people go through with choosing what grows on either side of the path, the pathway itself often is just a functional afterthought.
I think that's a shame, because a path shapes how your garden actually feels to use and move through. Plus, of course, there's the safety aspect. You need to think about accessibility and usability. That doesn't mean you have to rip out your path or hire an expensive contractor, though. In many cases, you can make smaller upgrades yourself in an afternoon or a weekend that make a big difference to how inviting and usable your yard is. Pathway upgrades can be as simple as installing solar lanterns, mixing in some glow-in-the-dark aggregate, applying an anti-slip treatment to hard slippery surfaces, or planting a fragrant border on either side of the walkway.
Install solar lantern-style stake lights
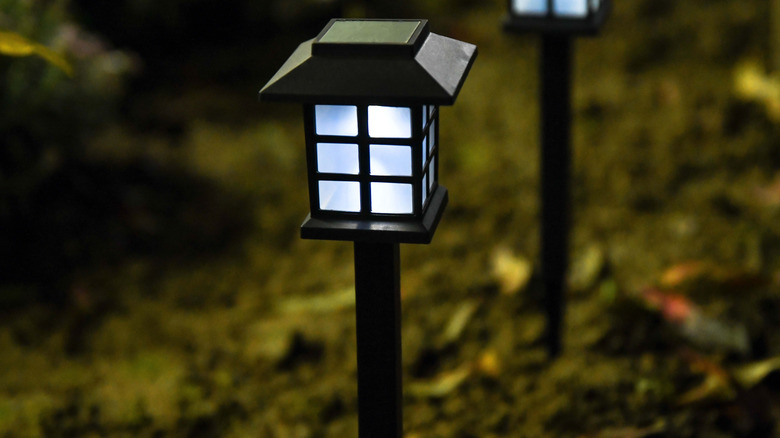
Installing solar lantern-style stake lights is probably the easiest upgrade you can make. These are a super smart option for homeowners that want immediate results without committing to an electrician, or who are working on a budget. There is nothing to wire in, no need to connect them to a transformer, and installation is ridiculously simple. You simply push the stake into the ground. These have a bit of a reputation for looking cheap and using brittle plastic. However, now there are plenty of budget-friendly models that look higher quality and give your garden pathway a sleek contemporary look. You can choose traditional lantern styles or fixed globes, and you can get some cute themed ones, like the Viewpick Solar Garden Decor Lights or BeHiller's Solar Frog Path Lights. Aside from improving the overall look of your pathway, it also makes using the pathway safer and easier after dark.
Do remember that the lights generally need up to 10 hours to fully charge in a sunny spot before they will release their light at night. Don't assume you've bought a dud if they are a little dull or don't last too long on the first night. Space them 6 to 8 feet apart along each side of the pathway. Alternating sides creates a more natural look and lets you use fewer lights. Try to angle the solar panels towards the south if you are in the Northern Hemisphere. If you have a shaded section of path, it is worth either relocating that particular light or using a fixture with a separate panel on a cable that you can pop in the sun and connect to the light. Otherwise, just skip that particular light and let that small section stay a little darker.
Add recessed in-ground LED path lights
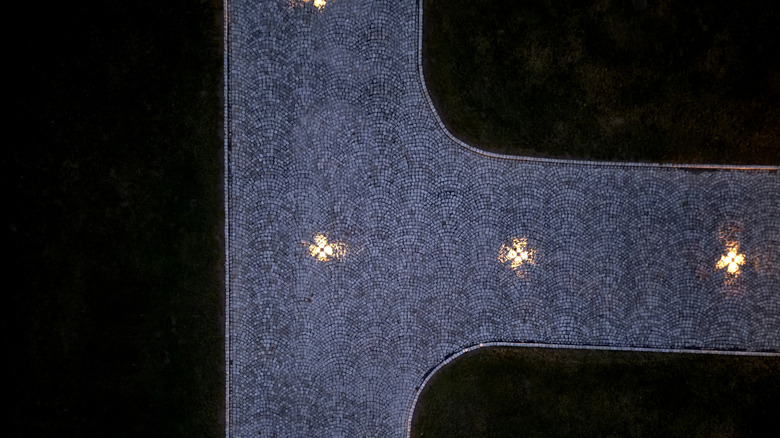
I really like recessed in-ground LED light fixtures in pathways. They sit flush with the path surface and so aren't trip hazards. The light itself is directed upward and outward, which gives excellent visibility at foot level. Plus, it gives the pathway a really architectural and contemporary look. These are well-suited to formal or modern gardens. You can have the lights embedded in your pathway material, or you can have them installed in a gravel border running on either side of the path. There are lots of options, including funky color-changing ones like AGDJASA's Color Changing In-Ground Lights.
These generally are not solar, but are instead low voltage with an IP65 rating, so they're sealed against dust and water, and can handle freezing conditions. You'll need a qualified person to tie them into the same electrical system as any other outdoor electricals you've already got. On hard surfaces, such as concrete and pavers, or compacted decomposed granite, a skilled handyman or even an experienced DIYer can cut the recess and install the fixtures.
Upgrade to motion-sensor path lights
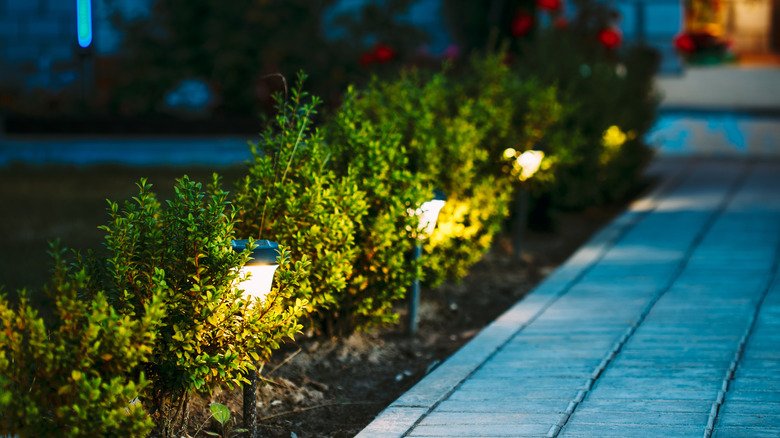
As a permaculture specialist, I'm a huge fan of night time being fully dark. Too much light in a space that should be dark is bad for nocturnal animals, so I prefer darkness at night whenever it's practical. Motion sensing path lights solve this problem. They only activate when somebody or something is nearby and they turn off, usually on a timer, after they stop sensing movement for a set period. This makes the path safe, usable, and maintains good visibility even on the darkest nights, but it limits disturbance to wildlife. It's also a minor security feature, as the lights will turn on just like your security light if somebody is on your path at 2 a.m., and therefore can help act as a deterrent.
These lights generally detect movement within 10 to 15 feet and switch off after about 30 seconds of inactivity. Some models have an adjustable timer. The sensors need a clear line of sight along the pathway, so take this into account when installing them. I'd suggest staggering these on either side of the path in a similar way to the solar lantern style stake lights. Again, these will need wiring into your home's electrical system.
Connect your path lights to a smart controller

Adding your path lights to a regular timer does a pretty good job. It lets you turn your lights on and off at set times. Most homeowners set these times in spring and then adjust again in fall. But if you want the next level of practical automation, you can connect a smart transformer with an astronomical timer that calculates local sunset and sunrise based on your GPS coordinates.
This means that the schedule shifts automatically as the seasons change. It's super energy efficient, as the lights never activate during daylight. A setup like this also improves safety on your path, so nobody ever has to traverse the area in the dark. Some kits have a smart phone app that includes Alexa and Google Home compatibility, and will connect to standard low-voltage wiring.
Mix glow-in-the-dark aggregate into the path surface

Photo-luminescent pebbles are a super fun addition, and a budget-friendly pathway upgrade. They absorb sunlight, hold the charge, and glow for hours afterwards. They don't require any electricity or wiring, or any ongoing cost or maintenance.
Scattered through a gravel pathway, glow-in-the-dark aggregate is a fun addition that enhances safety and gives you a gentler, more organic looking light than an actual fixture, like a crazy bioluminescent fungus. You can also scatter them through a gravel border to either side of a stone path. Consider having them mixed into fresh concrete when it's being poured or resurfaced, so they become permanently embedded in the surface. For a really polished result that's still kind of fun and quirky, you can have them mixed into clear resin and applied over an existing hard surface. This produces a kind of jewel-like finish that holds the glow uniformly. Photo-luminescent pebbles don't provide enough illumination for high-visibility navigation on their own, but they are genuinely useful and can help with darker sections of paths where regular lighting isn't feasible.
Plant a fragrant border alongside the path
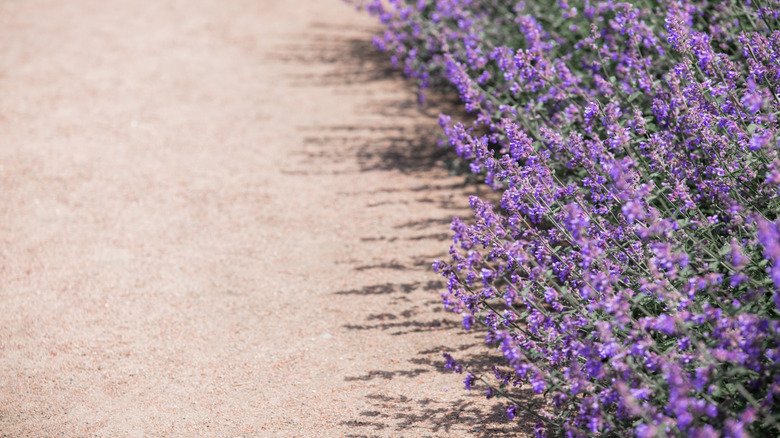
Now I know planting a fragrant border near the path doesn't directly upgrade the pathway itself — but it also kind of does. It changes the way it feels to walk along it. A beautiful, fragrant border is warm and inviting and draws people along the pathway. It says a great deal about your yard, your home, and its curb appeal. Easy-to-grow herbs like lavender, rosemary, or creeping thyme are beautiful, low maintenance, and release their unique and distinctive fragrances every time someone brushes past. This provides both a visual and olfactory sensory experience. No amount of hardscaping or pretty paver patterns can replicate this, and it costs next to nothing to establish, especially compared with resurfacing or relaying a pathway. It gets better over time, too, as the plants fill in and grow larger year after year.
You can get away with a single repeating plant all the way along, such as a row of heat-tolerant 'Phenomenal' lavender, or you can pair that with something like creeping thyme that will form mats that fill in not just the border, but also cracks and gaps in the pathway itself. For pathway edging, you generally want to choose something that is drought-tolerant once established and that can cope with thin nutrient-poor soils, as this is pretty common to either side of a walkway. If you want to use a gravel mulch, go with something like lavender or perhaps rosemary. If you'd rather just have gorgeous mats of flowers and foliage, then go with creeping plants like thyme or phlox.
Fill paving joints with a creeping ground cover
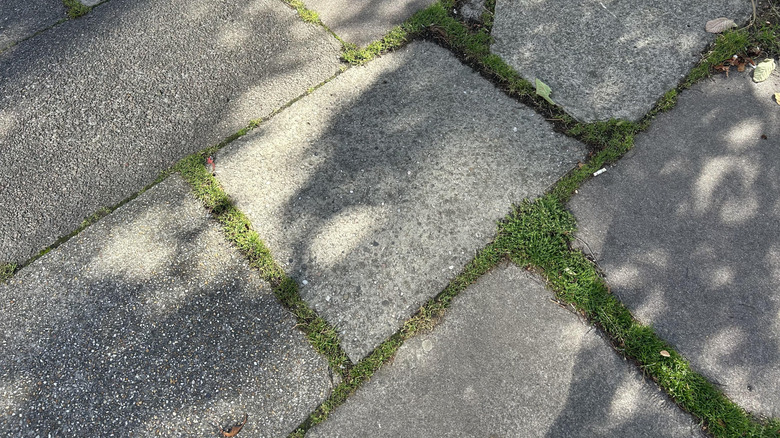
If you have a pathway with cracks or joints between paving slabs, and especially if you're struggling with weed proliferation in those areas, then fill the gaps with creeping ground covers. I'd recommend creeping thyme here again, as this though plant grows naturally on the rough, hilly, thin terrain and stony, thin soil of the Mediterranean, so it can cope with growing in the joints of your pavers. Roman chamomile or even white clover are both good alternatives as drought-tolerant, sun-loving ground covers.
These tough, but beautiful, little plants can transform a hard, cracked, sad-looking path into something rustic and beautiful with very little effort, and they require barely any maintenance once they are established. Fragrant plants like something in the 'thymus' genus will release their scent as they're brushed past. Both creeping thyme and white clover can cope with foot traffic, and they bring pollinators and suppress weeds. They also grow remarkably well in those little cracks where nothing much else apart from weeds will grow. Just be aware that for prolific creepers, you may need to trim them back once a year or so to keep them tidy.
Apply an anti-slip treatment to slippery hard surfaces
Sometimes, if they're not sufficiently textured or they are growing some type of algae or moss, concrete and stone pathways can become genuinely dangerous when they get wet or frosty. I have lost count of the number of times I've slipped on a wet garden path, even when I'm being cautious. And it can cause significant injury. Smooth sealed concrete looks fabulous when it's dry, but in the rain or if it gets wet then freezes, it becomes like an ice rink, making it incredibly unsafe. You can, however, get an anti-slip treatment that restores grip to the surface with a single application. It won't alter the path's appearance and it doesn't require any major work.
There are chemical etching treatments that create microscopic treads in the hard surface, which increases traction without changing the visual appearance of the material. Because this is etched directly into the surface, it's a long-lasting solution and doesn't affect permeability. This can be a relatively costly operation, however. Comparatively, grit-infused acrylic sealers are a more budget-friendly option, but they are not a long-lasting method. They essentially are clear films with small abrasive particles suspended in them, so once they are applied over the surface, they add grip. As a permaculture specialist I dislike the surface coatings because they are impermeable and change the way water moves across the path, so I would only recommend using a surface coating if no better option is available. I'd also recommend using a gravel border to either side of a pathway that has had this kind of impermeable treatment to help water slowly dissipate into the ground, rather than running off.
Resurface with an accessible material
If you've got someone in your household or among your close circle who might visit your property that has poor mobility, is at risk of a fall, uses a wheelchair, a walker, or a stroller, then having a loose gravel pathway or uneven broken flags is a significant issue. Gravel shifts and isn't remotely stable. And you can't get a wheelchair, walking frame, or even a baby stroller safely and easily across it. Uneven pavers are trip hazards and they are unpredictable underfoot. This is made worse in the dark, or in rainy and icy conditions. It is not exactly inviting, and it's a serious safety issue.
The Americans with Disabilities Act (ADA) says that accessible routes need to be stable, firm, and slip-resistant, and you can apply that to your own garden pathways. Stabilized decomposed granite or resin bound crushed stone are both practical, safe, and reasonably affordable solutions. Both of these options compact down into a firm, stable surface that drains freely and doesn't shift under feet or wheels. You can also choose a variety of permeable pavers that, when set correctly, are both stable and firm. Permeable resin bound aggregate is another popular choice, as it gives a high-end finish that is slip-resistant and allows water to pass through its surface. Well-laid textured flagstones and paving slabs are also accessible as long as they are properly installed and are level and embedded firmly. These can be permeable or at least the joints between them can be permeable to allow water to pass through.
Roll out a permeable mat over soft or muddy paths

Most of us have at least one part of the garden that has an informal, unintentional pathway through it. Perhaps it's the worn grass track from the back door to the shed or the muddy passage around the side of the house. For me it's the track between my fruit bushes and the side door of the garage. During the summer months, those tracks are a bit sad to look at, but overall, they are dry and harmless. Once they get wet, they turn slick and get incredibly muddy, but most of us will still use them out of habit.
You can combat this with a roll-out permeable pathway mat. It doesn't require any groundwork, it's comparatively affordable, and it's super easy to install. You want to make sure whatever you use is slip-resistant and permeable. It also needs to be thick and heavy enough to sit flat without too much staking. You can usually trim these to shape with a sharp utility knife. Just roll the mat directly over the existing grass track and secure the edges with landscape pins. Because these mats are permeable, water passes through them directly to the soil beneath without pooling on the surface. Obviously this isn't a permanent solution, and it doesn't replace a properly constructed path, but for an informal route that gets moderate traffic and becomes a sloppy nightmare in winter, it's a quick, cheap fix.
Install a linear channel drain to eliminate puddling
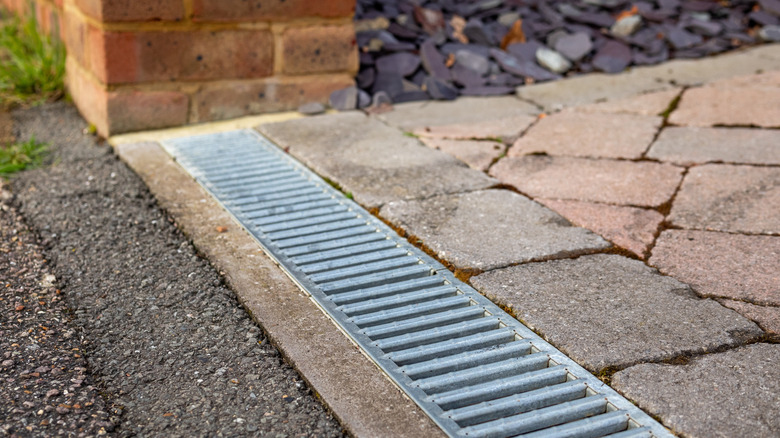
Water pooling on a pathway is hazardous. It creates a slippery surface, made worse if it ices over. Moss can also colonize on a constantly damp surface, adding to the slipperiness. In these cases, it could be worth installing a simple drain that helps eliminate puddling. A linear channel drain sits at the low point of the pathway or across the path where water naturally gathers. It intercepts runoff before it can pool and carries it away to a drain, swale, or soakaway. It involves cutting a shallow trench at the low point of the path, then bedding the channel section so the drain grate sits just below the finished path surface, and then it needs connecting to an outlet of an existing drain or directing to a channel of some kind.
A lower-tech alternative, which I prefer in many cases because it's easier, more affordable, permeable, and super effective, is to run a gravel channel either side of the pathway in a shallow depression, much like a swale, which is a simple, eco-friendly drainage solution. Instead of pooling in the center of the path, the water should run off into the gravel, where it will slowly dissipate into the groundwater and seep away. The gravel option doesn't require any cutting or piping and you can even plant it up with water-loving plants, like purple coneflowers, primrose, violet, or sedges to beautify the strips.
Fit a handrail on any sloped or stepped section
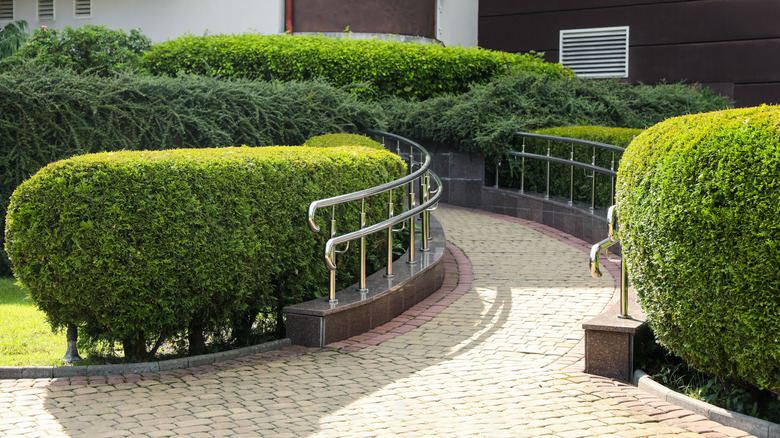
Sloped or stepped garden paths without a handrail are genuinely dangerous. One slip or trip can cause really significant injury. While you might think steep slopes or steep stairways are the only obvious dangers, even modest gradients can be treacherous in adverse conditions, or just for somebody with reduced balance or mobility. Falls are among the most common causes of significant injury to older Americans, with 2,453,500 reported injuries treated at the ER each year (via United States Consumer Product Safety Commission), so a handrail fitted to a stepped section at the very least is a smart move. Having somebody install a sturdy handrail costs a fraction of what a fall and the aftermath of that injury costs.
It does need to be strong and sturdy though, and for outdoor use, you want something that will last over time, such as powder-coated aluminum or stainless steel. Before you have any kind of handrail installed, don't forget to check your local building codes for handrail height and load-bearing requirements to make sure you're compliant. This is one of those jobs that seems simple, but unless you are very confident in your DIY skills, it may be advisable to hire somebody to do it. You need to make sure the handrail is anchored into a firm foundation and can take the full weight of someone who grabs it suddenly to stop a fall.